GitHub AST Orchestrator
The Conviso Platform's GitHub AST Orchestrator simplifies Application Security Testing (AST) by centralizing scanning logic in a single repository. Instead of configuring workflows in every repository, the Conviso Platform triggers a workflow_dispatch event on a designated "Orchestrator" repository to scan other assets.
Overview
The Orchestrator model provides several benefits:
- Centralized Management: Maintain and update security scanning logic in one place.
- Consistency: Ensure all repositories use the same tools and configurations.
- Ease of Use: Quickly onboard new repositories without manual workflow setup.
Execution Costs: Since the Orchestrator runs within your GitHub Actions environment, the execution time is consumed from your organization's GitHub Actions minutes.
Prerequisites
Before configuring the Orchestrator, ensure that:
- You have configured the GitHub Integration.
- You have a designated repository to act as the Orchestrator. We recommend cloning our public template: convisoappsec/pipeline-orchestrator.
- You have a Conviso API Key. Find yours in this tutorial.
- Go to your Orchestrator repository's Settings > Secrets and Variables > Actions and create a New Repository Secret named
CONVISO_API_KEYwith your API Key value.
You must create or clone the Orchestrator repository and ensure the Conviso GitHub App integration has permission to see and access it.
Configuring the AST Orchestrator
Step 1 - Enable Features
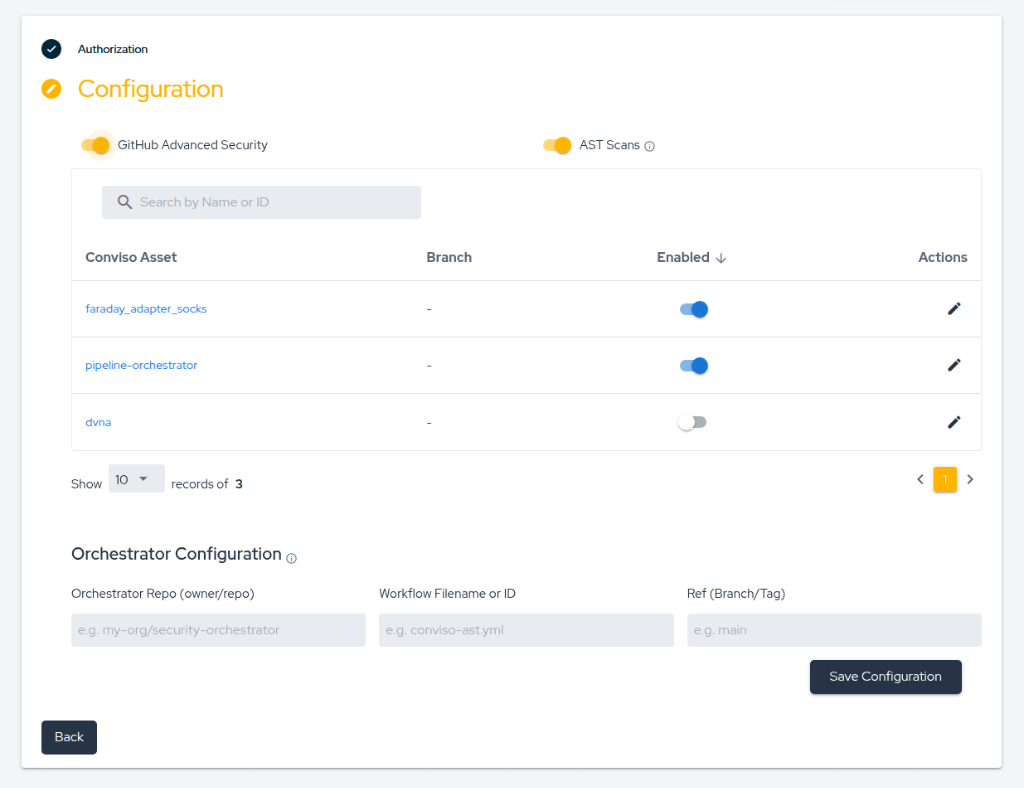
In the Conviso Platform UI, navigate to the GitHub Integration settings and ensure the following are toggled On:
- GitHub Advanced Security
- AST Scans
Step 2 - Configure Orchestrator Settings
Fill in the Orchestrator Configuration section with the following details:
- Orchestrator Repo (owner/repo): The full path to your orchestrator repository (e.g.,
my-org/pipeline-orchestrator). - Workflow Filename or ID: The name of the YAML file containing the orchestrator workflow. If using our template, use
ast.yml. - Ref (Branch/Tag): The branch or tag where the workflow is defined (e.g.,
main).
Disabling the Orchestrator
You can disable the AST Orchestrator feature entirely by toggling the AST Scans switch to Off in the Conviso Platform integration page. This will prevent any further automatic triggers from the platform.
Recommended setting: In the GitHub App installation on GitHub, allow access to All repositories to ensure the Orchestrator can scan any mapped asset.
Step 3 - Asset Mapping and Control
Map your Conviso Assets to specific branches. This mapping is primarily for edge cases where an asset does not follow the branch defined in your default Orchestrator configuration.
- Simplified Setup: If you leave the branch mapping empty for an asset, the Orchestrator will automatically use the default configuration provided in Step 2.
- Granular Control: Use the Enabled toggle in the configuration table to activate or deactivate scans for specific assets without affecting the entire integration.
- Automatic Triggers: By integrating with Conviso, we automatically trigger the scanning workflow whenever you merge a Pull Request (PR) into a branch mapped to an active asset.
The Orchestrator logic is specifically designed to run upon PR merges, ensuring that only verified code changes are analyzed and identifying vulnerabilities before they progress further in your environment.
Workflow Definition
The Orchestrator workflow is triggered via workflow_dispatch. It receives several inputs from the Conviso Platform to identify the target for scanning.
Required Workflow Inputs
If you are using our pipeline-orchestrator template, the workflow is already pre-configured at .github/workflows/ast.yml.
If you choose to create your own, it must define the following inputs:
repo_full_name: The full name of the repository to scan.branch: The branch to scan.commit_sha: The specific commit SHA for the scan.pr_number: (Optional) The pull request number if the scan is triggered from a PR.
Workflow Template
Copy the YAML content below as a reference for your Orchestrator repository:
name: Conviso AST Orchestrator

on:
  workflow_dispatch:
    inputs:
      repo_full_name:
        description: 'Repository to scan'
        required: true
      branch:
        description: 'Branch to scan'
        required: true
      commit_sha:
        description: 'Commit SHA'
        required: true
      pr_number:
        description: 'PR number'
        required: false

jobs:
  conviso-ast:
    runs-on: ubuntu-latest
    container:
      image: convisoappsec/convisoast:latest
      env:
        CONVISO_API_KEY: ${{ secrets.CONVISO_API_KEY }}
    steps:
      - name: Checkout target repository
        uses: actions/checkout@v6
        with:
          repository: ${{ github.event.inputs.repo_full_name }}
          ref: ${{ github.event.inputs.commit_sha }}

      - name: Run AST Scan
        run: |
          conviso ast run \
            --vulnerability-auto-close \

## Scan Logic and Execution

- **Environment**: The scan runs using the `convisoappsec/convisoast:latest` Docker image within **your GitHub Actions environment**.
- **Execution Costs**: As the scan executes on your runners, the time consumed counts towards your GitHub Actions minutes.
- **Command**: `conviso ast run --vulnerability-auto-close --company-id [ID]`
- **Blocking Status**: The scan is currently configured as **non-blocking**.
- **Results**: Identified vulnerabilities are automatically sent to the mapped asset on the Conviso Platform.

## Support

If you have any questions or need assistance, feel free to contact our support team.
Contribute to the Docs
Found something outdated or missing? Help us improve the documentation with a quick suggestion or edit.
How to contributeResources
By exploring our content, you'll find resources that will enhance your understanding of the importance of a Security Application Program.
Conviso Blog: Explore our blog, which offers a collection of articles and posts covering a wide range of AppSec topics. The content on the blog is primarily in English.
Conviso's YouTube Channel: Access a wealth of informative videos covering various topics related to AppSec. Please note that the content is primarily in Portuguese.