Integration ADFS
Introduction
The ADFS integration - SSO or Single Sign-On - aims to increase user security on the platform. With this SSO feature, managers will have full control of who should have access to Conviso Platform. The impact will be positive for the work of the company's support teams, reducing common “forgot my password” calls by employees, customers and suppliers, allowing the process to flow more quickly.
ADFS Setup
This documentation was designed to guide users so that they can perform authentication within Conviso Platform through their own ADFS Identity Provider, using the SAML 2.0 protocol.
For this configuration we will need 3 pieces of information:
-
SAML IdP SSO Target;
-
SAML IdP entity ID;
-
SAML IdP Certificate.
Requirements
-
Microsoft Windows Server 2008, 2012 or 2012 R2 server;
-
Active Directory instance where all users have the email attribute configured;
-
ADFS configured along with your SSL certificate;
-
Users (emails) that will use Conviso Platform must be previously created on the platform;
-
The ADFS server must have the clock synchronized. Integration errors may occur if there are differences with the Conviso Platform and ADFS server's clock.
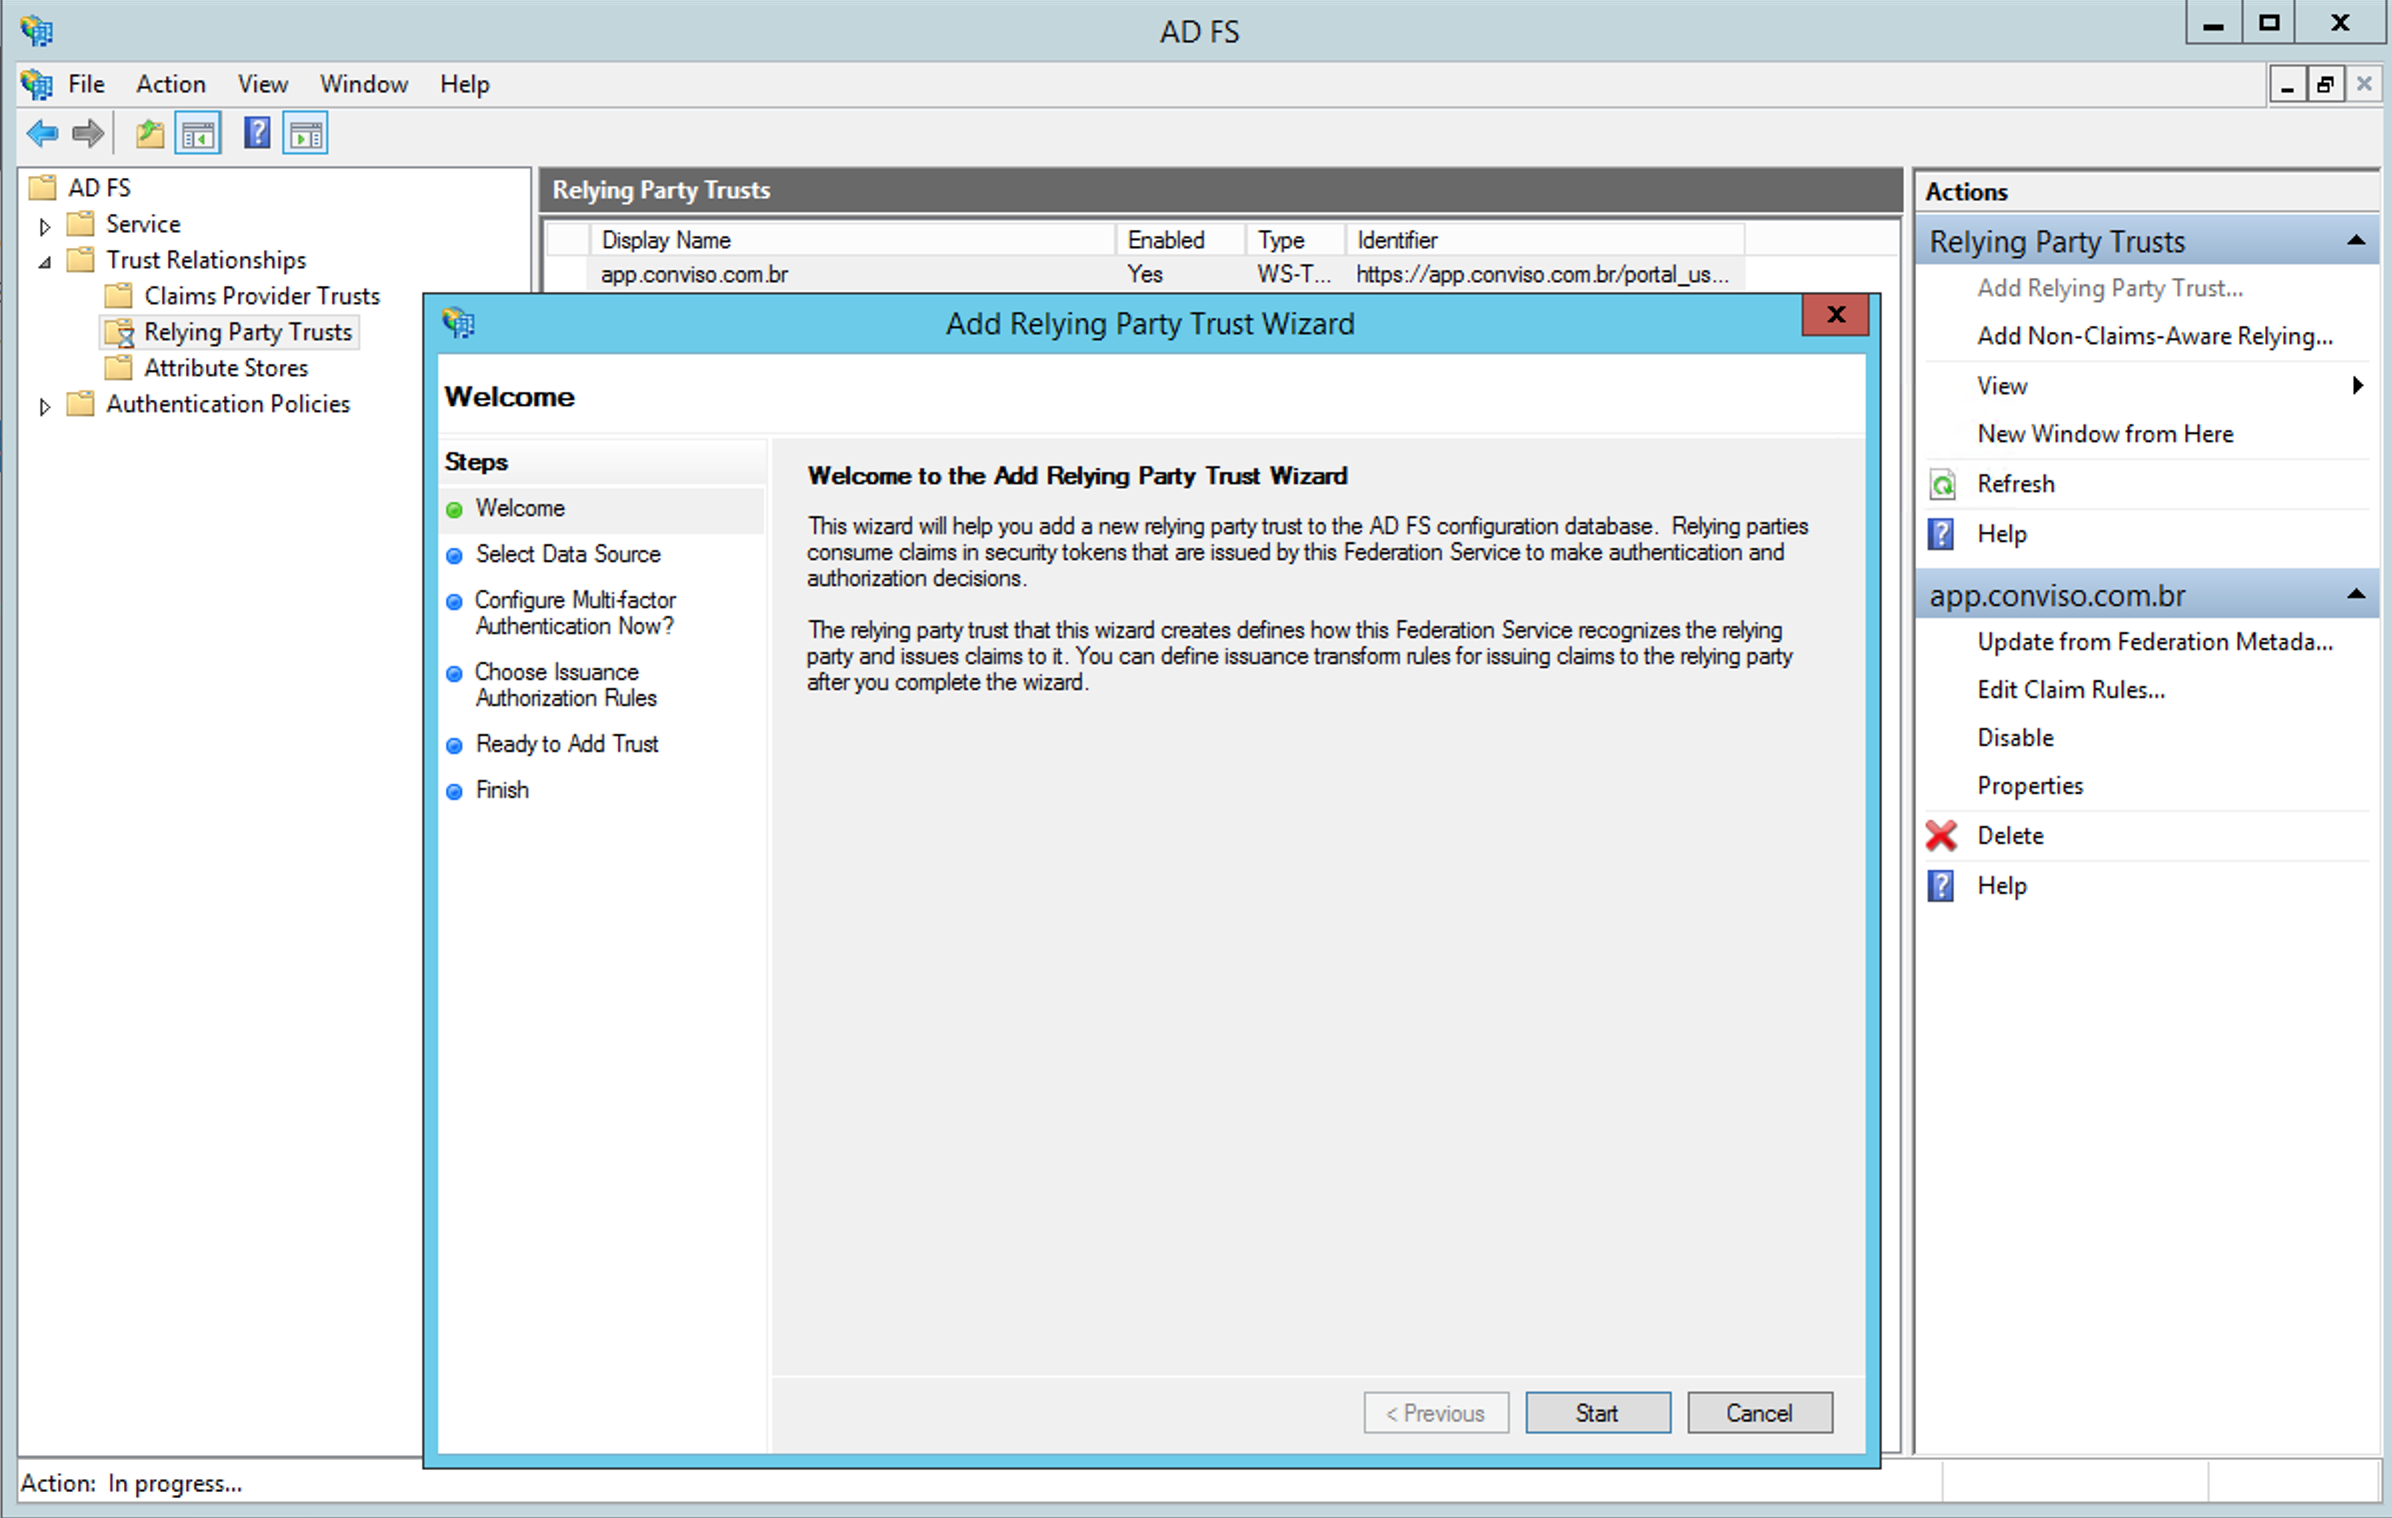
Adding the Relying Party Trust to ADFS
Inside ADFS, click on the option to add a Relying Party Trust as shown in the following image:
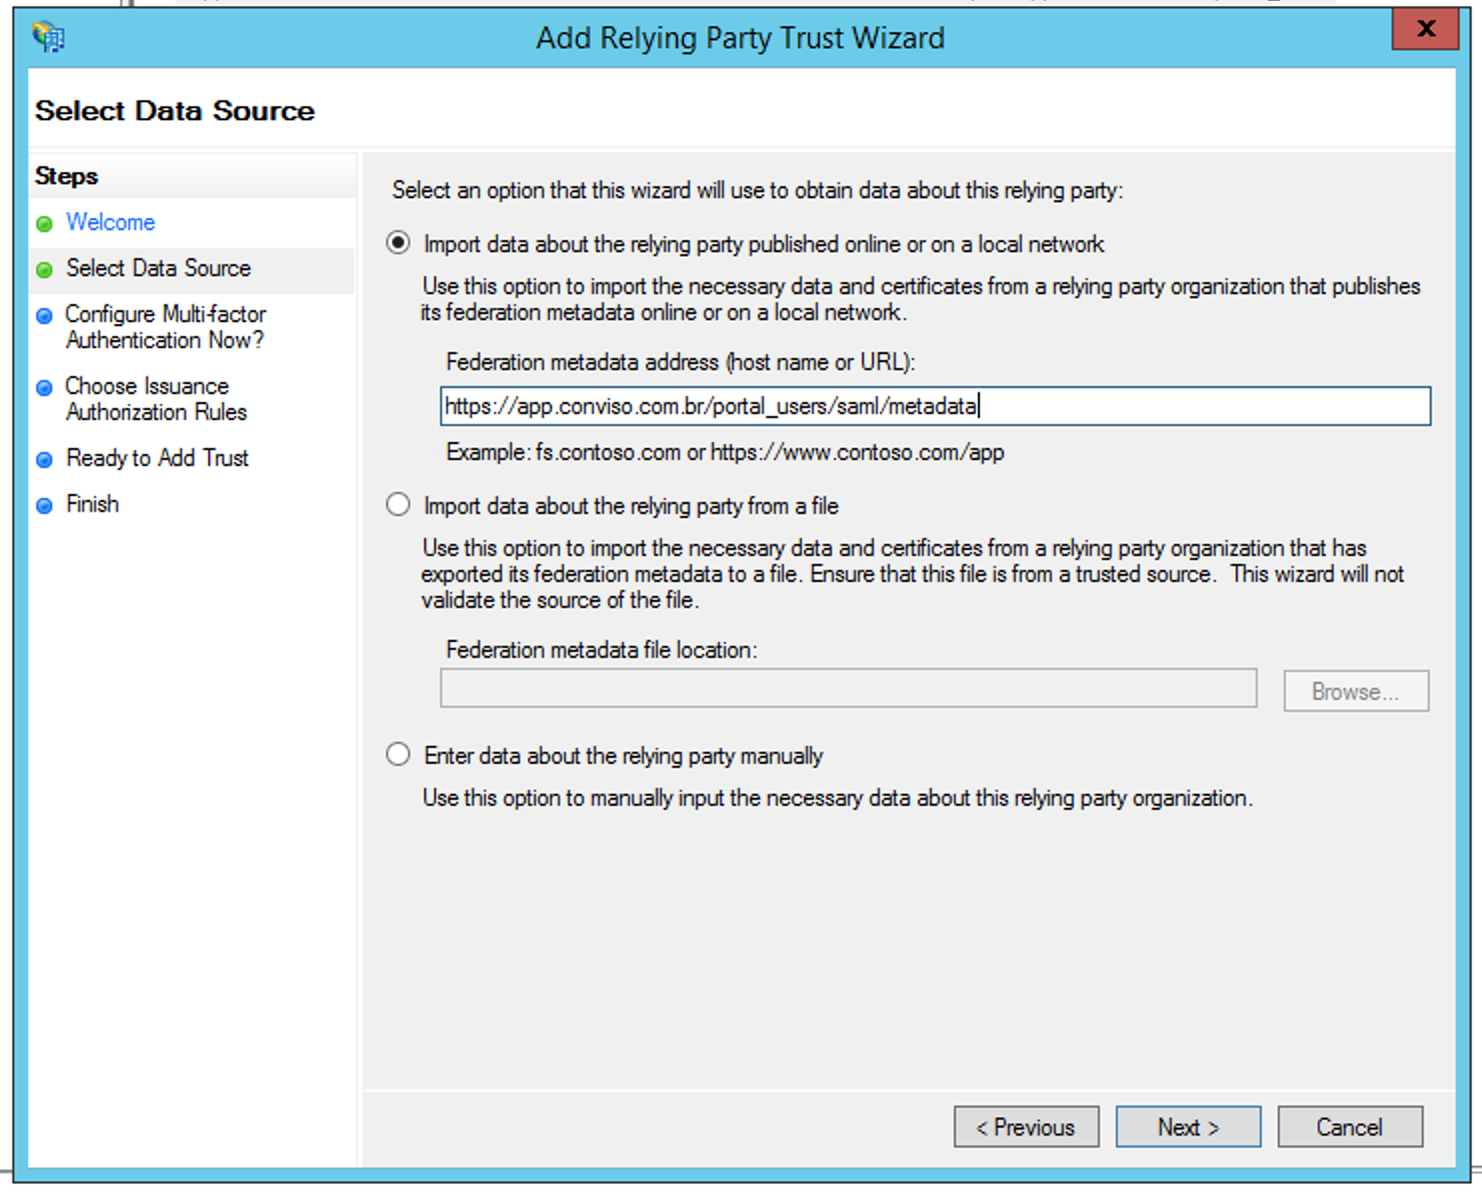
Next, we need to configure the Data Source to use. The first option is to include the following Conviso Platform url:
https://app.convisoappsec.com/portal_users/saml/metadata
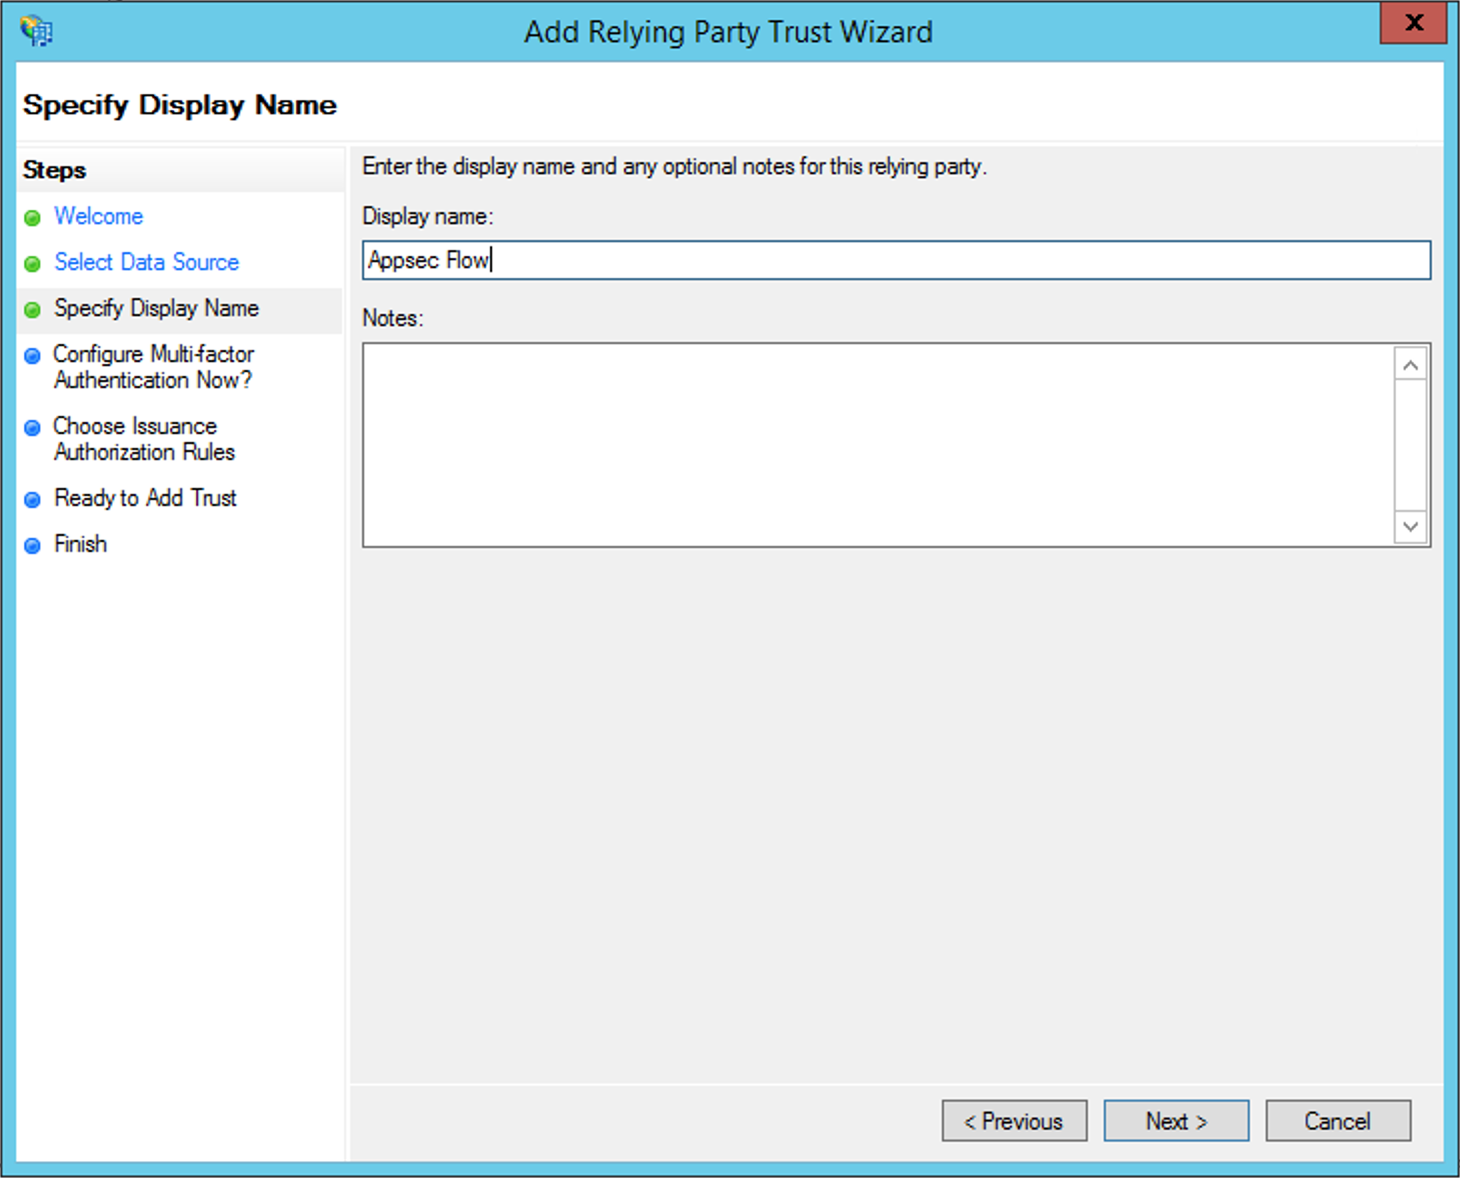
Press on Next to configure a name that will identify the Conviso Platform:
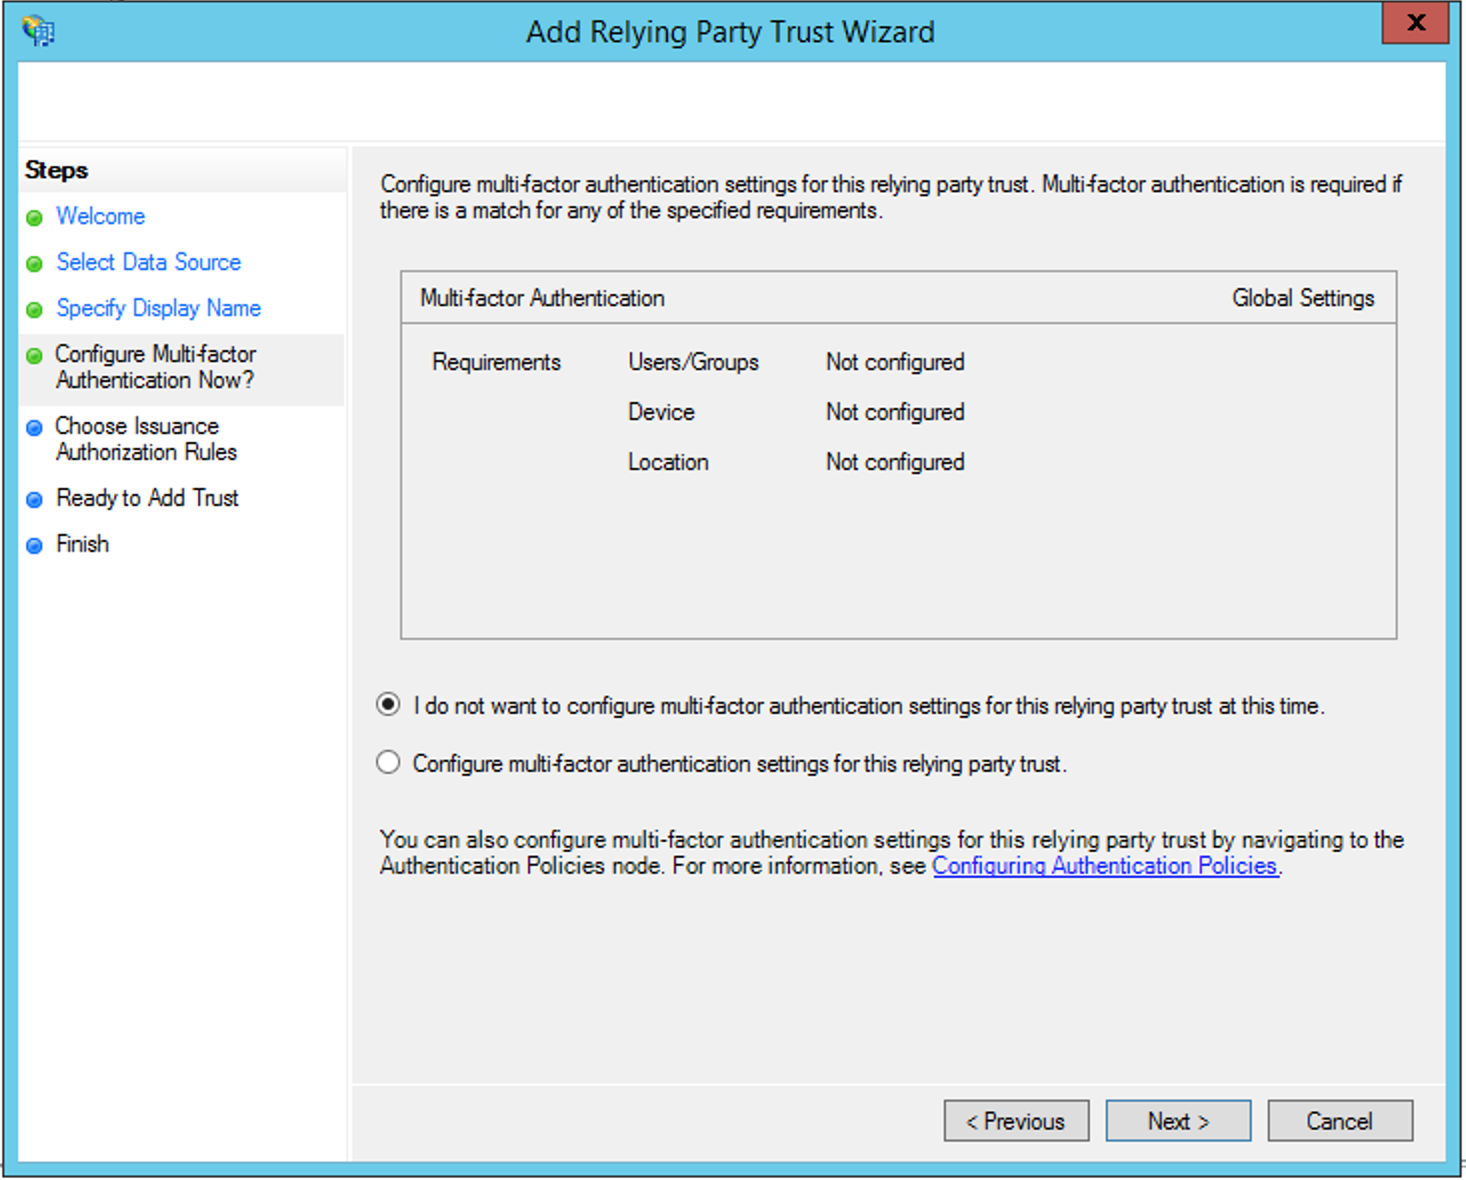
Click Next and leave the default settings to do not use the Multi-factor Authentication:
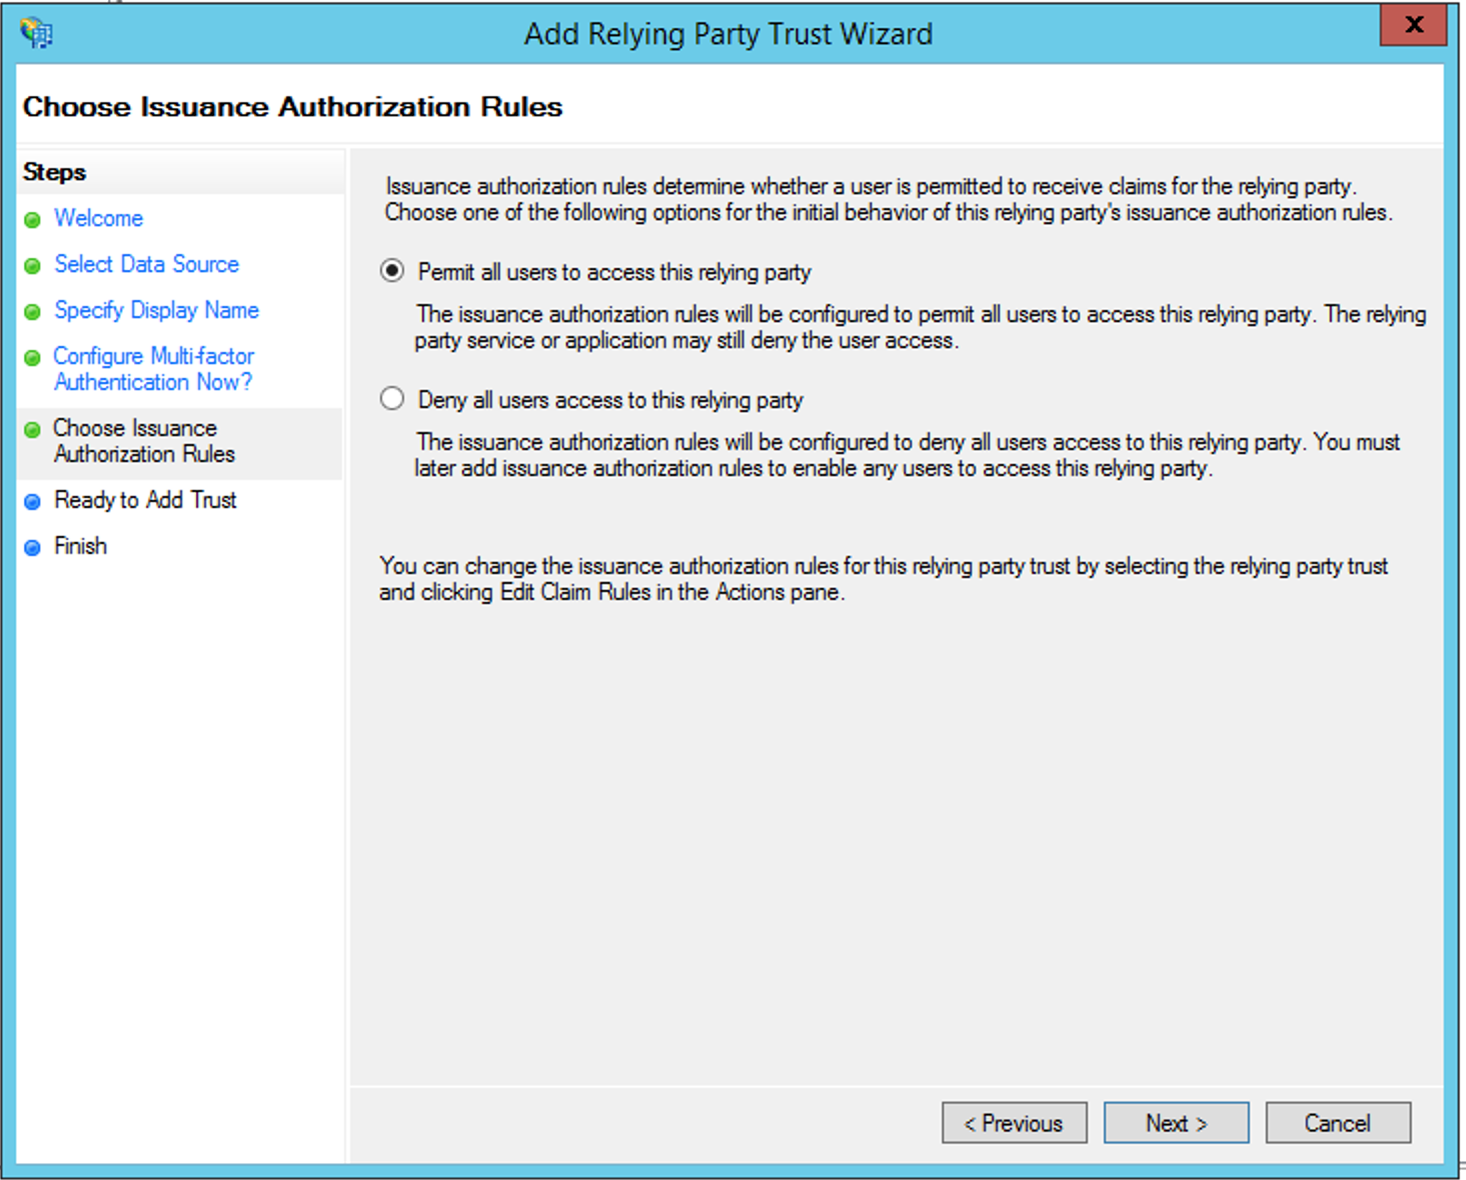
Again, we leave the default setting to allow all users access:
Creating the Claim Rules
After creating the Relying Party Trust, it is now necessary to create the Claim Rules:
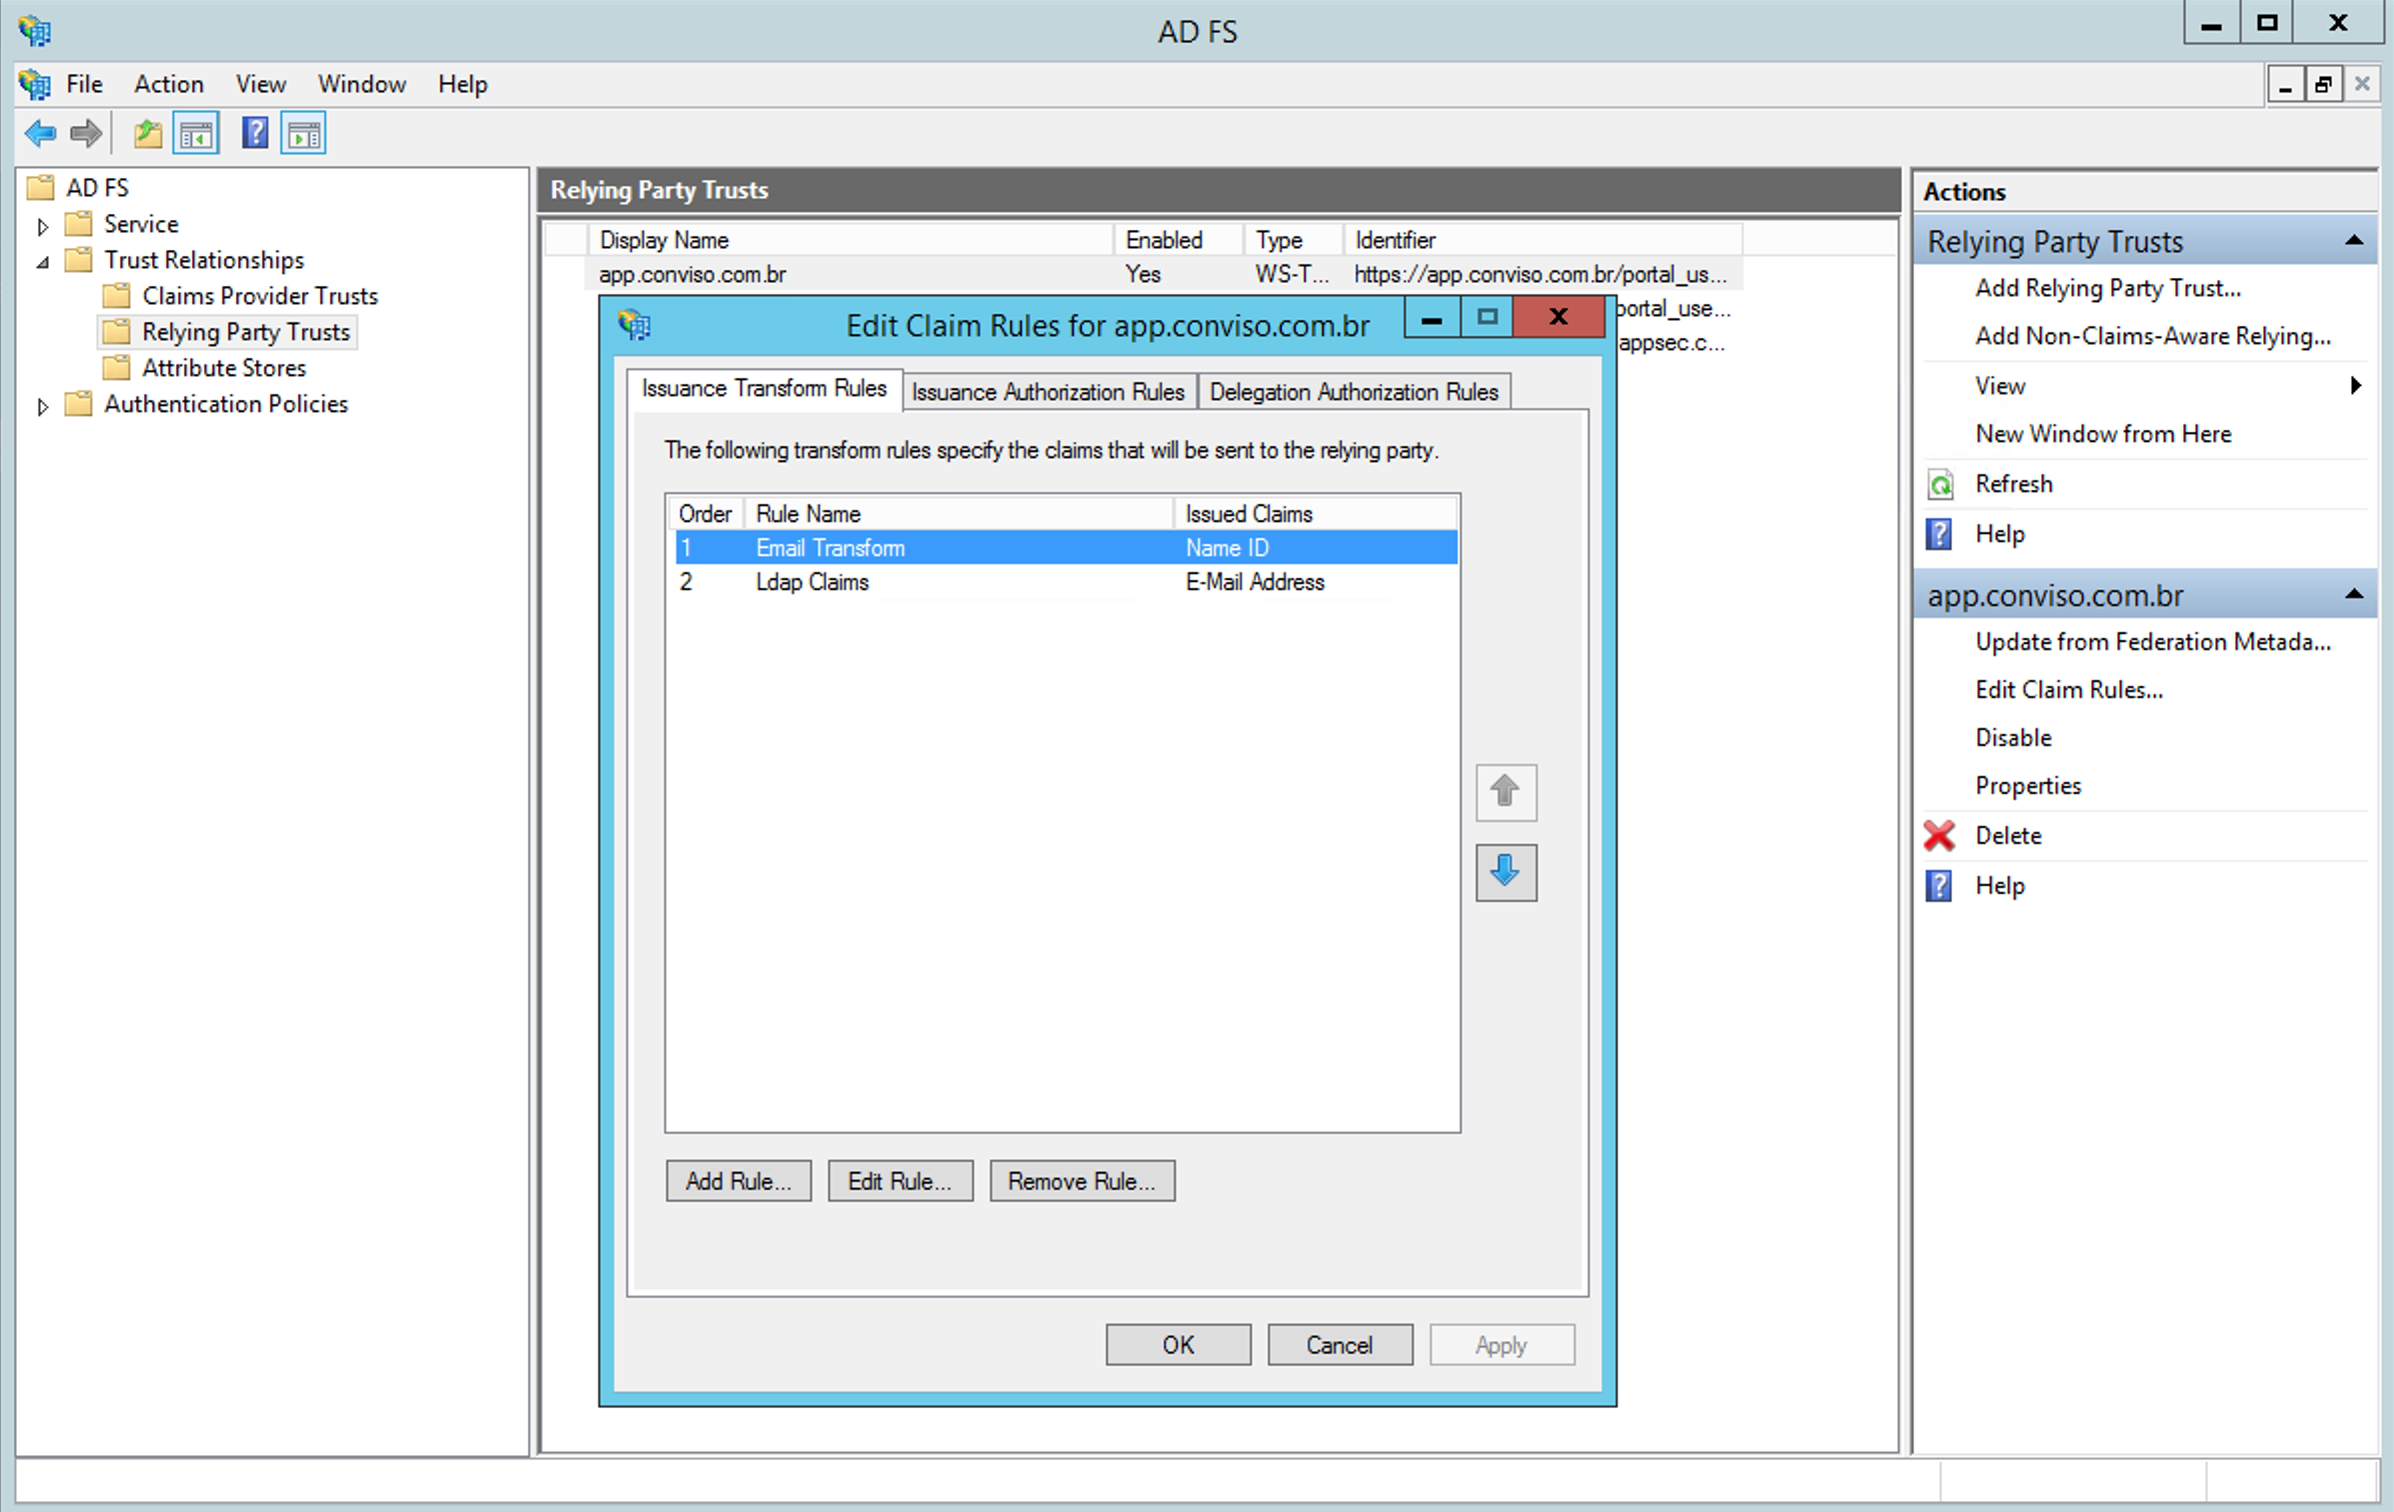
First, it is necessary to create a rule of type LDAP Attribute Claim:
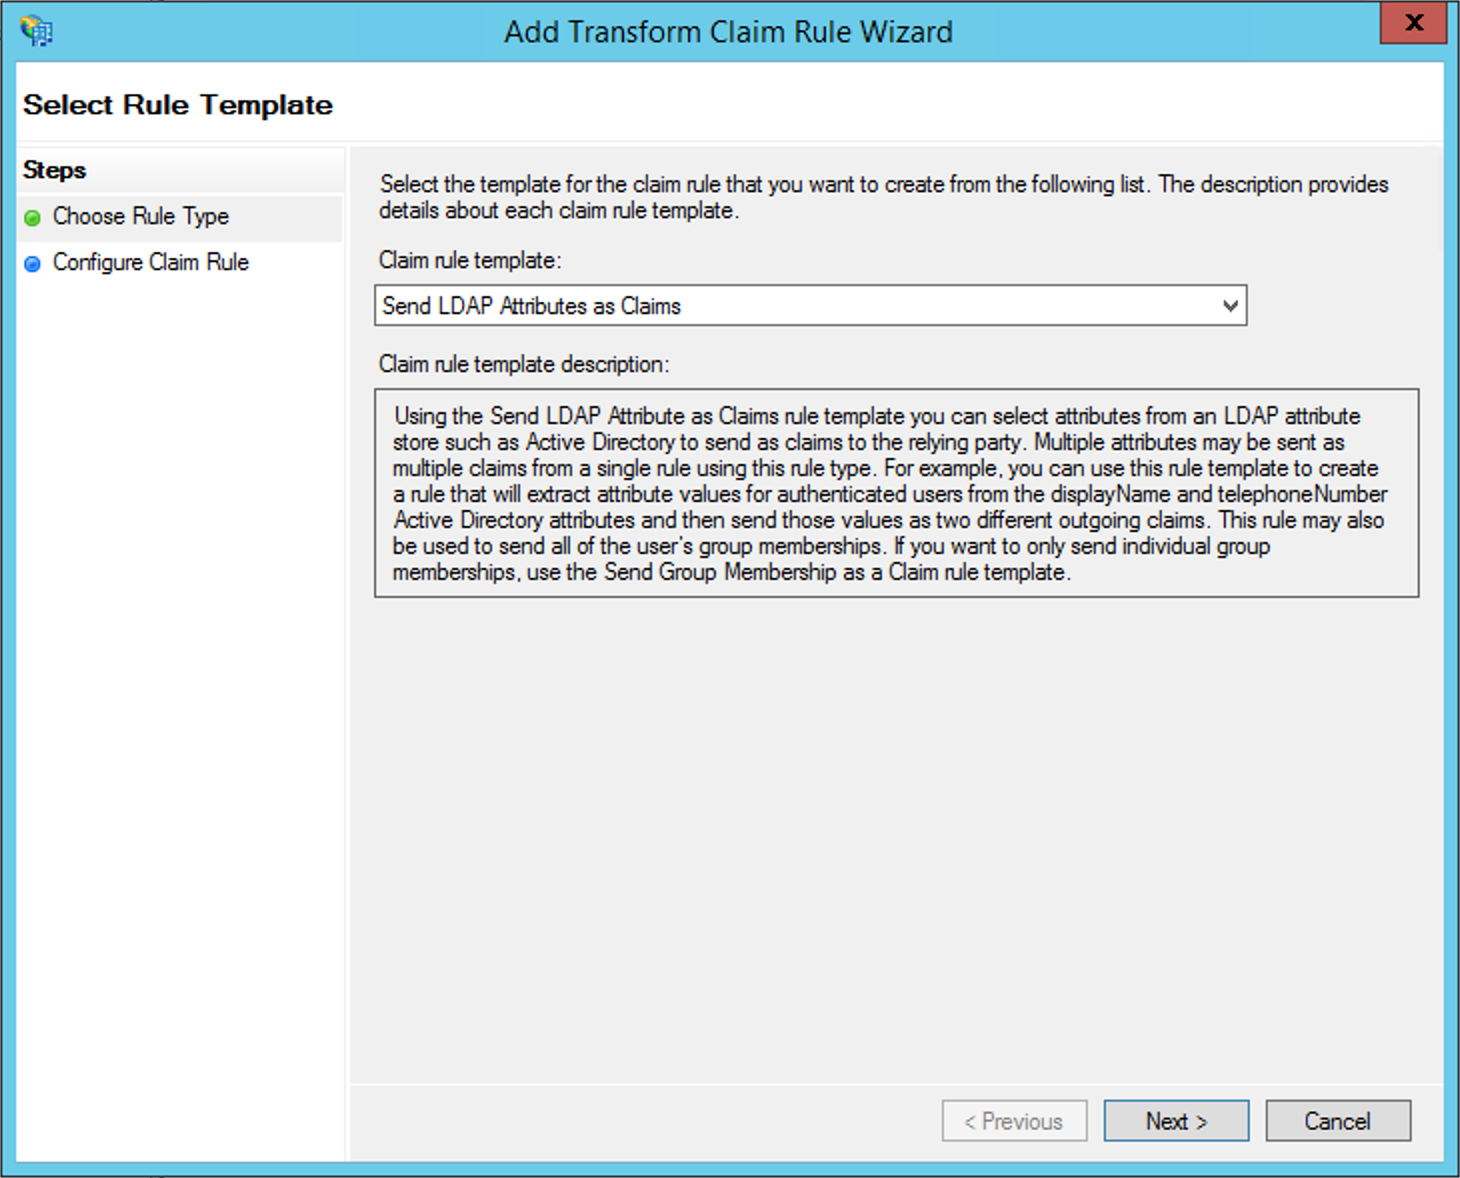
You must enter a name to identify the rule at Claim Rule Name and map the LDAP Attribute with the Outgoing Claim Type. In this case, the E-mail-Addresses attribute and the E-mail-Address attribute must be configured as shown in the following image:

Click at the button View Rule Language. The output should look like this:
c:[Type == "http://schemas.microsoft.com/ws/2008/06/identity/claims/windowsaccountname", Issuer == "AD AUTHORITY"] => issue(store = "Active Directory", types = ("http://schemas.xmlsoap.org/ws/2005/05/identity/claims/emailaddress"), query = ";mail;{0}", param = c.Value);
Finally, a last rule of the Transform an Incoming Claim type must be created:
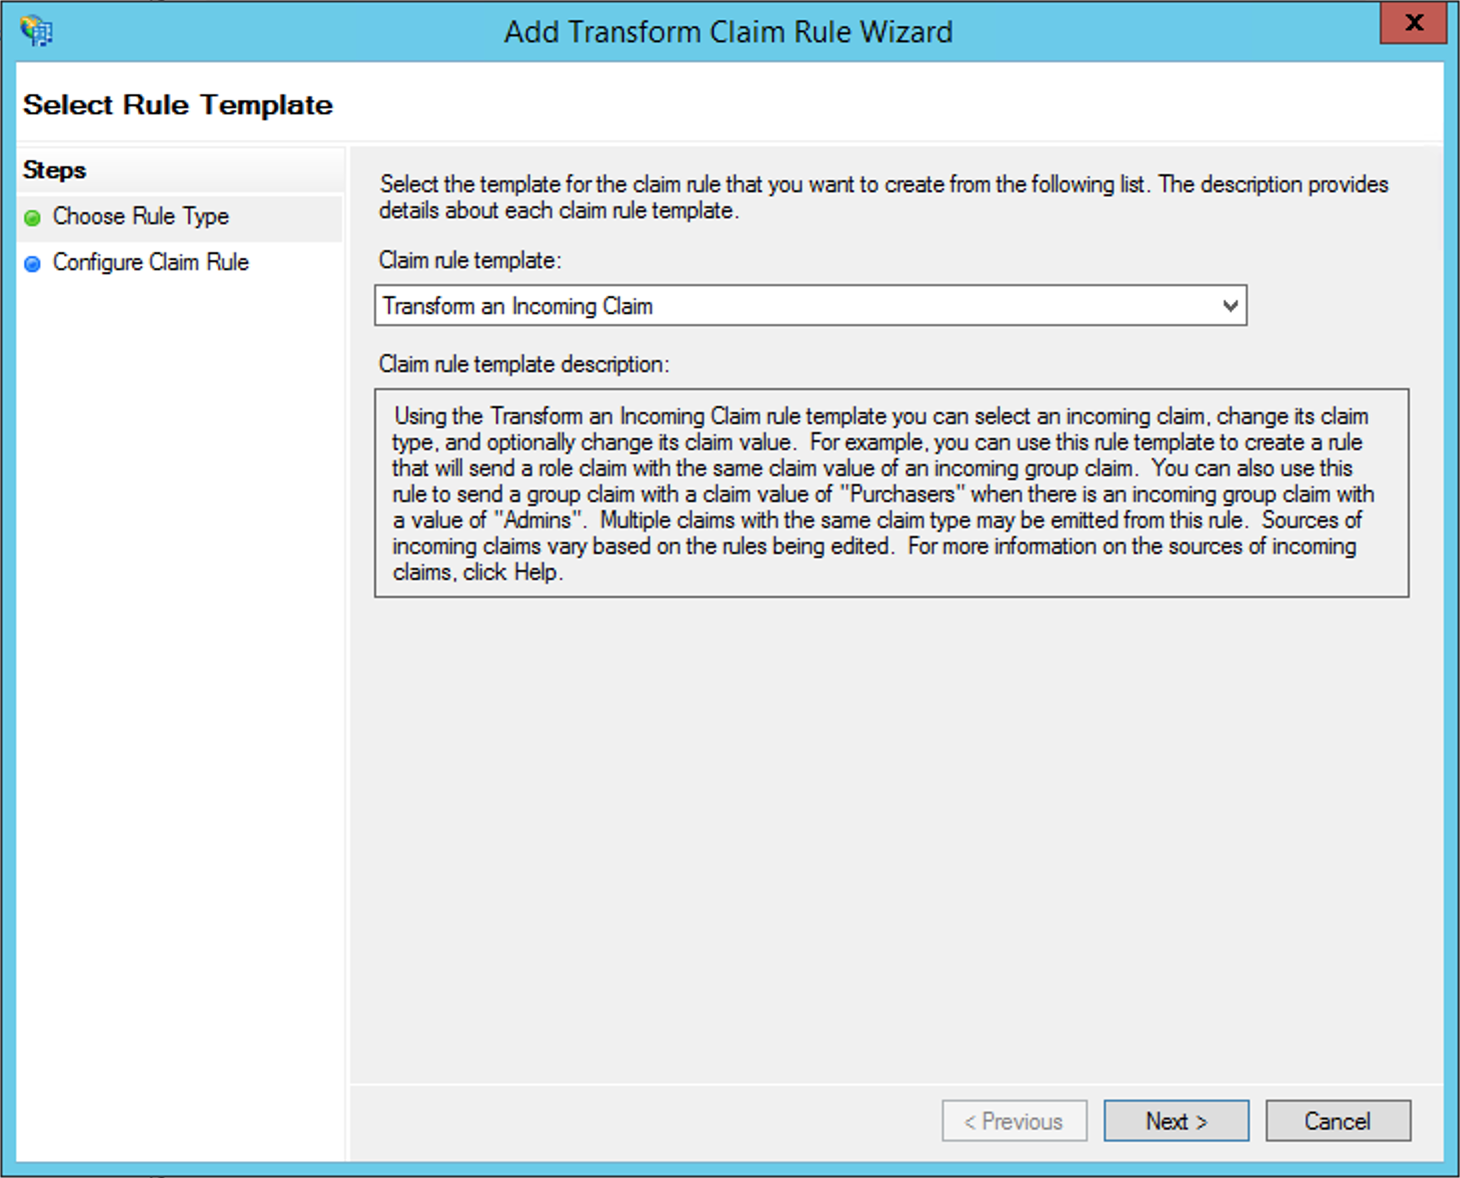
Define a name for the rule at Claim Rule Name, and configure it according to the following image:
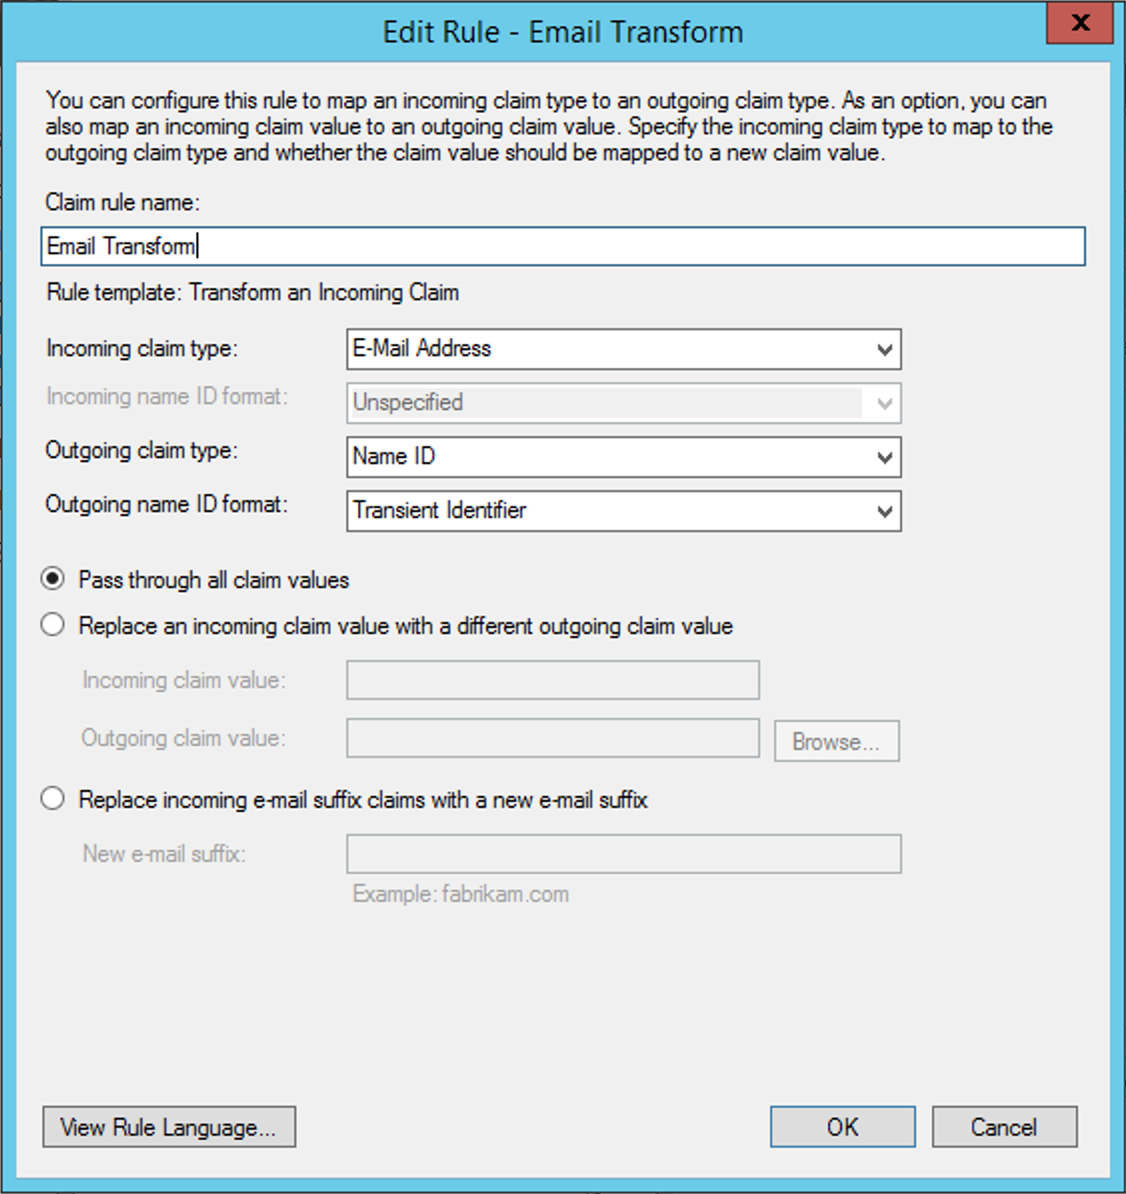
Click at the button View Rule Language. The output should look like this:
c:[Type == "http://schemas.xmlsoap.org/ws/2005/05/identity/claims/emailaddress"] => issue(Type = "http://schemas.xmlsoap.org/ws/2005/05/identity/claims/nameidentifier", Issuer = c.Issuer, OriginalIssuer = c.OriginalIssuer, Value = c.Value, ValueType = c.ValueType, Properties["http://schemas.xmlsoap.org/ws/2005/05/identity/claimproperties/format"] = "urn:oasis:names:tc:SAML:2.0:nameid-format:transient");
These values must be exactly the same as shown, for the correct functioning of the integration.
Configuring ADFS Logout Endpoint
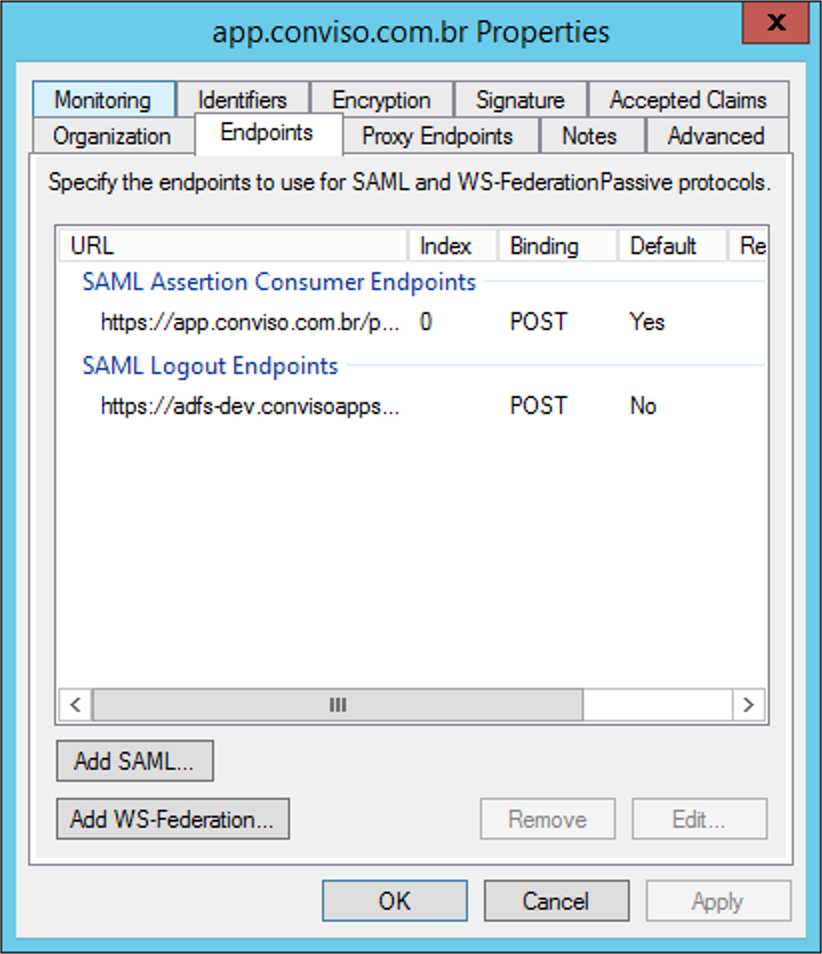
In order to perform this configuration, we have to make sure that the Secure Hash Algorithm is configured for SHA-256 within the Relying Trust Party properties, in the Advanced tab:

Now we must open the Monitoring tab and disable the Automatically Update Relying Party option and press the Apply button. After doing so, go to the Endpoints tab and add a new endpoint using the Add SAML option (it may be necessary to close the window and open it again to see this option enabled):
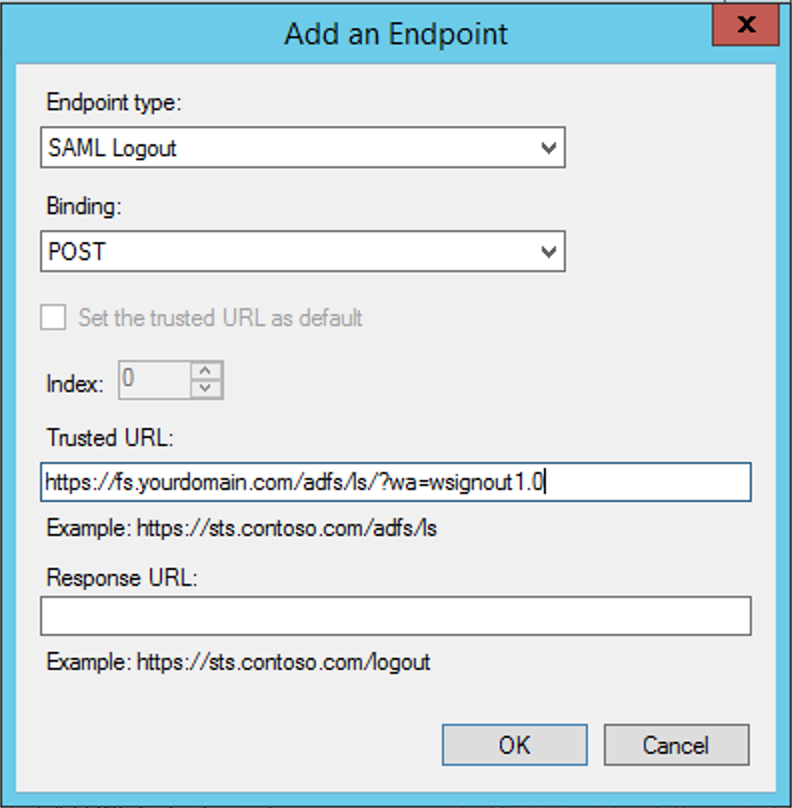
We should configure as shown in the following image and configure the client's own ADFS logout URL. The default is https://X.Y.com/adfs/ls/?wa=wsignout1.0, where X and Y are, respectively, the subdomain and the root domain where the client's ADFS is installed:
Obtaining the SSL certificate (SAML IdP Certificate)
Using the ADFS Management Console, expand the node Services and, then, expand the node Certificates:

Choose the Token-Signing certificate, open it and go to the Details tab:
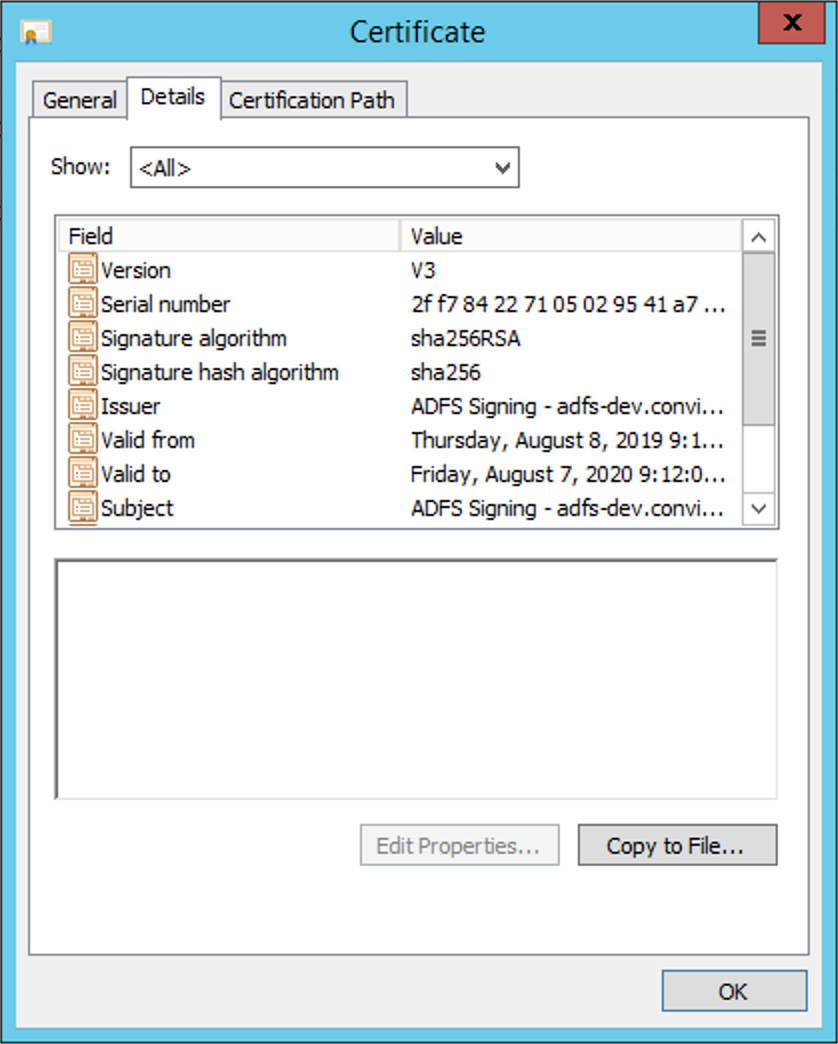
Click on Copy to file, choose the option Base-64 encoded X.509 (.CER) and save in a preferred directory.
The contents of this file will be used in the configuration of Conviso Platform later in this tutorial.
Obtaining the Entity ID (SAML IdP entity ID)
Within ADFS Management Console, right-click on the Service node and choose the Edit Federation Services Properties option. Copy the url from the Federation Service Identifier field:
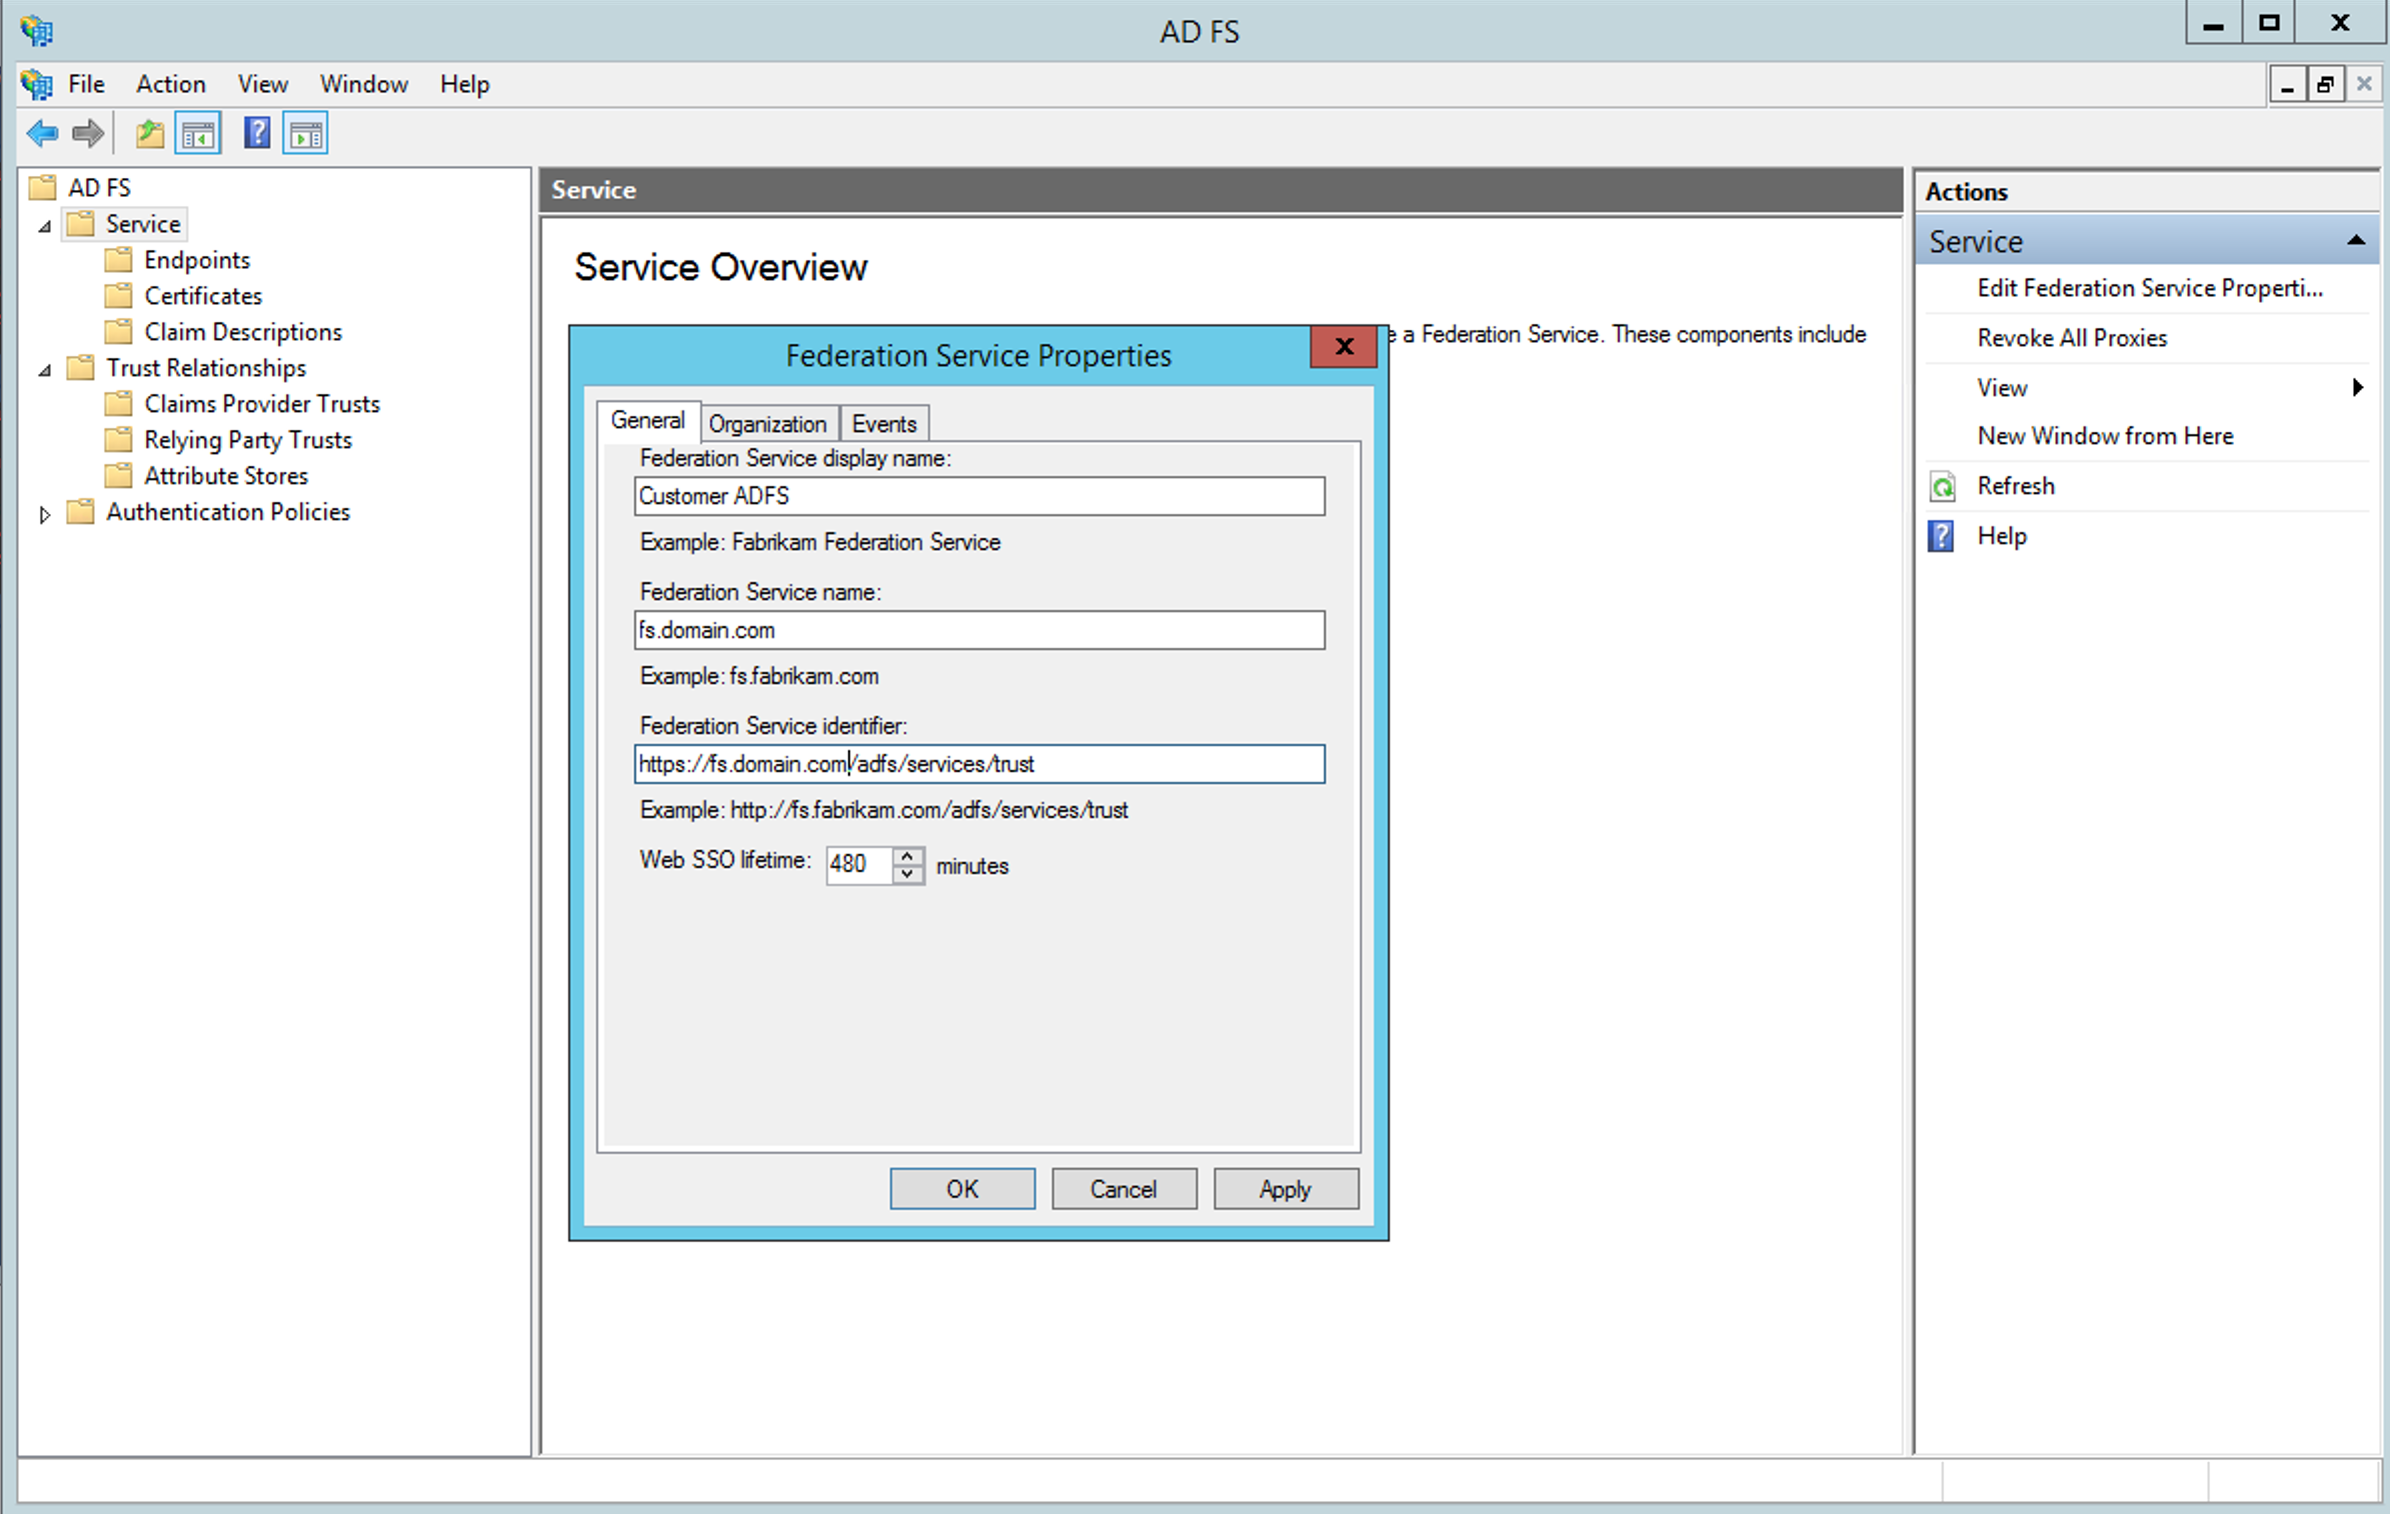
Be careful with the protocol used in this url, it may default to HTTP. When using HTTPS (and we strongly recommend doing so), change this field and leave HTTPS in the value of Federation Service Identifier.
Configuring integration in Conviso Platform
Only users of the Company type can perform this operation.
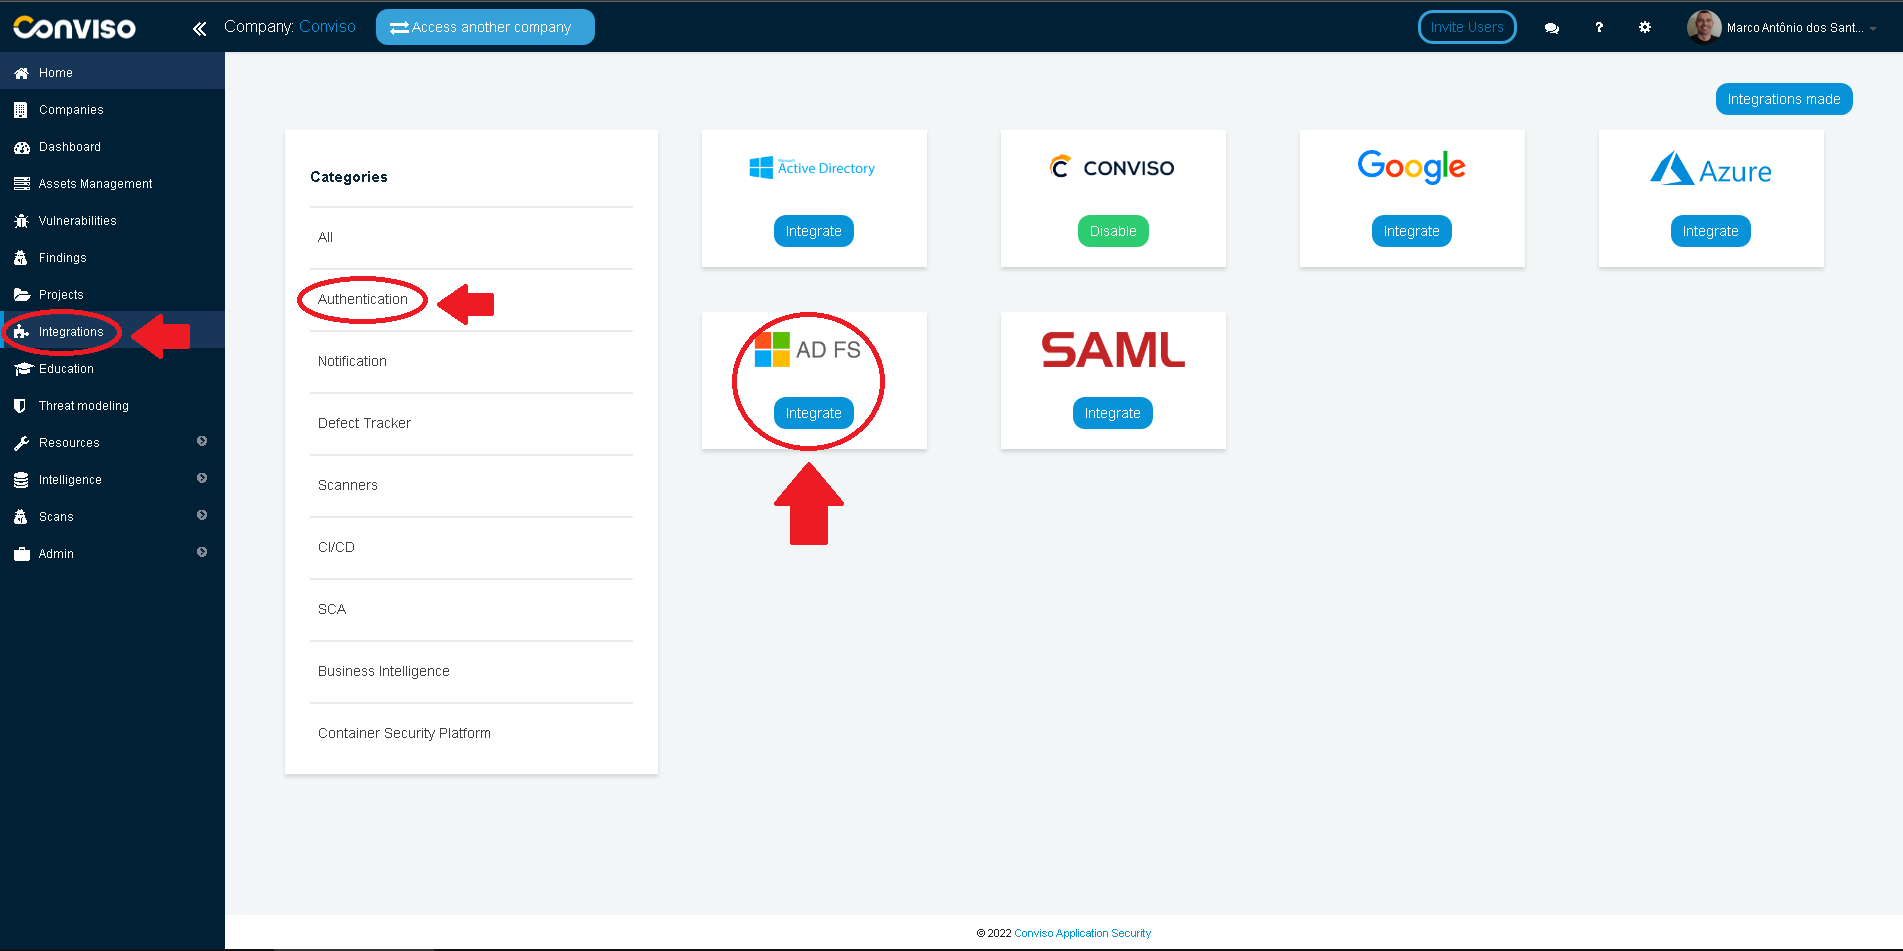
Log in to the Conviso Platform;
At the left menu, choose Integrations. At the right panel, click on Authentication menu option, then click on the Integrate button of the ADFS card:
Fill in the SSO ADFS modal form with proper data:
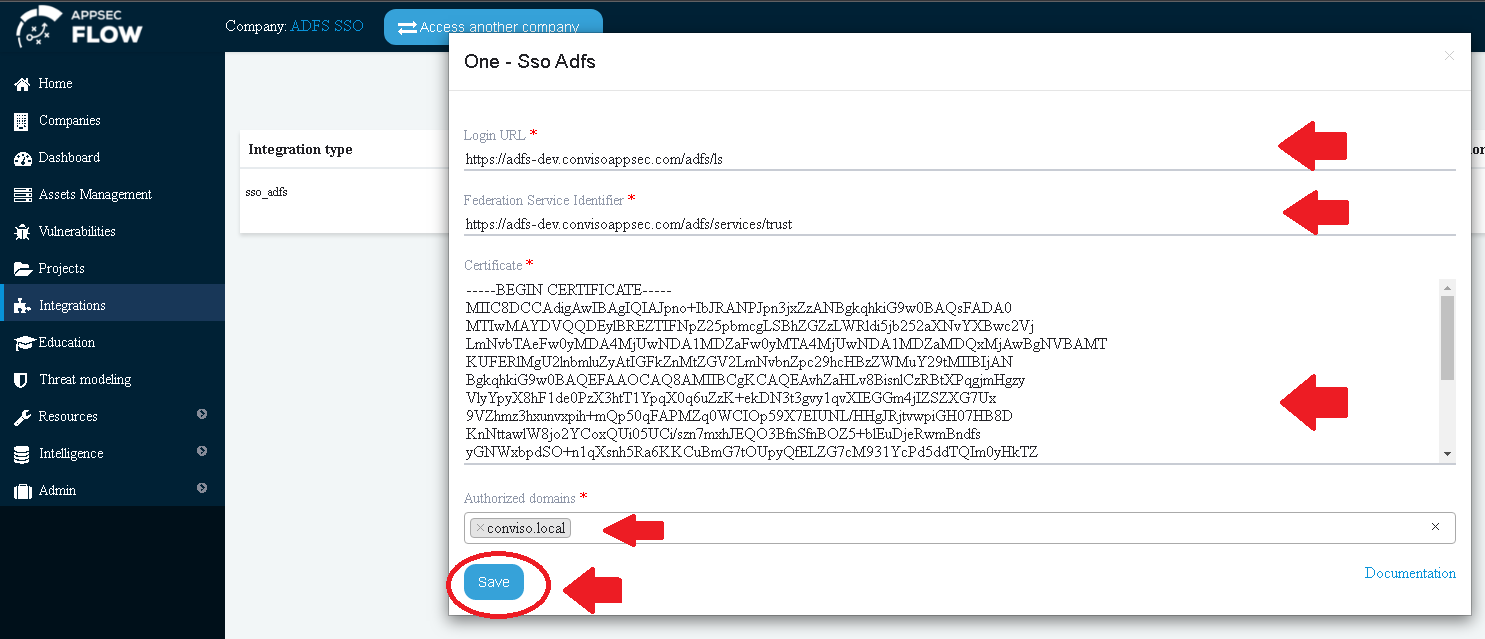
For the Login URL, use https://<your-fqdndomain-name>/adfs/ls:
Fill the Federation Service Identifier and Certificate fields with the previously obtained information.
Fill the Authorized Domains field with all of your domain aliases.
After clicking on the Save button, we must disable Conviso Platform default authentication option.

Contribute to the Docs
Found something outdated or missing? Help us improve the documentation with a quick suggestion or edit.
How to contributeResources
By exploring our content, you'll find resources that will enhance your understanding of the importance of a Security Application Program.
Conviso Blog: Explore our blog, which offers a collection of articles and posts covering a wide range of AppSec topics. The content on the blog is primarily in English.
Conviso's YouTube Channel: Access a wealth of informative videos covering various topics related to AppSec. Please note that the content is primarily in Portuguese.