Microsoft Entra ID SSO
Introduction
In this tutorial, you'll learn how to integrate Conviso Platform SSO with Microsoft Entra ID. When you integrate Conviso Platform SSO with Microsoft Entra ID, you can:
- Control in Microsoft Entra ID who has access to Conviso Platform SSO.
- Enable your users to be automatically signed-in to Conviso Platform SSO with their Microsoft Entra accounts.
- Manage your accounts in one central location.
Prerequisites
To get started, you need the following items:
- A Microsoft Entra subscription. If you don't have a subscription, you can get a free account.
- Conviso Platform SSO single sign-on (SSO) enabled subscription.
Usage
This section provides a comprehensive guide on using the Conviso Platform SSO Application, covering installation and assigning user permissions.
- Introduction
- Usage
- Installing the Conviso Platform SSO Application
- Performing Conviso Platform setup
- Test in Microsoft Entra ID
- Assigning users to the Conviso Platform SSO Application
- Setup Group Mapping Integration
- Setup Role Mapping Integration
- Email Field Mapping in SAML 2.0 for Microsoft Entra ID
- Support
- Resources
Following these steps, you can efficiently configure and manage user access to the Conviso Platform, ensuring a streamlined and secure experience for your enterprise customers.
Installing the Conviso Platform SSO Application
To install the Conviso Platform SSO application, follow these steps:
-
Sign in to the Microsoft Entra admin center as at least a Cloud Application Administrator.
-
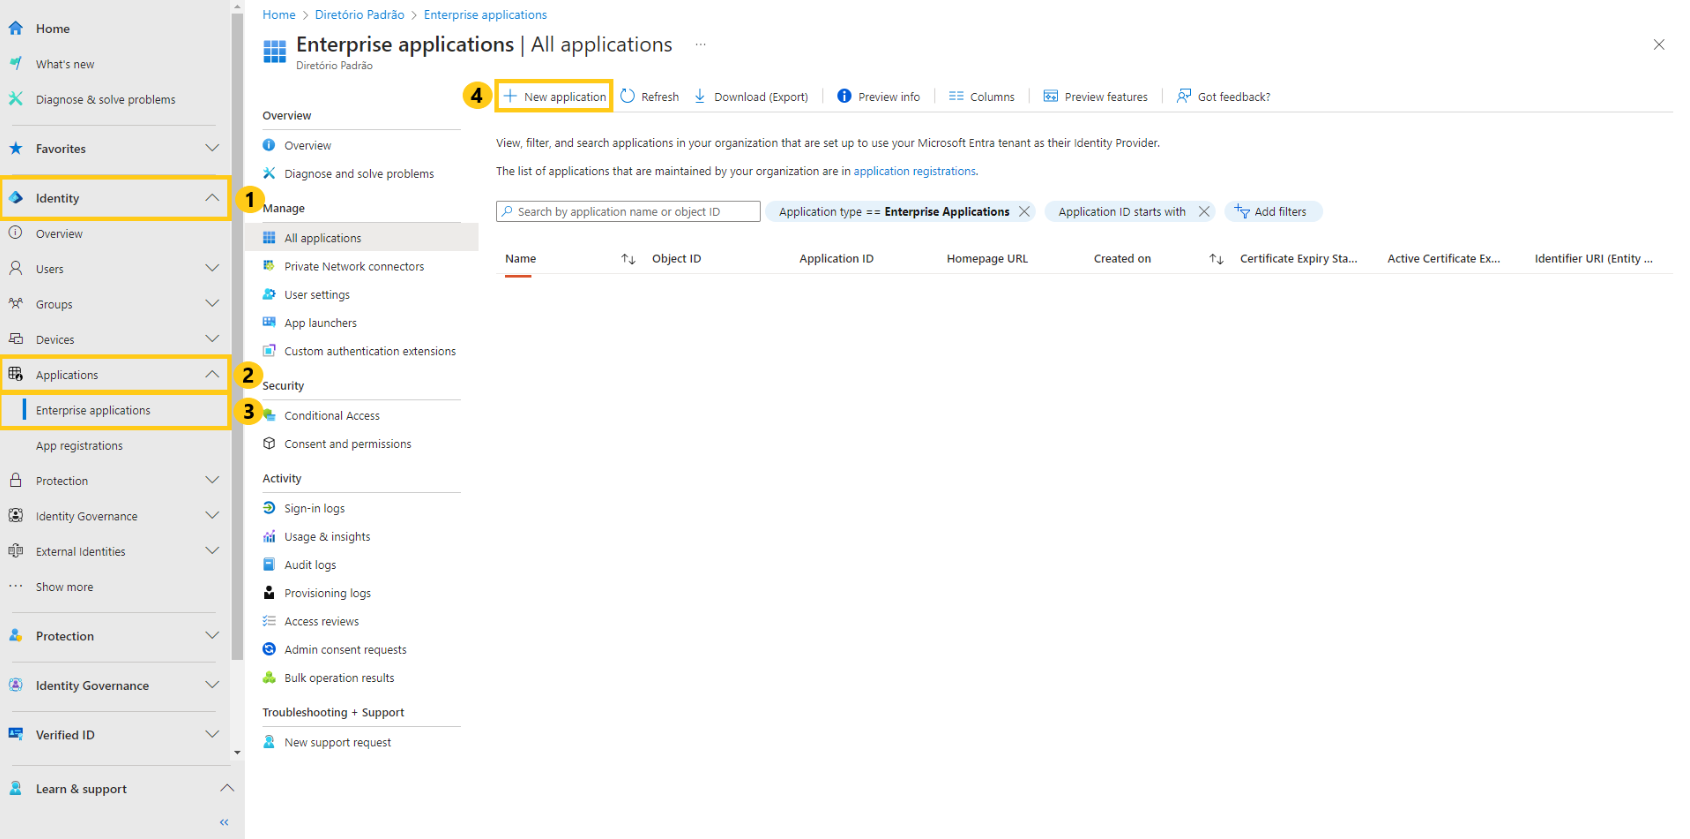
Browse to Identity > Applications > Enterprise applications > New application:
-
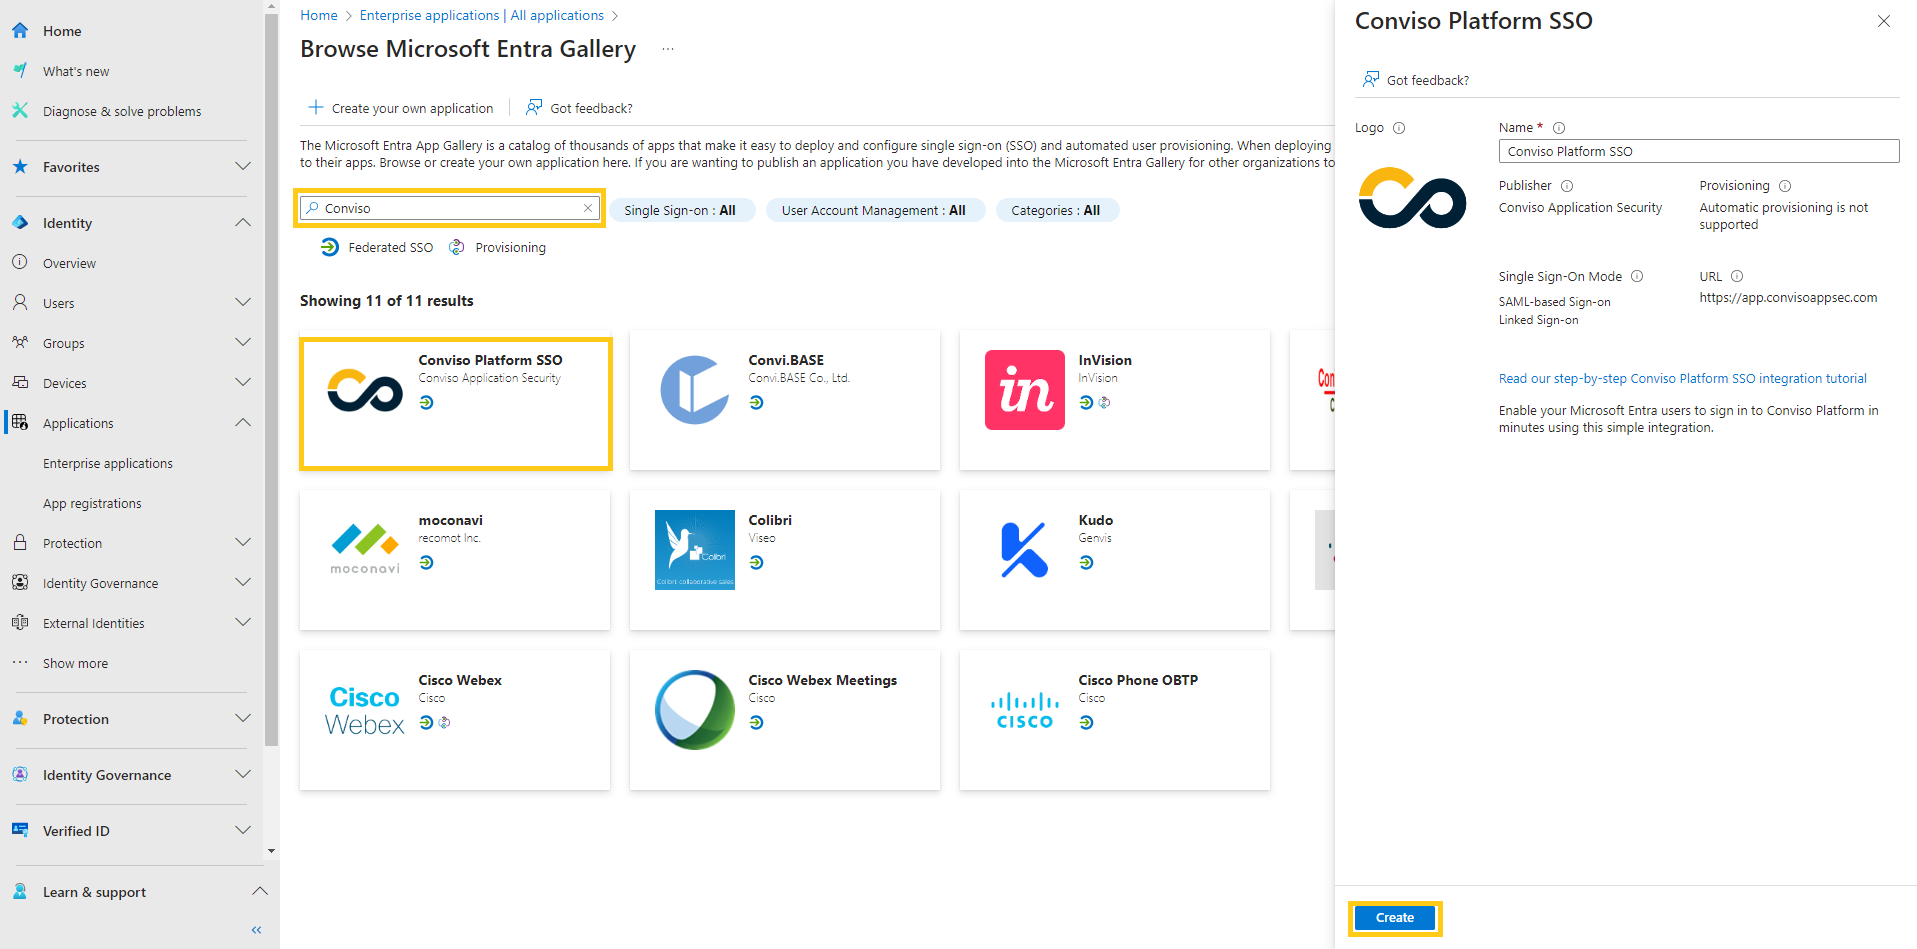
In the Add from the gallery section, type Conviso Platform SSO in the search box.
-
Select Conviso Platform SSO from results panel and then add the app, clicking on Create. Wait a few seconds while the app is added to your tenant.
-
You will be redirected to Conviso Platform SSO application's Overview page.
-
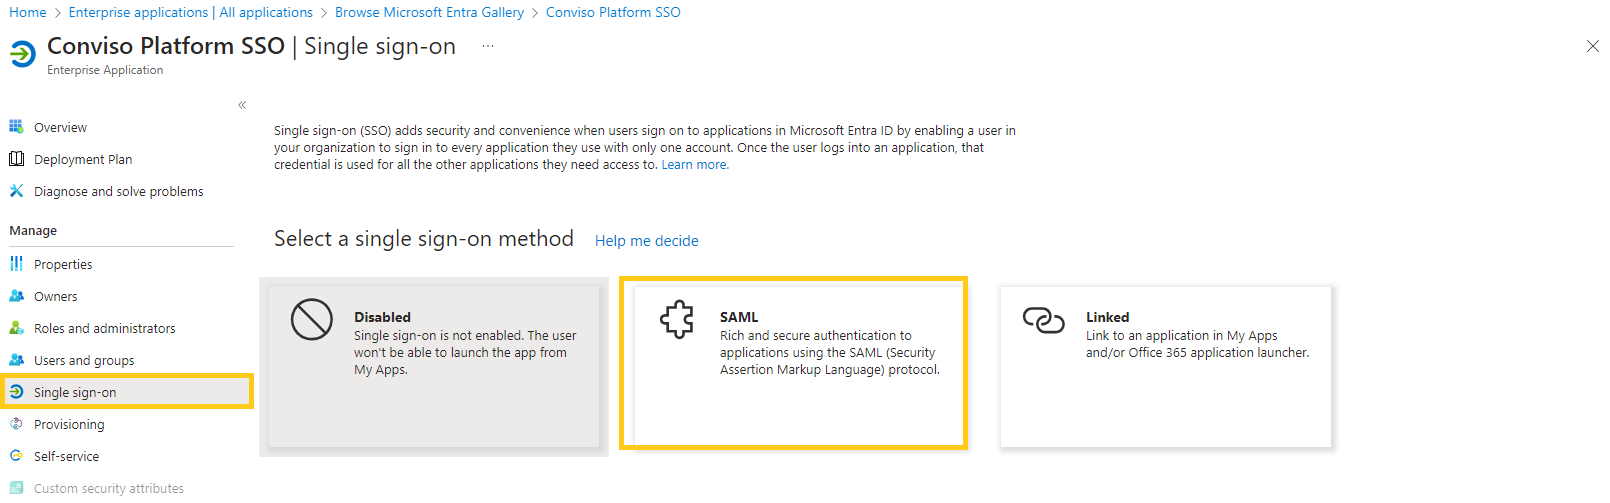
In the left navigation pane, select Single Sign-On.
-
On the Select a single sign-on method page, choose SAML.
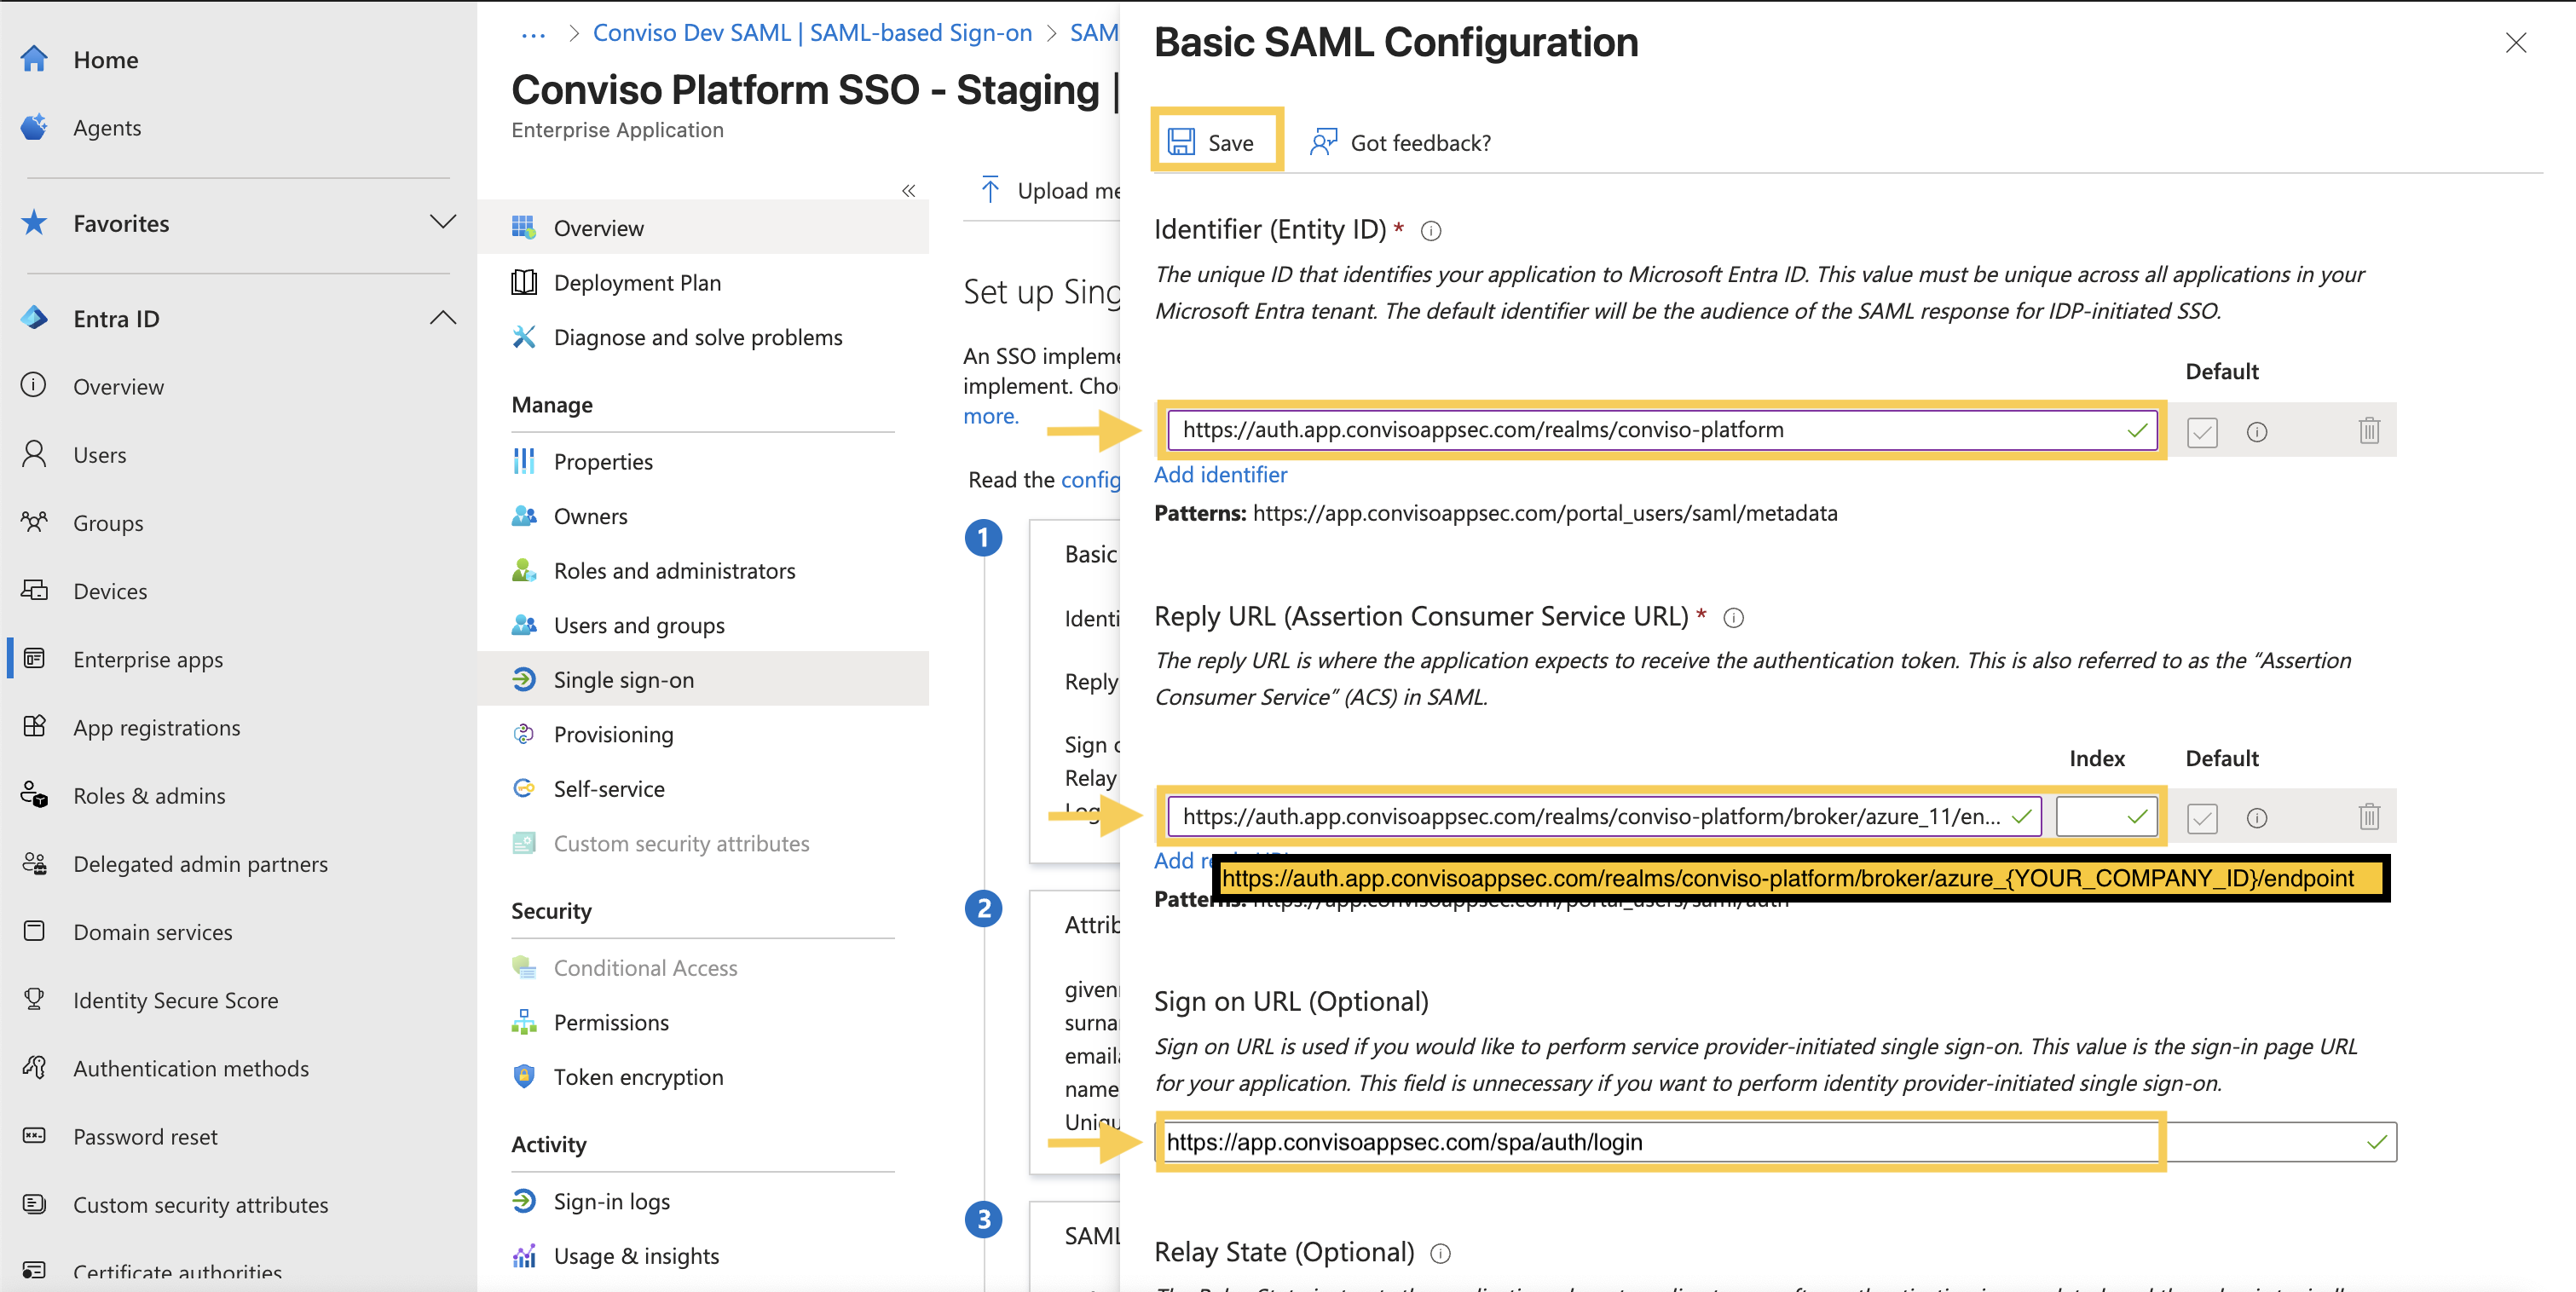
- The Basic SAML Configuration must be edited as it is a requirement by Microsoft. Select Edit, then Save with the following data:
- Identifier (Entity ID):
https://auth.app.convisoappsec.com/realms/conviso-platform - Reply URL (Assertion Consumer Service URL):
https://auth.app.convisoappsec.com/realms/conviso-platform/broker/azure_{YOUR_COMPANY_ID}/endpoint - Sign on URL:
https://app.convisoappsec.com/spa/auth/login
- Identifier (Entity ID):
- Close the pop-up window.
Replace {YOUR_COMPANY_ID} in the Reply URL with your actual company identifier.
- In the Attributes & Claims section, make sure that the
name(http://schemas.xmlsoap.org/ws/2005/05/identity/claims/name) is mapped to the attribute corresponding to the email the user uses to log in:
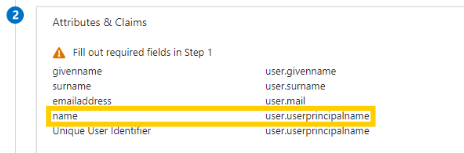
The user.userprincipalname attribute is not mandatory. Just make sure you're using the email the user uses to log in.
- Now, find the Certificate (Base64) and download it.
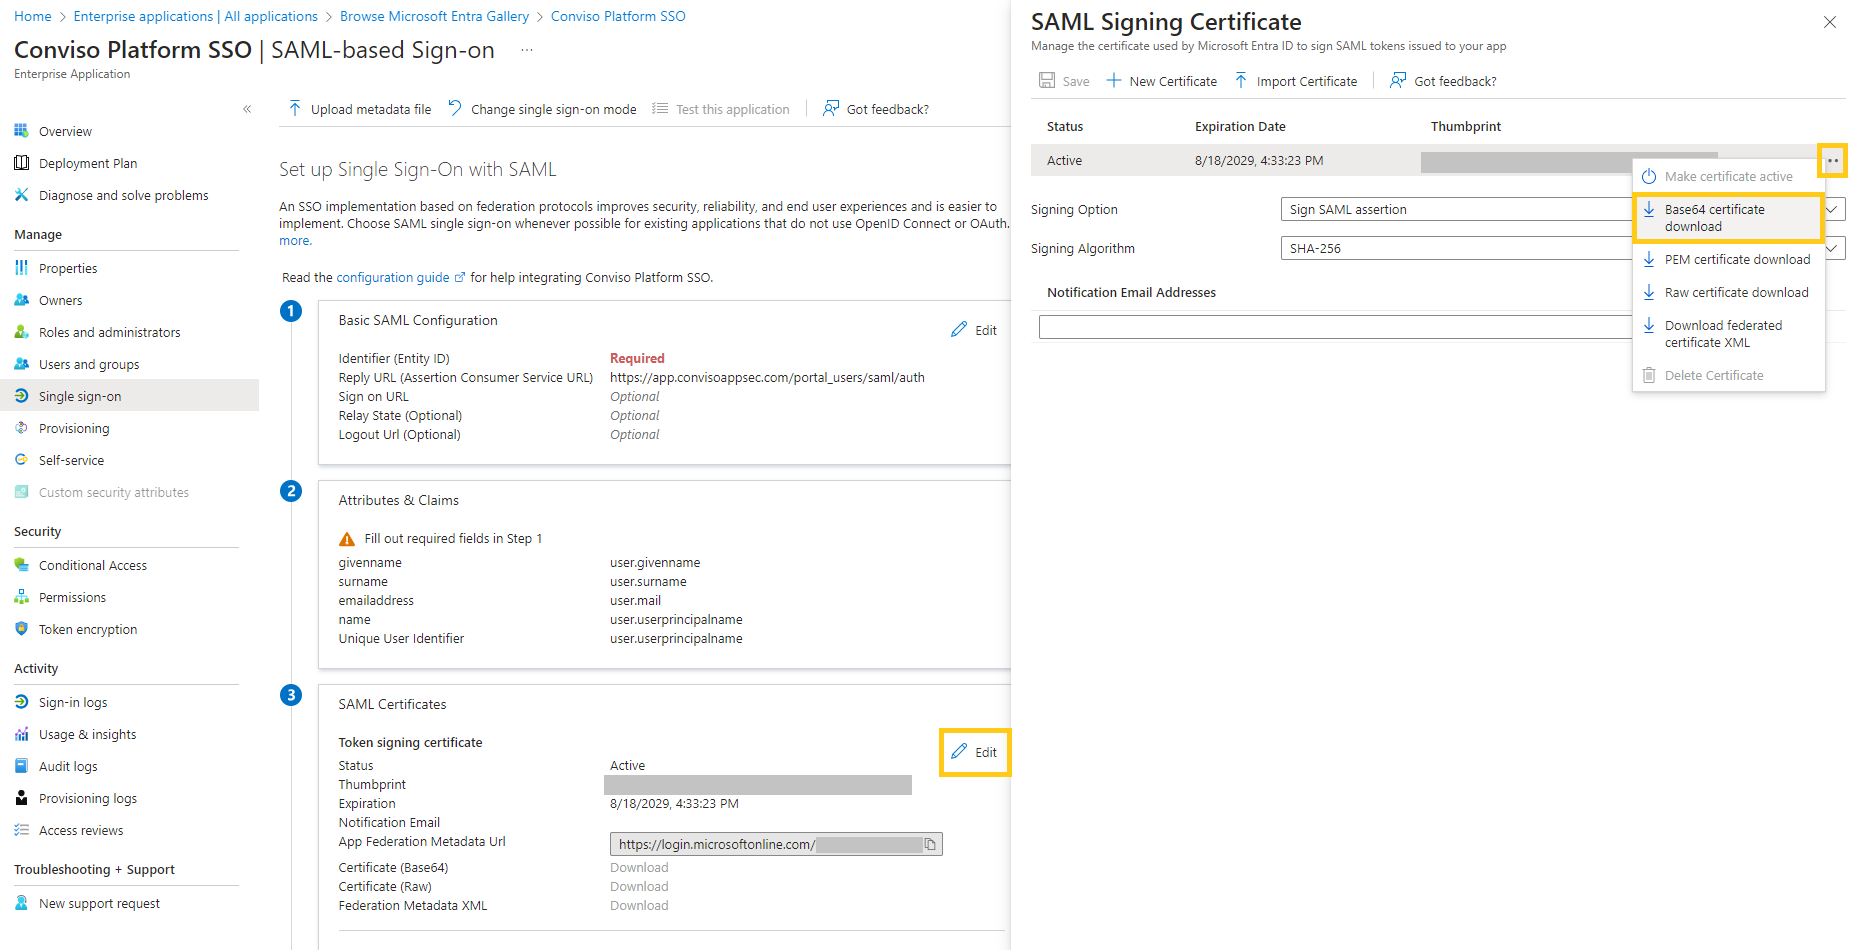
- Along with the certificate, you need the Login URL and the Microsoft Entra Identifier.
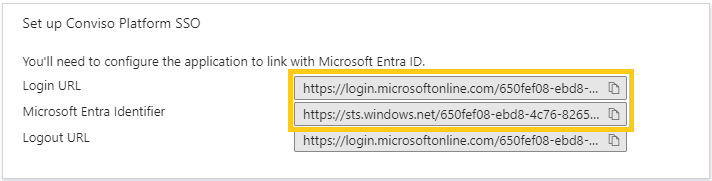
- Conviso Platform uses the Certificate (Base64), Login URL, and Microsoft Entra Identifier as credentials to communicate with Microsoft Entra.
Performing Conviso Platform setup
To set up the Conviso Platform, follow these steps:
-
Log in to the Conviso Platform.
-
In the left navigation pane, click on Integrations.
-
From the Integrations panel, select the Authentication category, find the Entra ID card and click Connect.
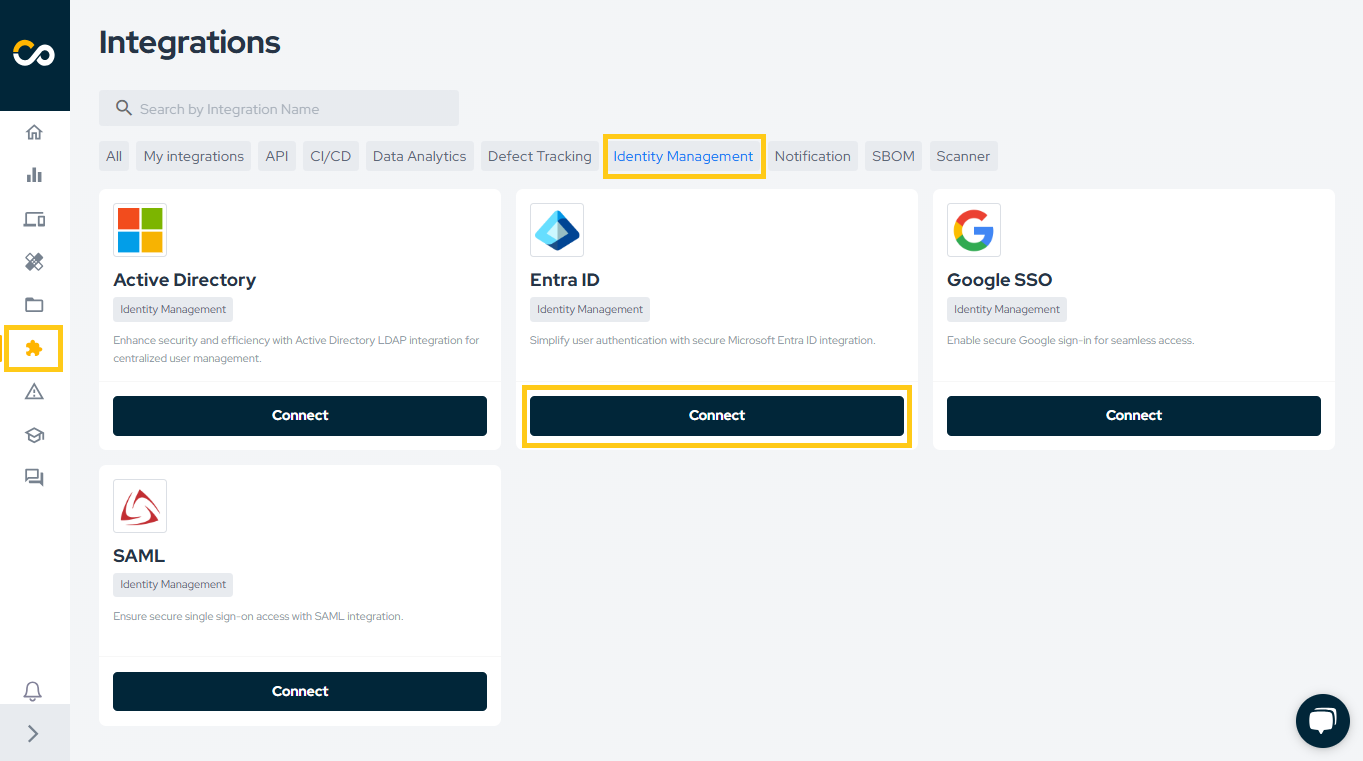
- Fill out the Credentials step with the corresponding information obtained previously. Enter the domain name and all domain aliases used by your organization to log in at the Authorized Domains field. Click Continue to save your SSO configuration.
- Authorized Domains example: company.com
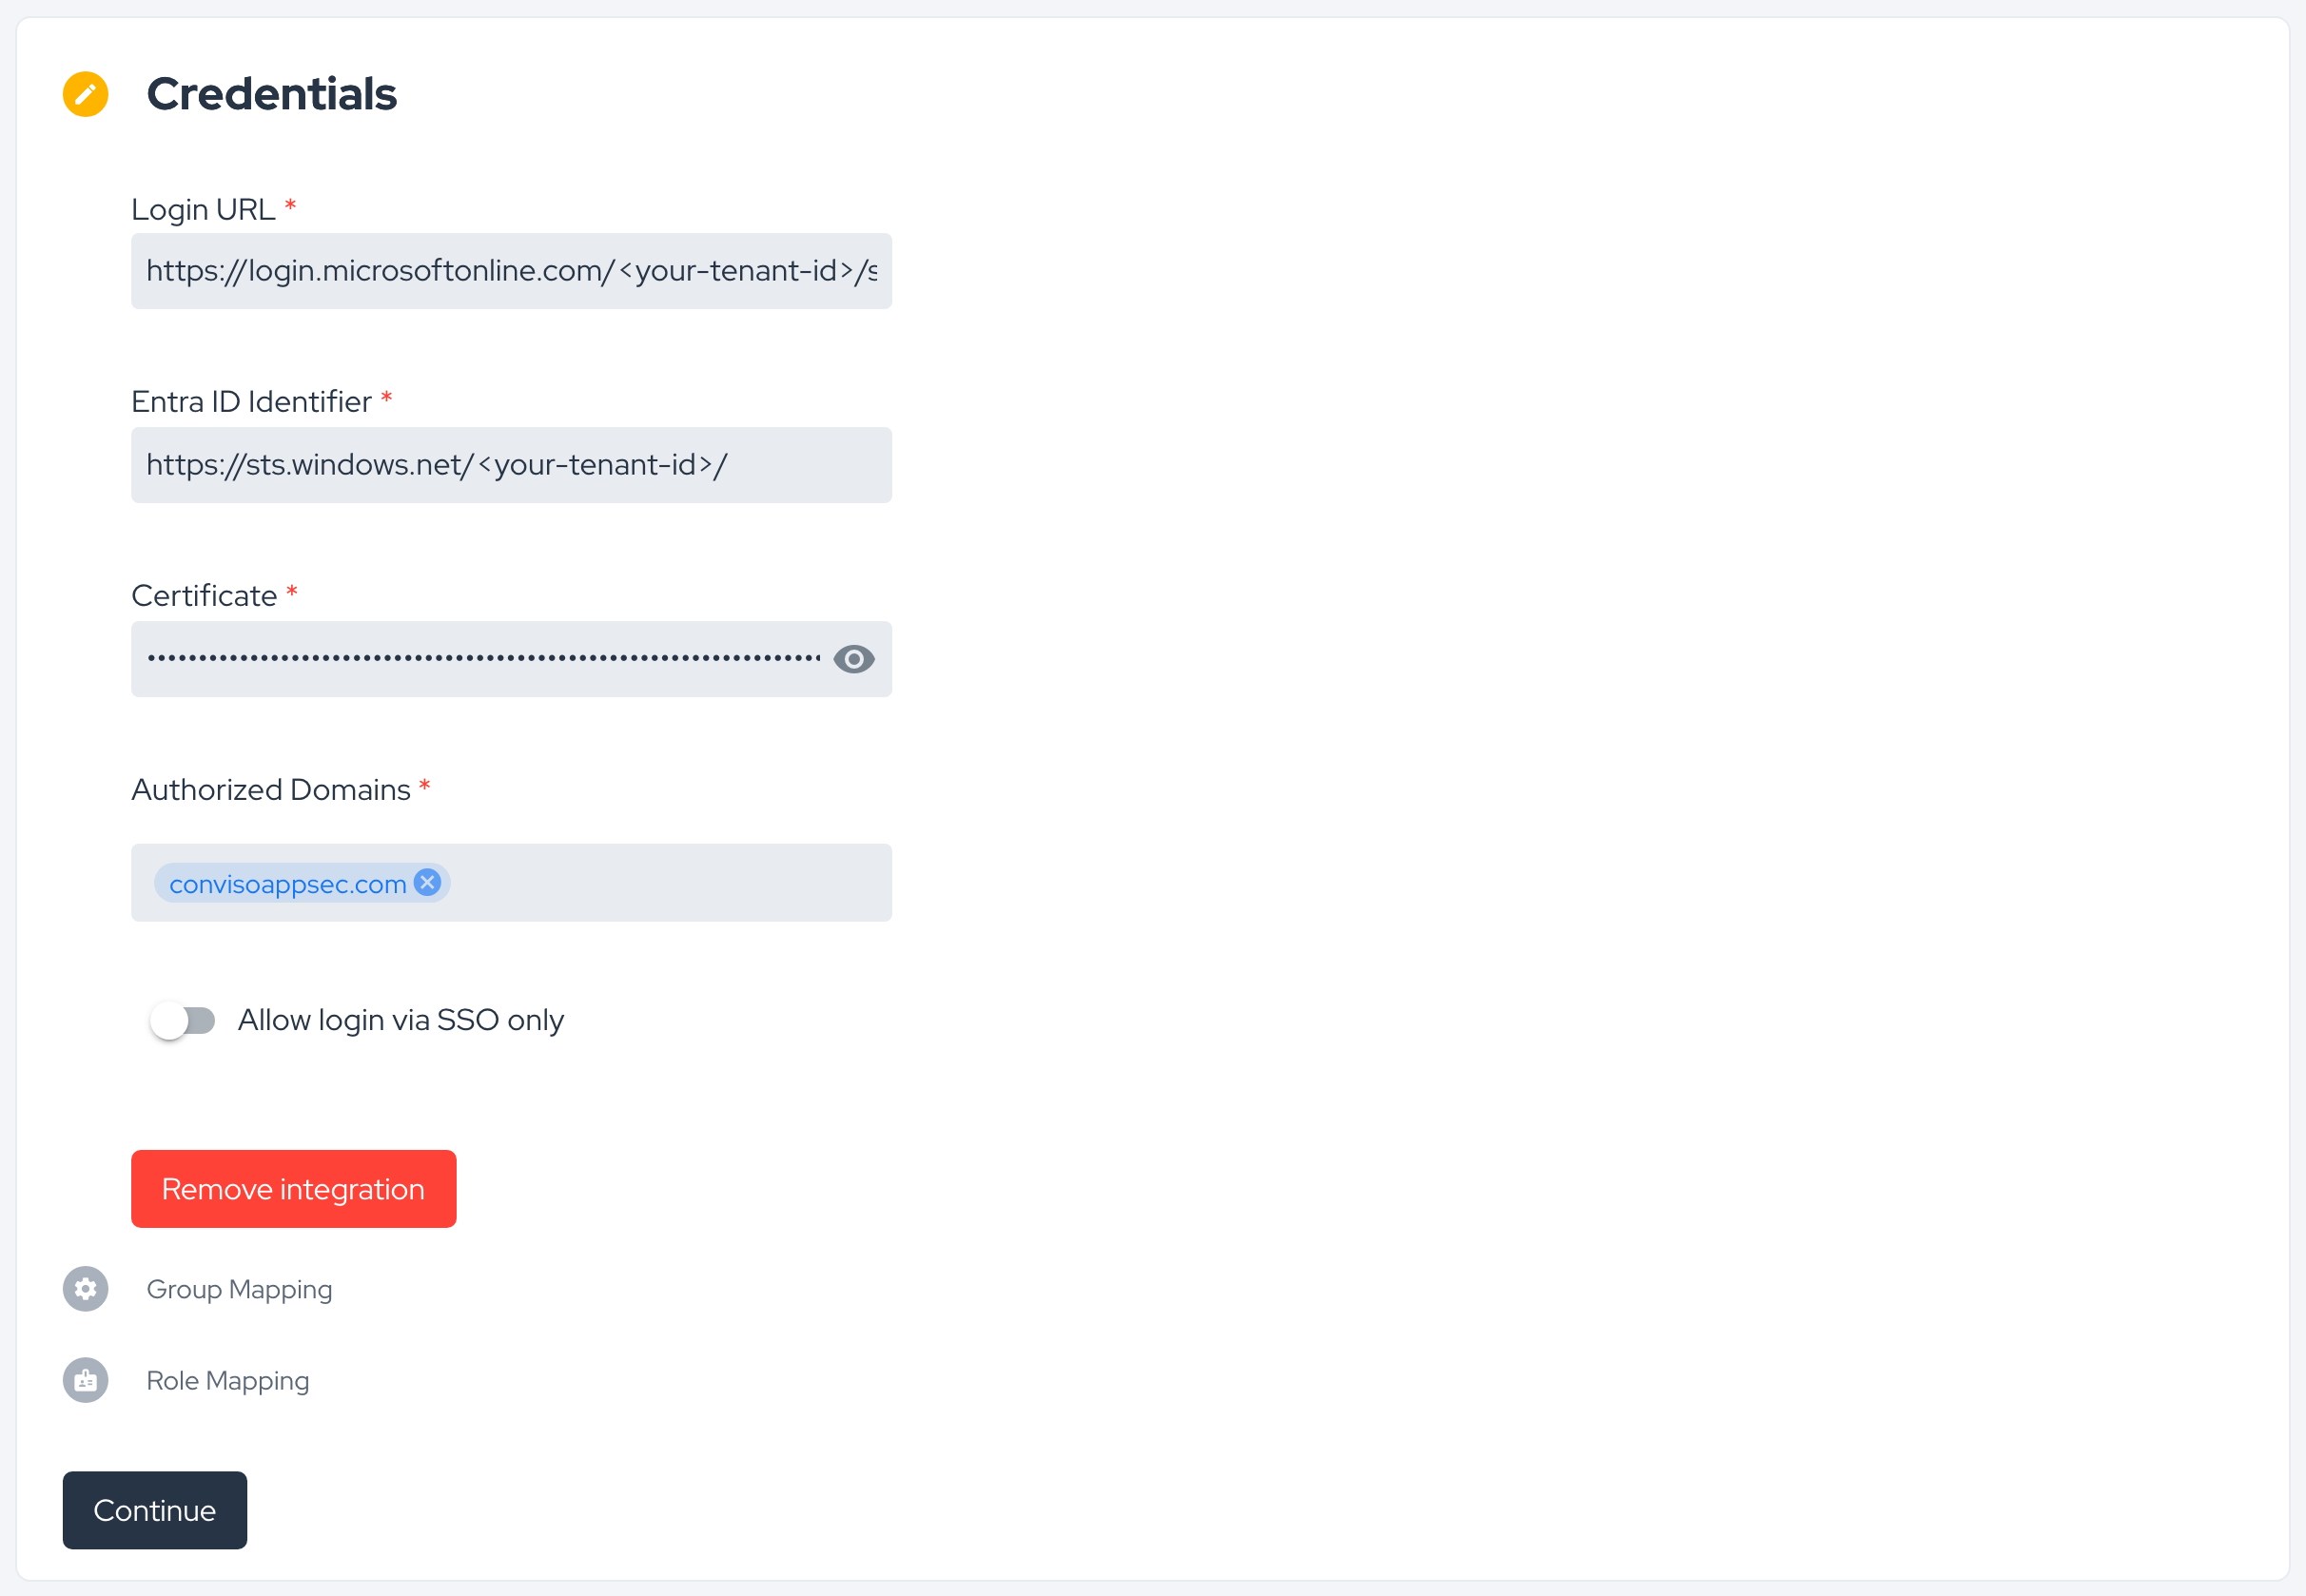
The two steps that follow — Group Mapping and Role Mapping — are optional, and each is covered in its own section below. Once the integration is saved you can come back at any time and jump straight to a step by clicking its title.
The next step is to assign which Microsoft Entra users will use SSO to access the Conviso Platform.
Test in Microsoft Entra ID
Before testing the SSO integration, ensure you are logged out of the Conviso Platform.
The SSO test process is mandatory in the Microsoft Entra ID provider. Follow these steps to test the integration:
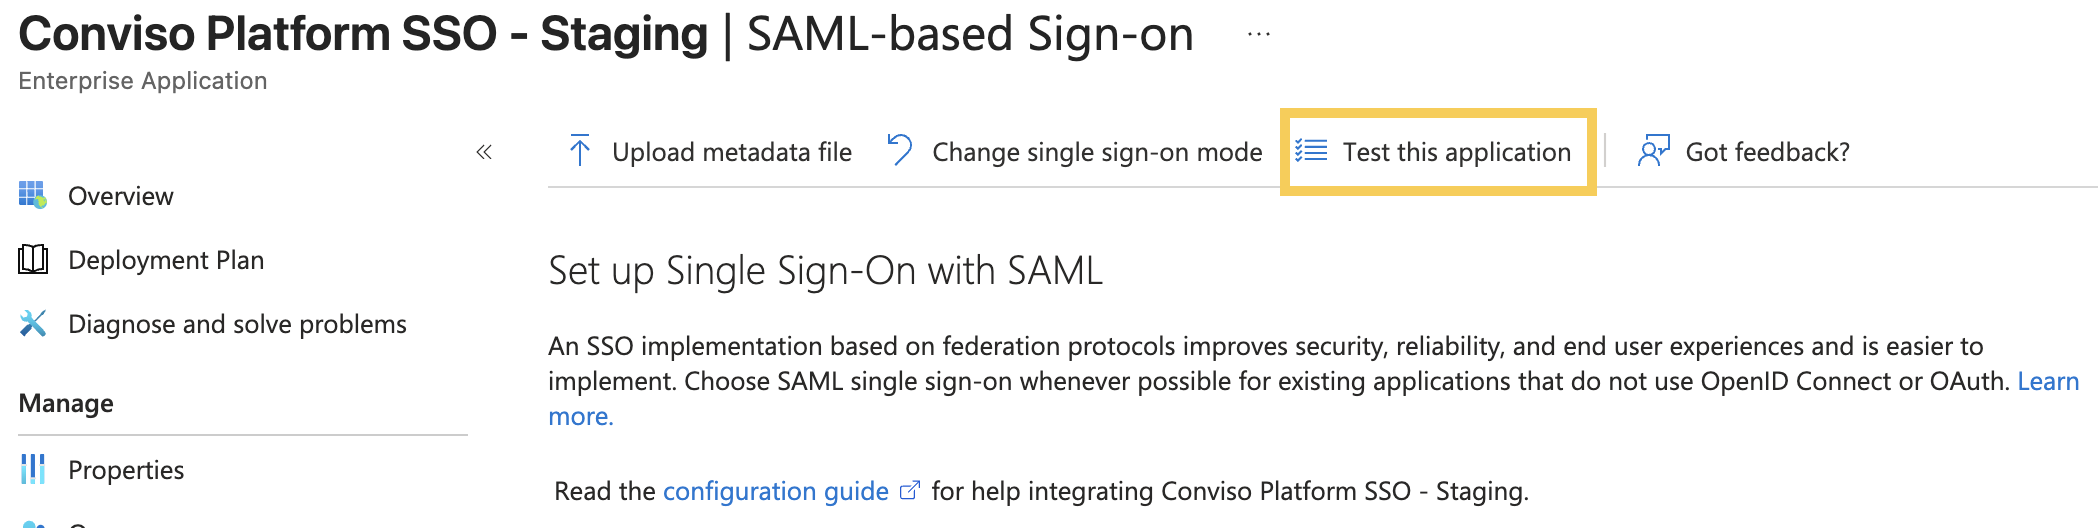
- In the Single sign-on page, click Test this application.
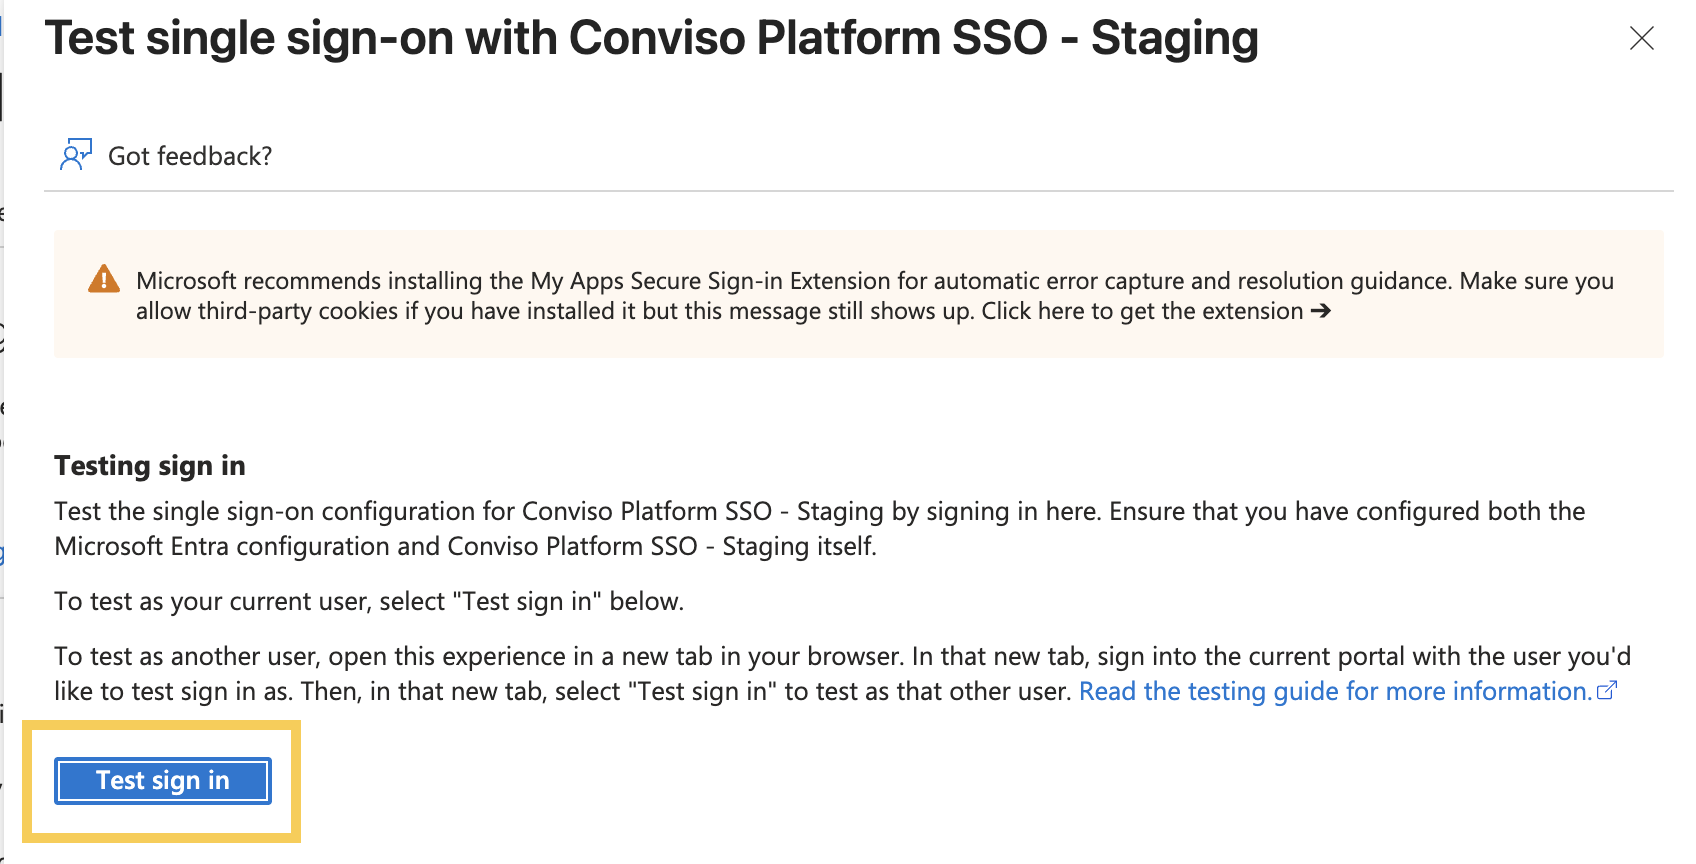
- Click Test sign in.
- You will be redirected to the new Conviso login page. Click SSO access.
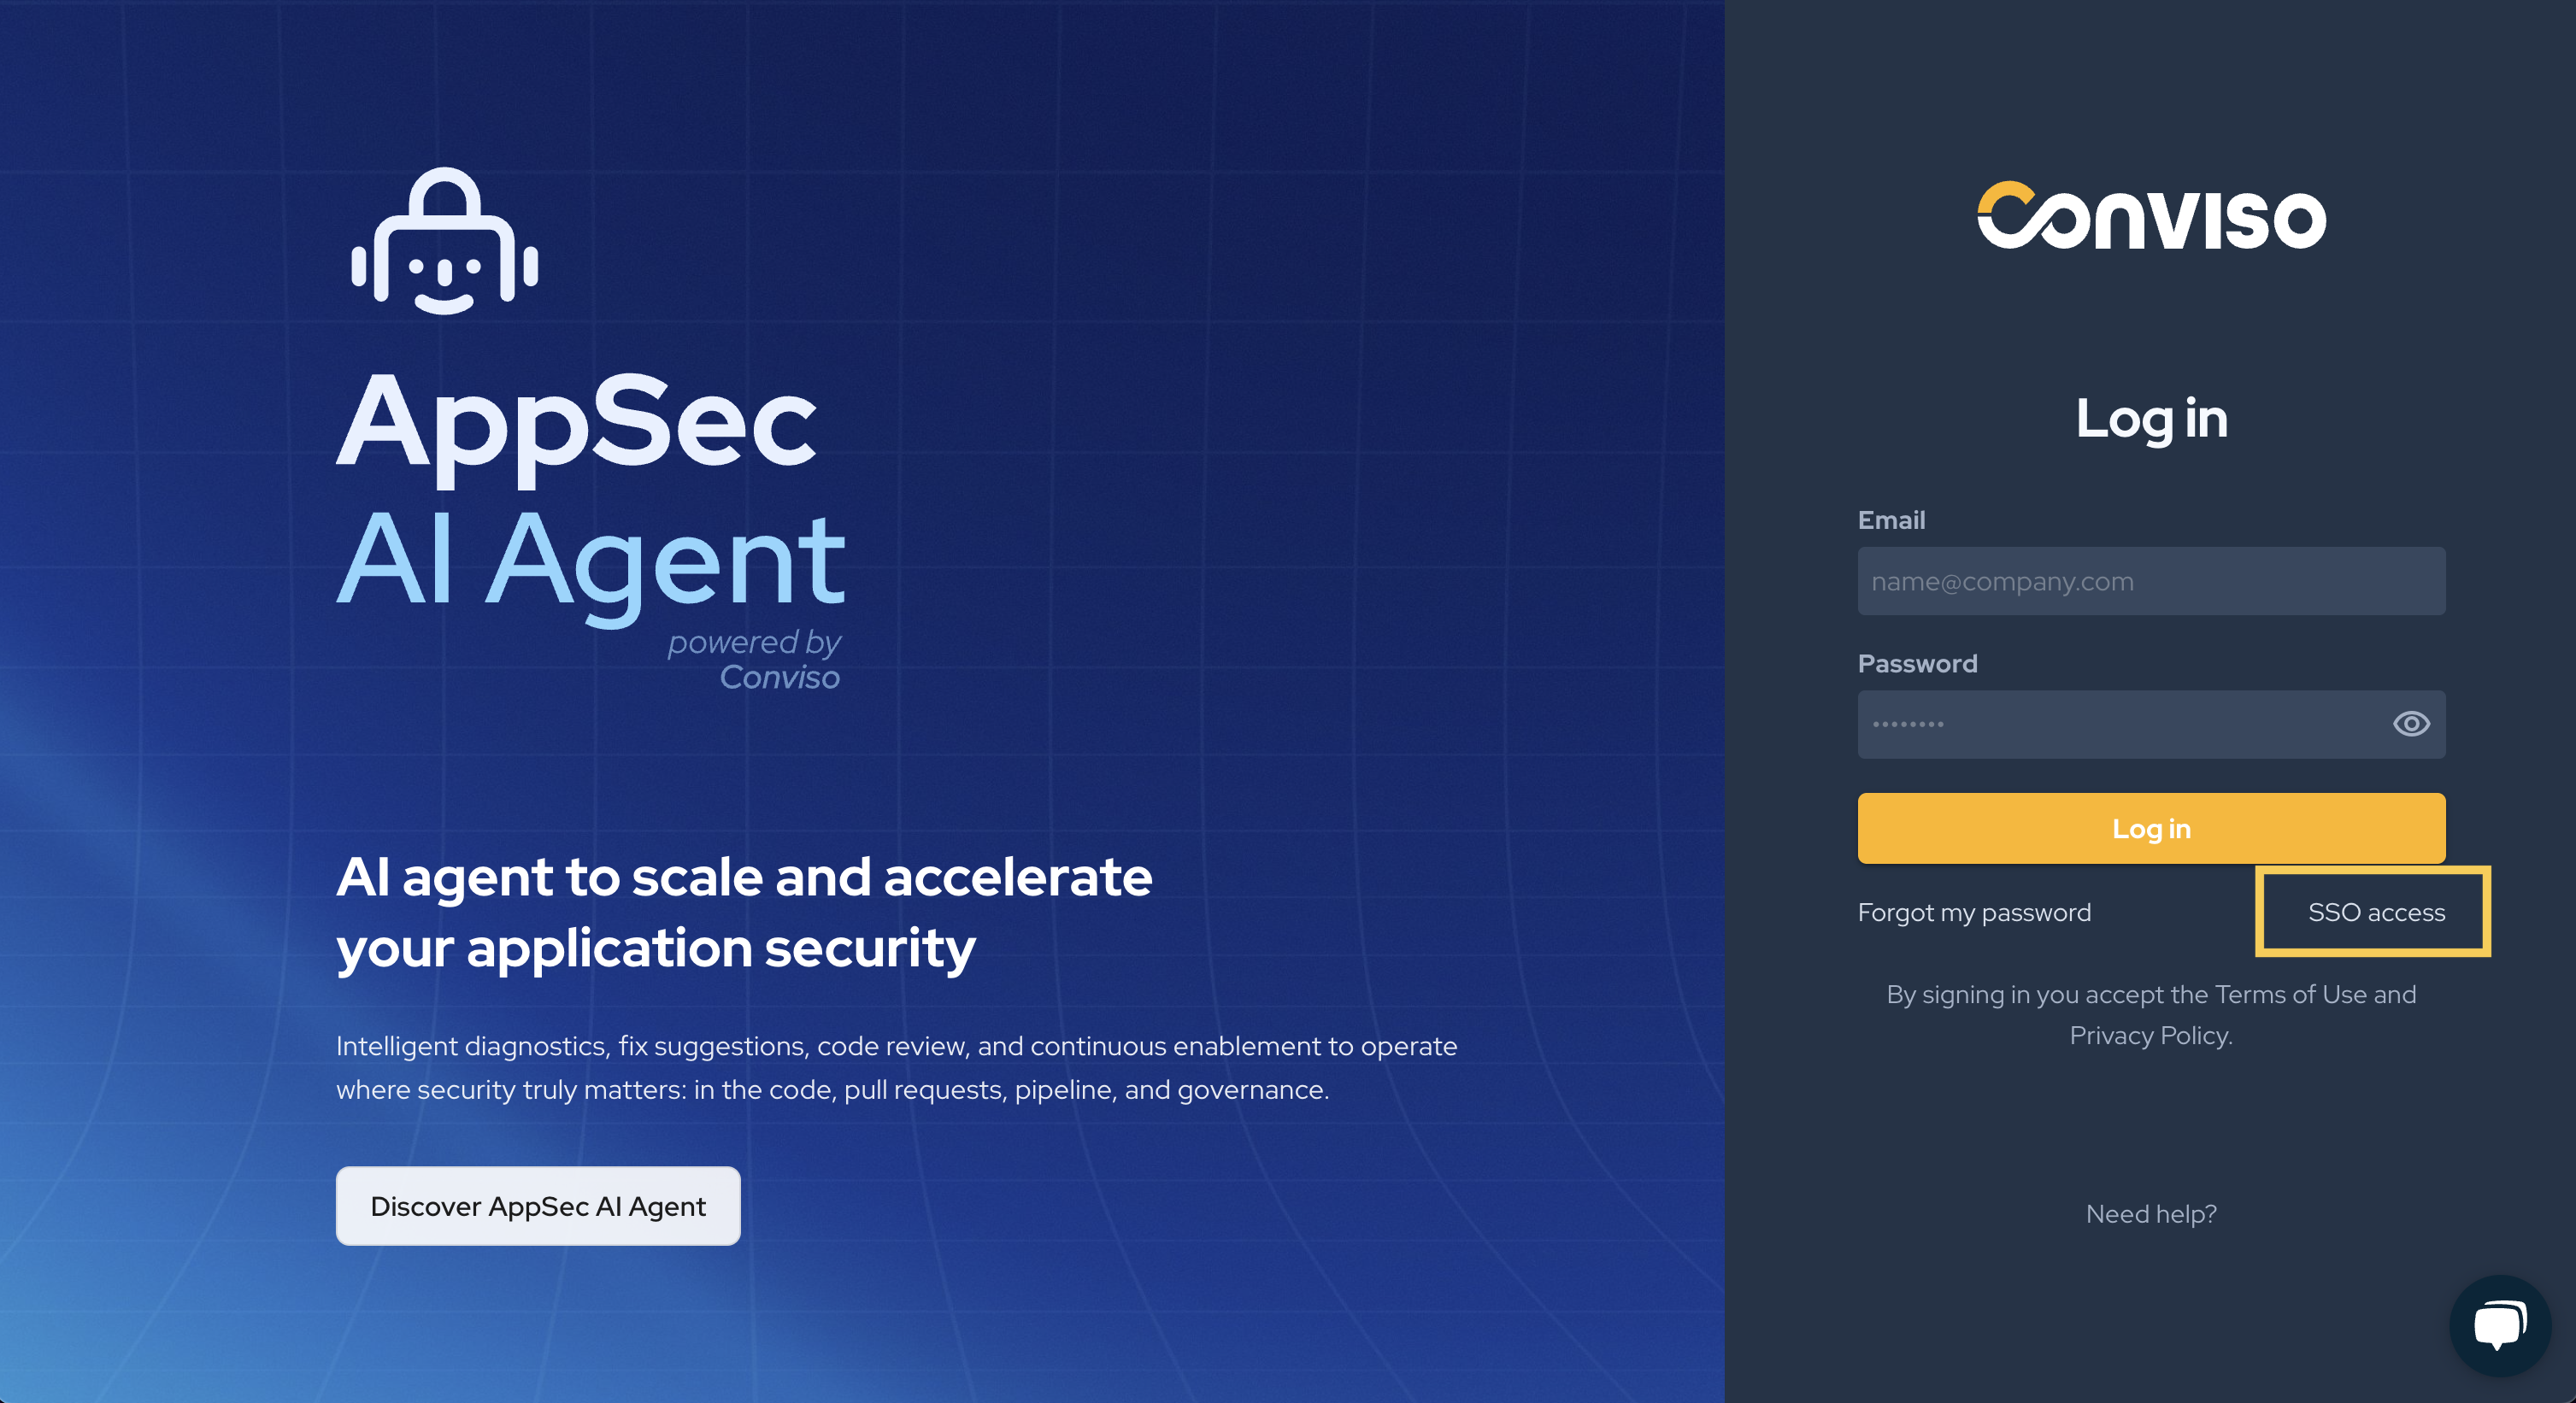
- Enter your provider email and click Log in.
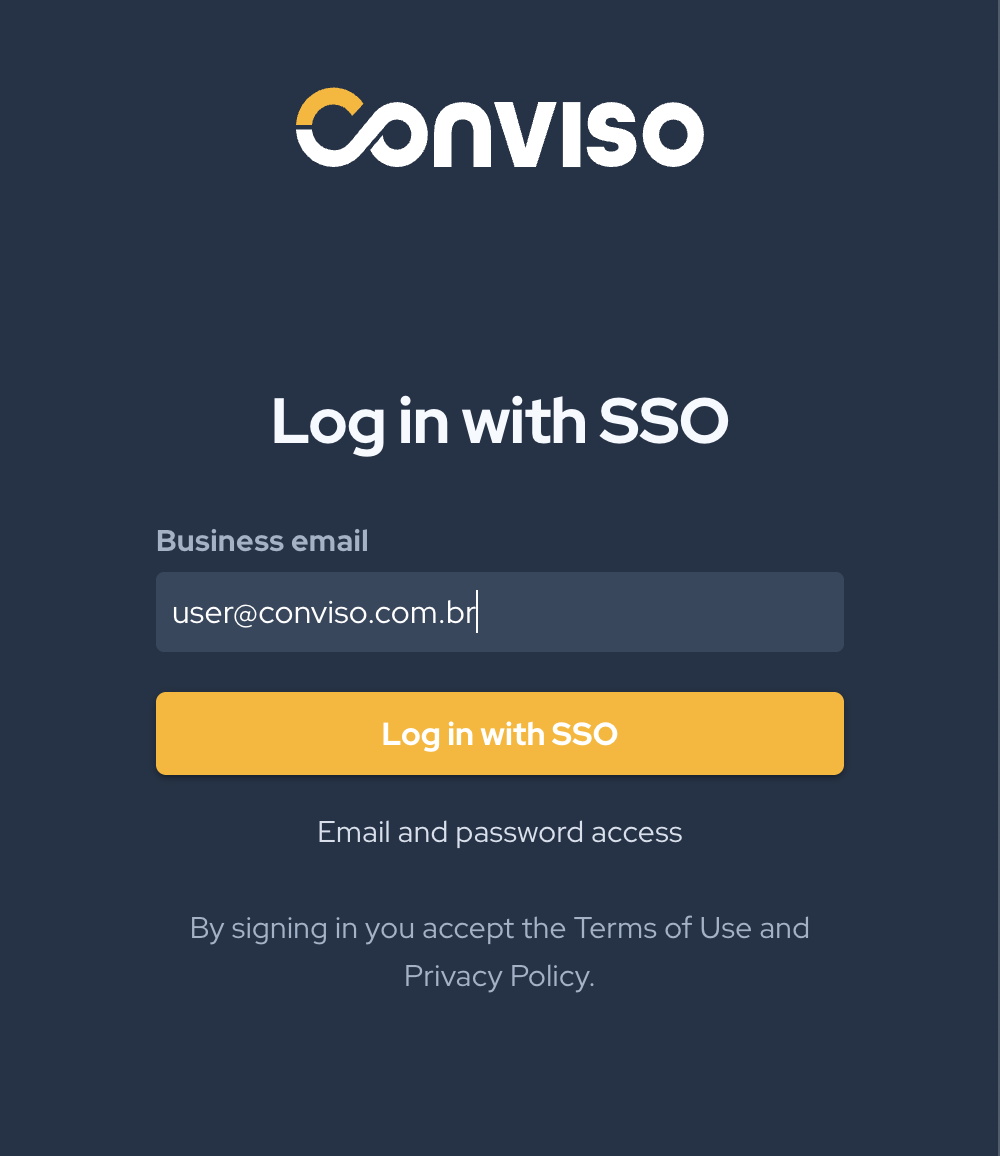
The test will verify that the SSO configuration is working correctly between Microsoft Entra ID and the Conviso Platform.
Assigning users to the Conviso Platform SSO Application
To assign users to the Conviso Platform SSO application, follow these steps:
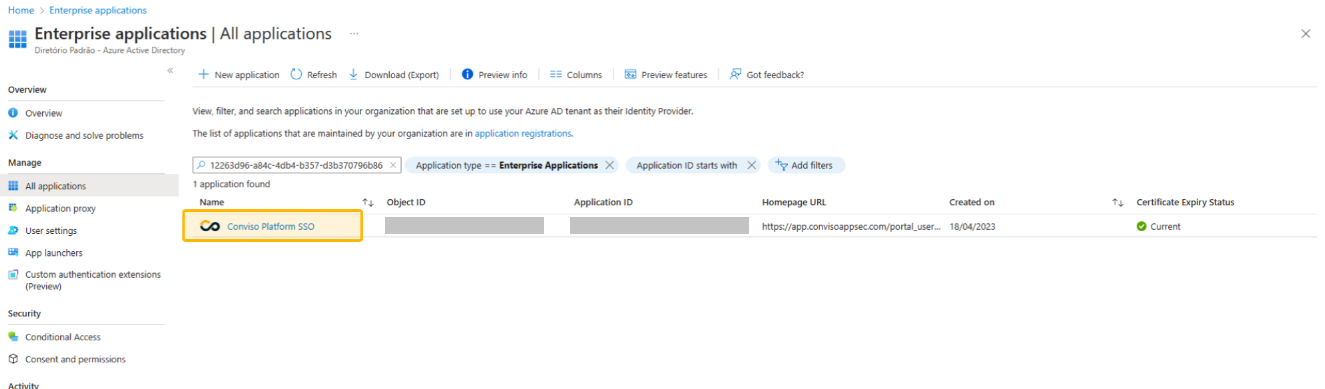
- After configuring the Microsoft Entra ID in the Conviso Platform, you must permit users to use the SSO. Go back to your Microsoft Entra Portal. In the Enterprise Applications | All applications page, select your recently configured Conviso Platform SSO application. If it doesn't show your new application, refresh the page.
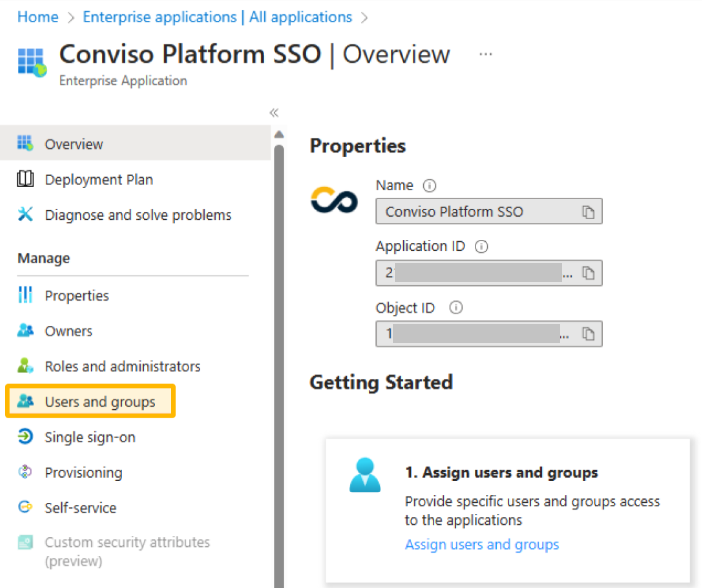
- In the left navigation pane within the application's page, select Users and Groups.
- Search for and click the Add user/group button.
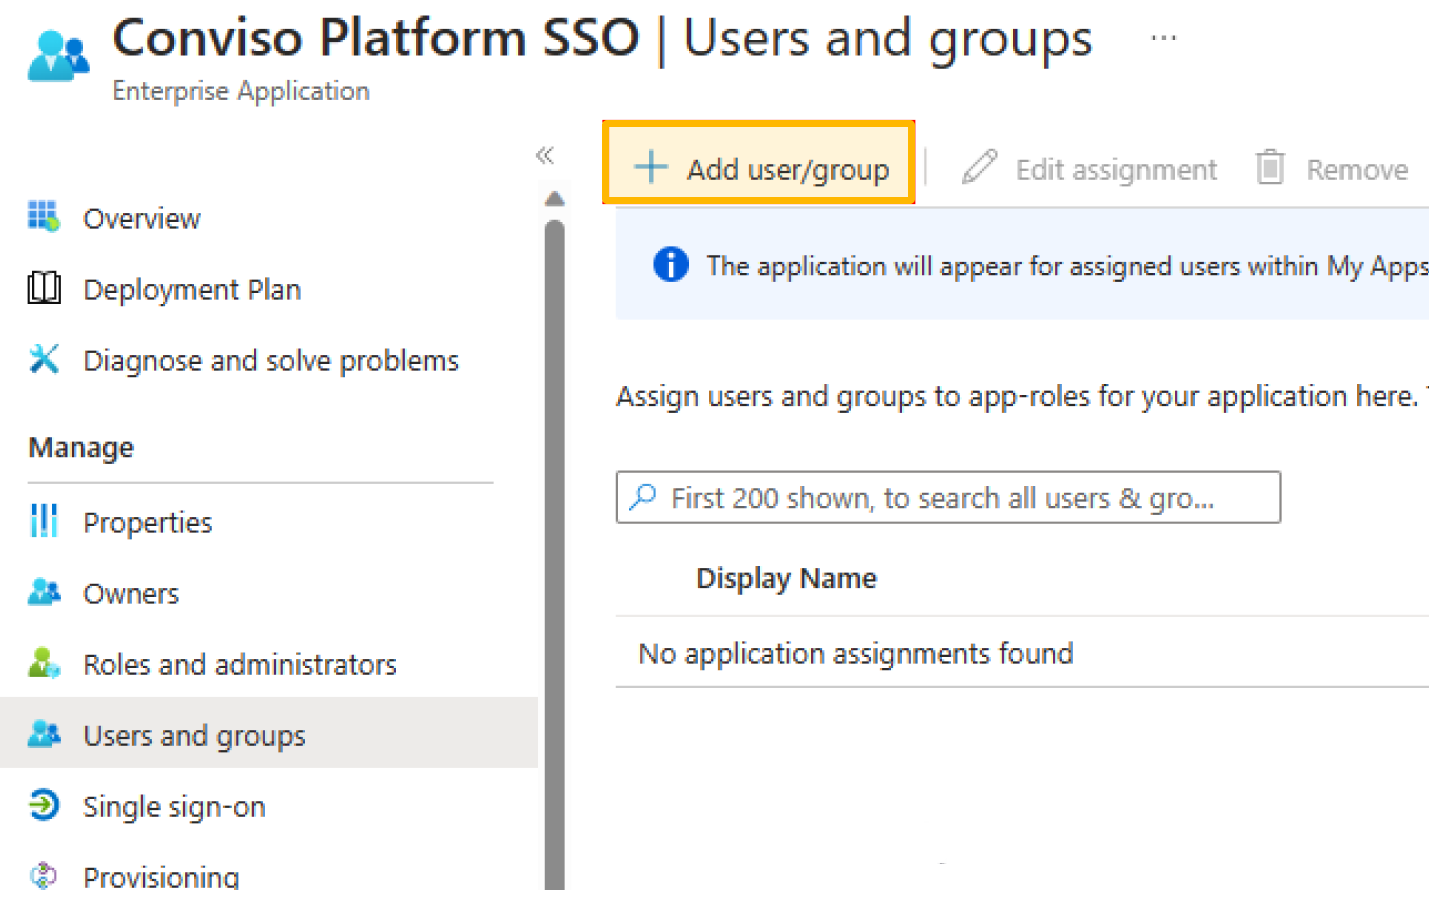
- Under Users, click None Selected. A window will appear displaying all your Microsoft Entra users. Select the desired users by checking the boxes next to their names.
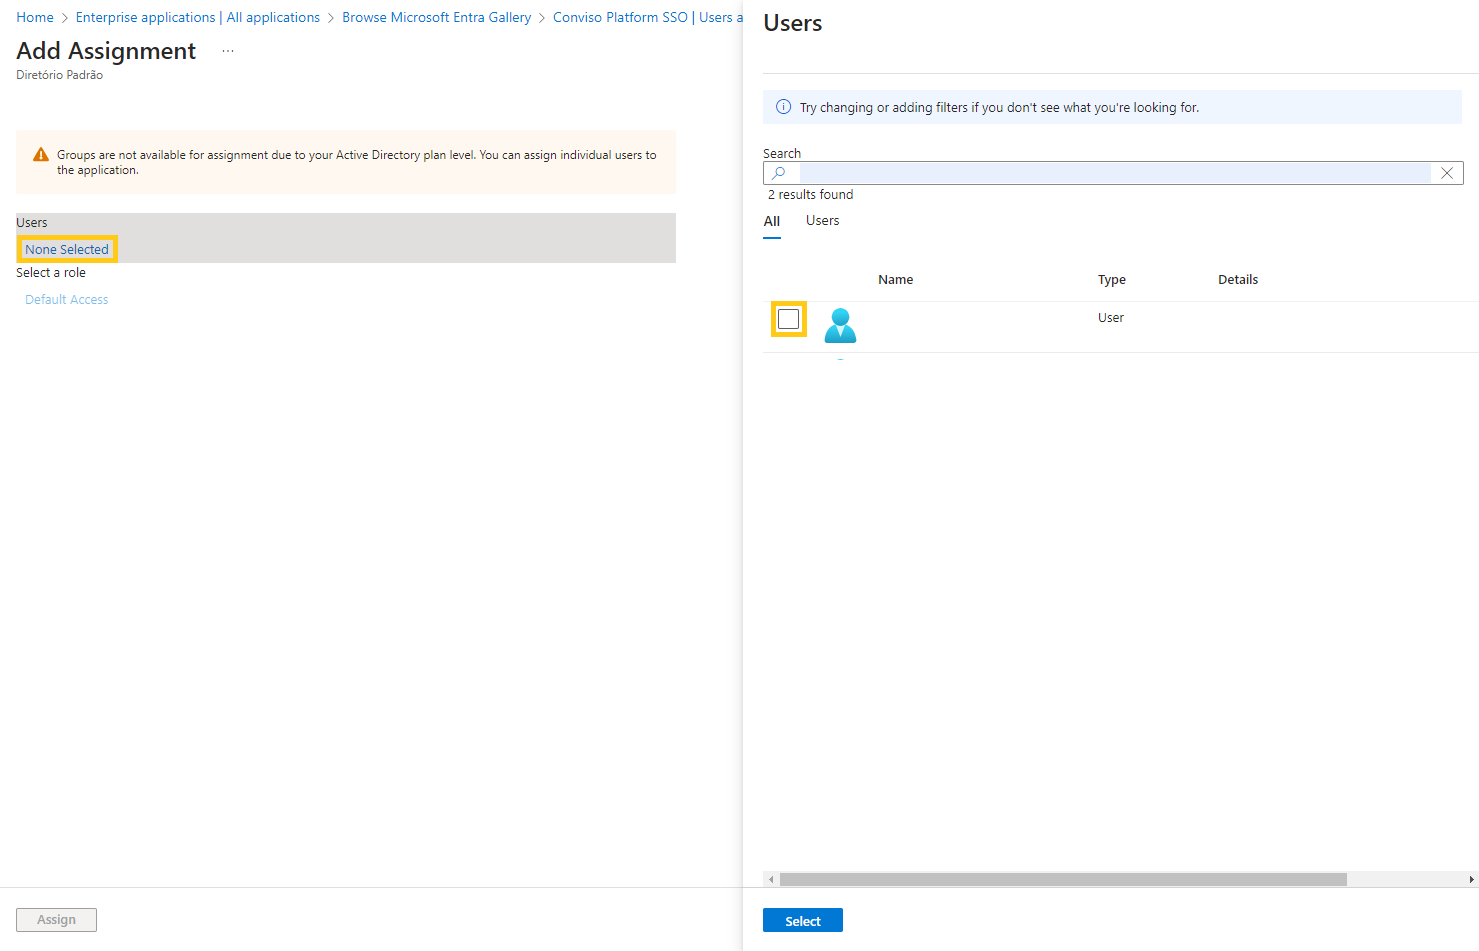
- After selecting the users, click Select and then Assign.
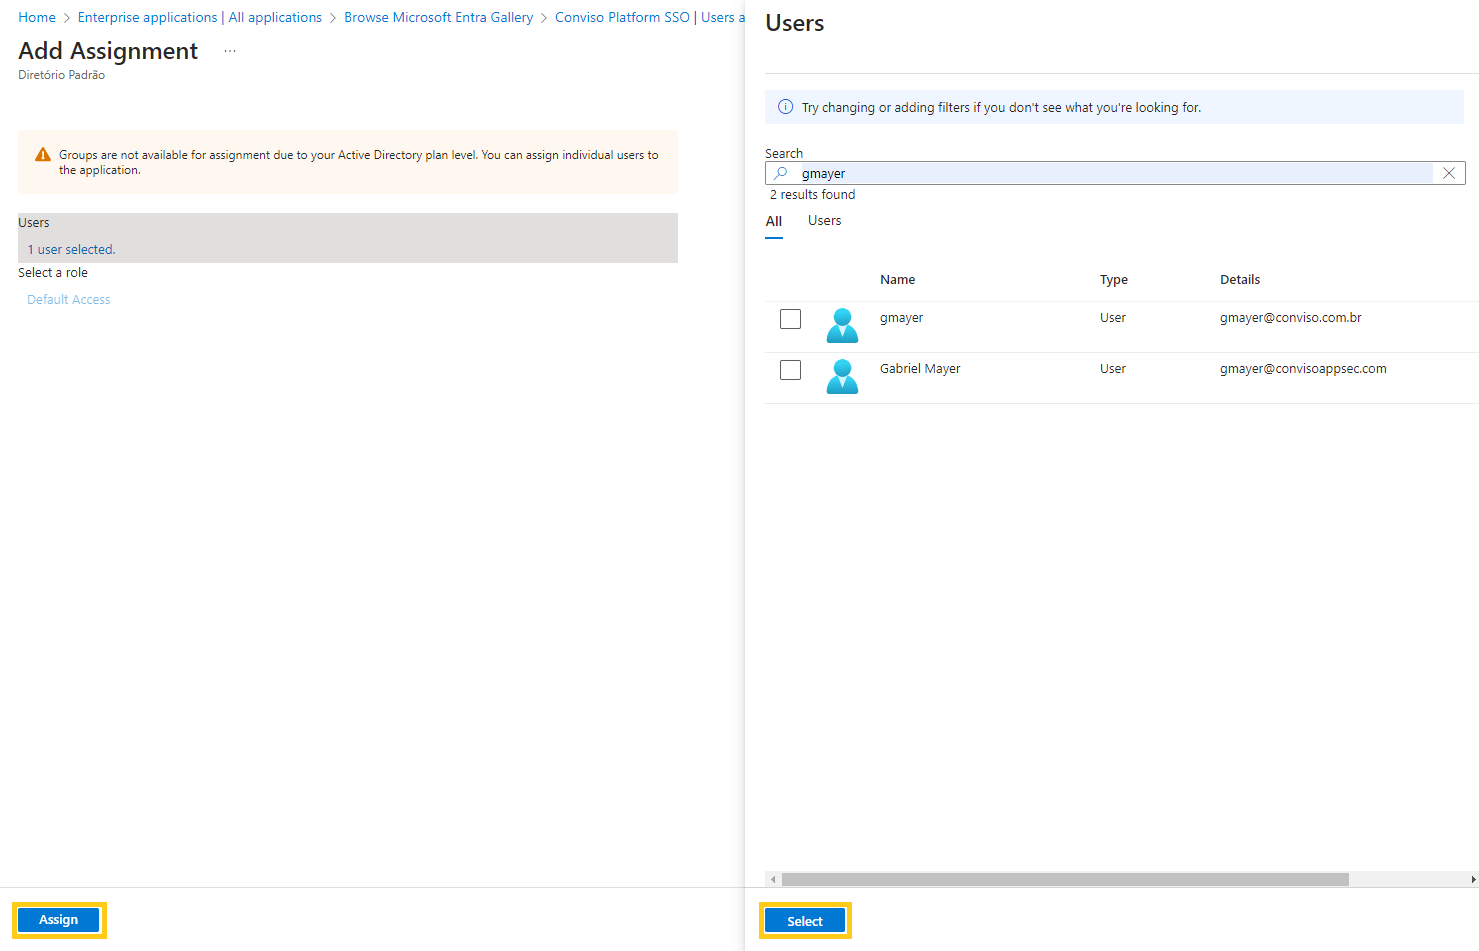
Finally, you can view the Microsoft Entra ID users with access to the Conviso Platform.
The first SSO login creates the account, so a user does not have to be invited to the Conviso Platform beforehand. What decides what they see is access: a user who arrives without an invite and without a mapped group logs in successfully and sees nothing until someone grants them access.
Setup Group Mapping Integration
To enable integration with group mapping support in Entra ID, follow the steps below:
- Within the Conviso Platform SSO application, ensure that the fields highlighted below are created.

Make sure that the claim name is mapped to the attribute corresponding to the email the user uses to log in.
Three settings on the Entra ID side decide whether group mapping works at all, and getting any of them wrong fails silently — the mapping saves, no error appears, and the user simply never joins the Team:
- The group claim has to be enabled. Under Single sign-on → Attributes & Claims, add a group claim if there is none.
- It has to be named
groups, with an empty namespace. In the group claim dialog, customize the claim name togroups. Entra ID's default name carries a Microsoft namespace, and that one the Conviso Platform does not read. - The source has to include your group types. Security groups does not emit Microsoft 365 groups. Groups assigned to the application is the safest option, and the one Microsoft recommends for large organizations, because of the limit below.
A SAML assertion carries at most 150 groups, nested groups included. Above that, a user's groups may not reach the Conviso Platform at all.
-
Assign users to the Entra ID group.
-
Create a Team in the Conviso Platform, specifying the desired Profile and Access Type for the group's users.
-
Retrieve the Entra ID group ID.
-
In the Entra ID integration page within the Conviso Platform, open the Group Mapping step, select the Team you created and associate it with the Entra ID group ID.
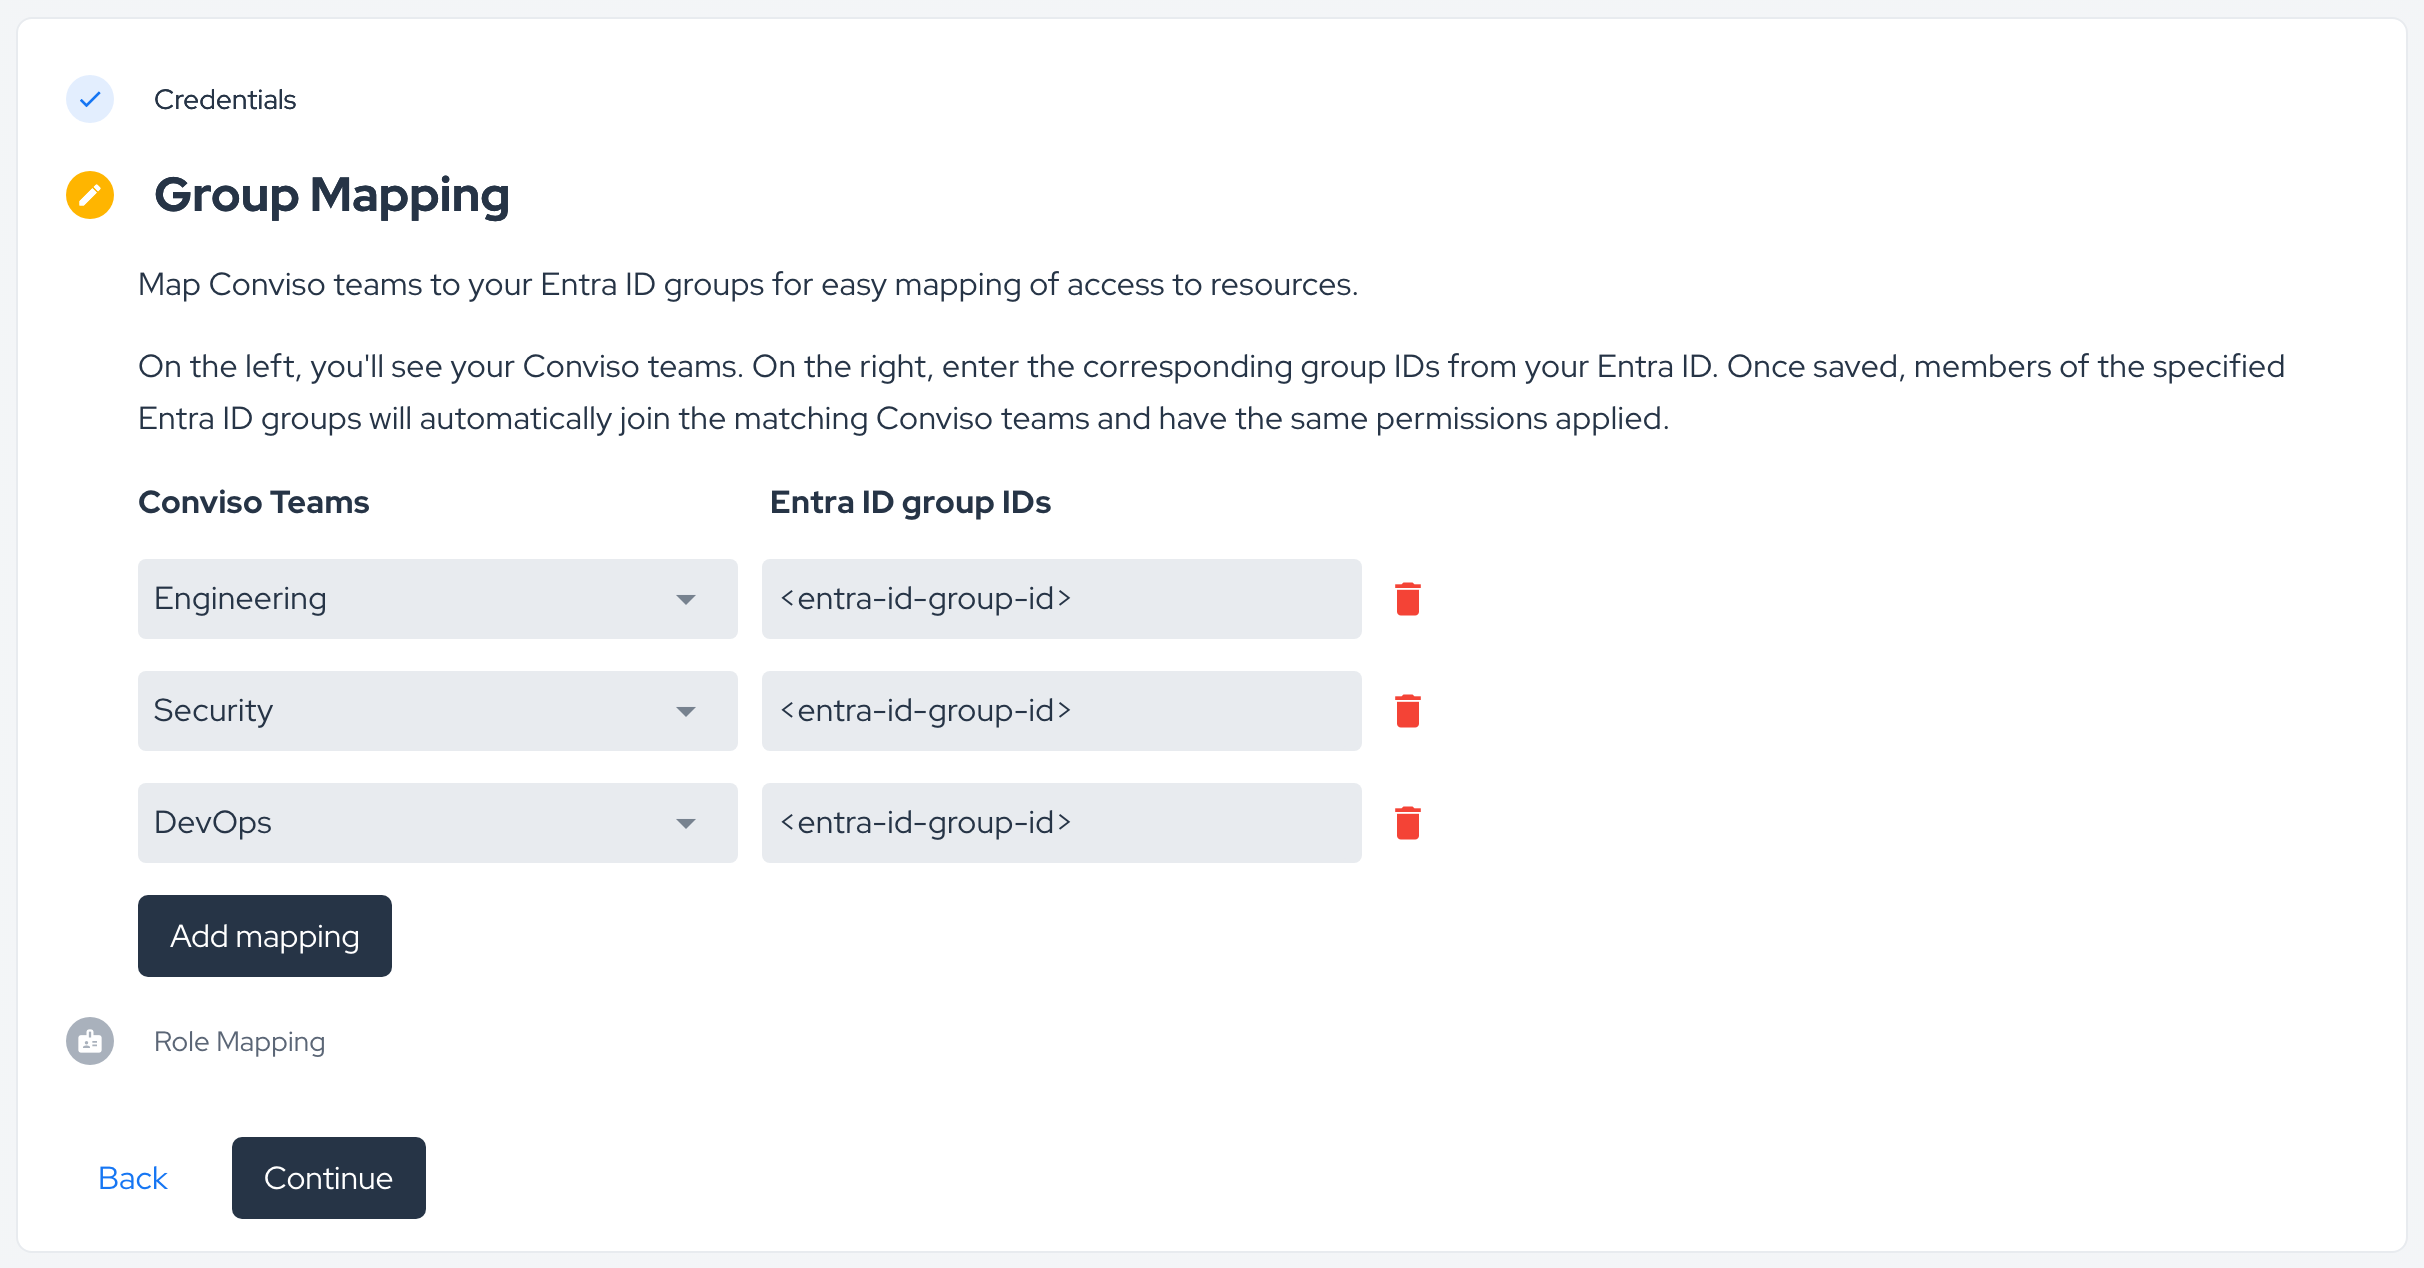
- Click Continue.
This setup simplifies user management, as permissions and access will be managed through the Team, while users are managed via Entra ID.
A user who arrives through a mapped group needs nobody to act: the Team already carries its accesses, and they apply on that first login. This only works if the groups claim actually reaches the platform — see the settings above.
Setup Role Mapping Integration
Group mapping decides which Team a user joins. Role mapping decides which access profile the user gets — that is, what they are allowed to do once inside the company. The two are independent: you can use either, or both.
Roles travel as an Entra ID App Role, so a user's profile is granted in Entra ID and applied on every login to the Conviso Platform.
On the Entra ID side
-
In the Microsoft Entra admin center, browse to Entra ID > App registrations and open the registration behind your Conviso Platform SSO application.
-
Select App roles > Create app role and create one role for each access profile you intend to grant. Fill in:
- Display name: any label — it is what appears when you assign the role.
- Allowed member types: Users/Groups.
- Value: the string that is actually sent in the assertion, and the one you will map in the Conviso Platform. Choose something stable, such as
conviso-admin. - Description: any text.
-
Go back to Enterprise applications > Conviso Platform SSO > Users and groups and assign each user (or group) to the role you created. A user with no role assigned asserts no role.
-
In Single sign-on > Attributes & Claims, add a claim:
- Name:
roles - Namespace: leave it empty
- Source: Attribute
- Source attribute:
user.assignedroles
- Name:
The claim has to be named exactly roles, with an empty namespace. Entra ID also emits App Roles under a default claim name carrying a Microsoft namespace, and that one the Conviso Platform does not read. Without the claim above, no role reaches the platform, and — once you have declared at least one mapping — every user is treated as carrying no role. See What happens on each login.
On the Conviso Platform side
-
Log in to the Conviso Platform, go to Integrations > Authentication > Entra ID and open your integration.
-
Open the Role Mapping step.
-
For each App Role, type the role Value exactly as you set it in Entra ID and select the access profile it should grant. Use Add mapping to declare more than one mapping.
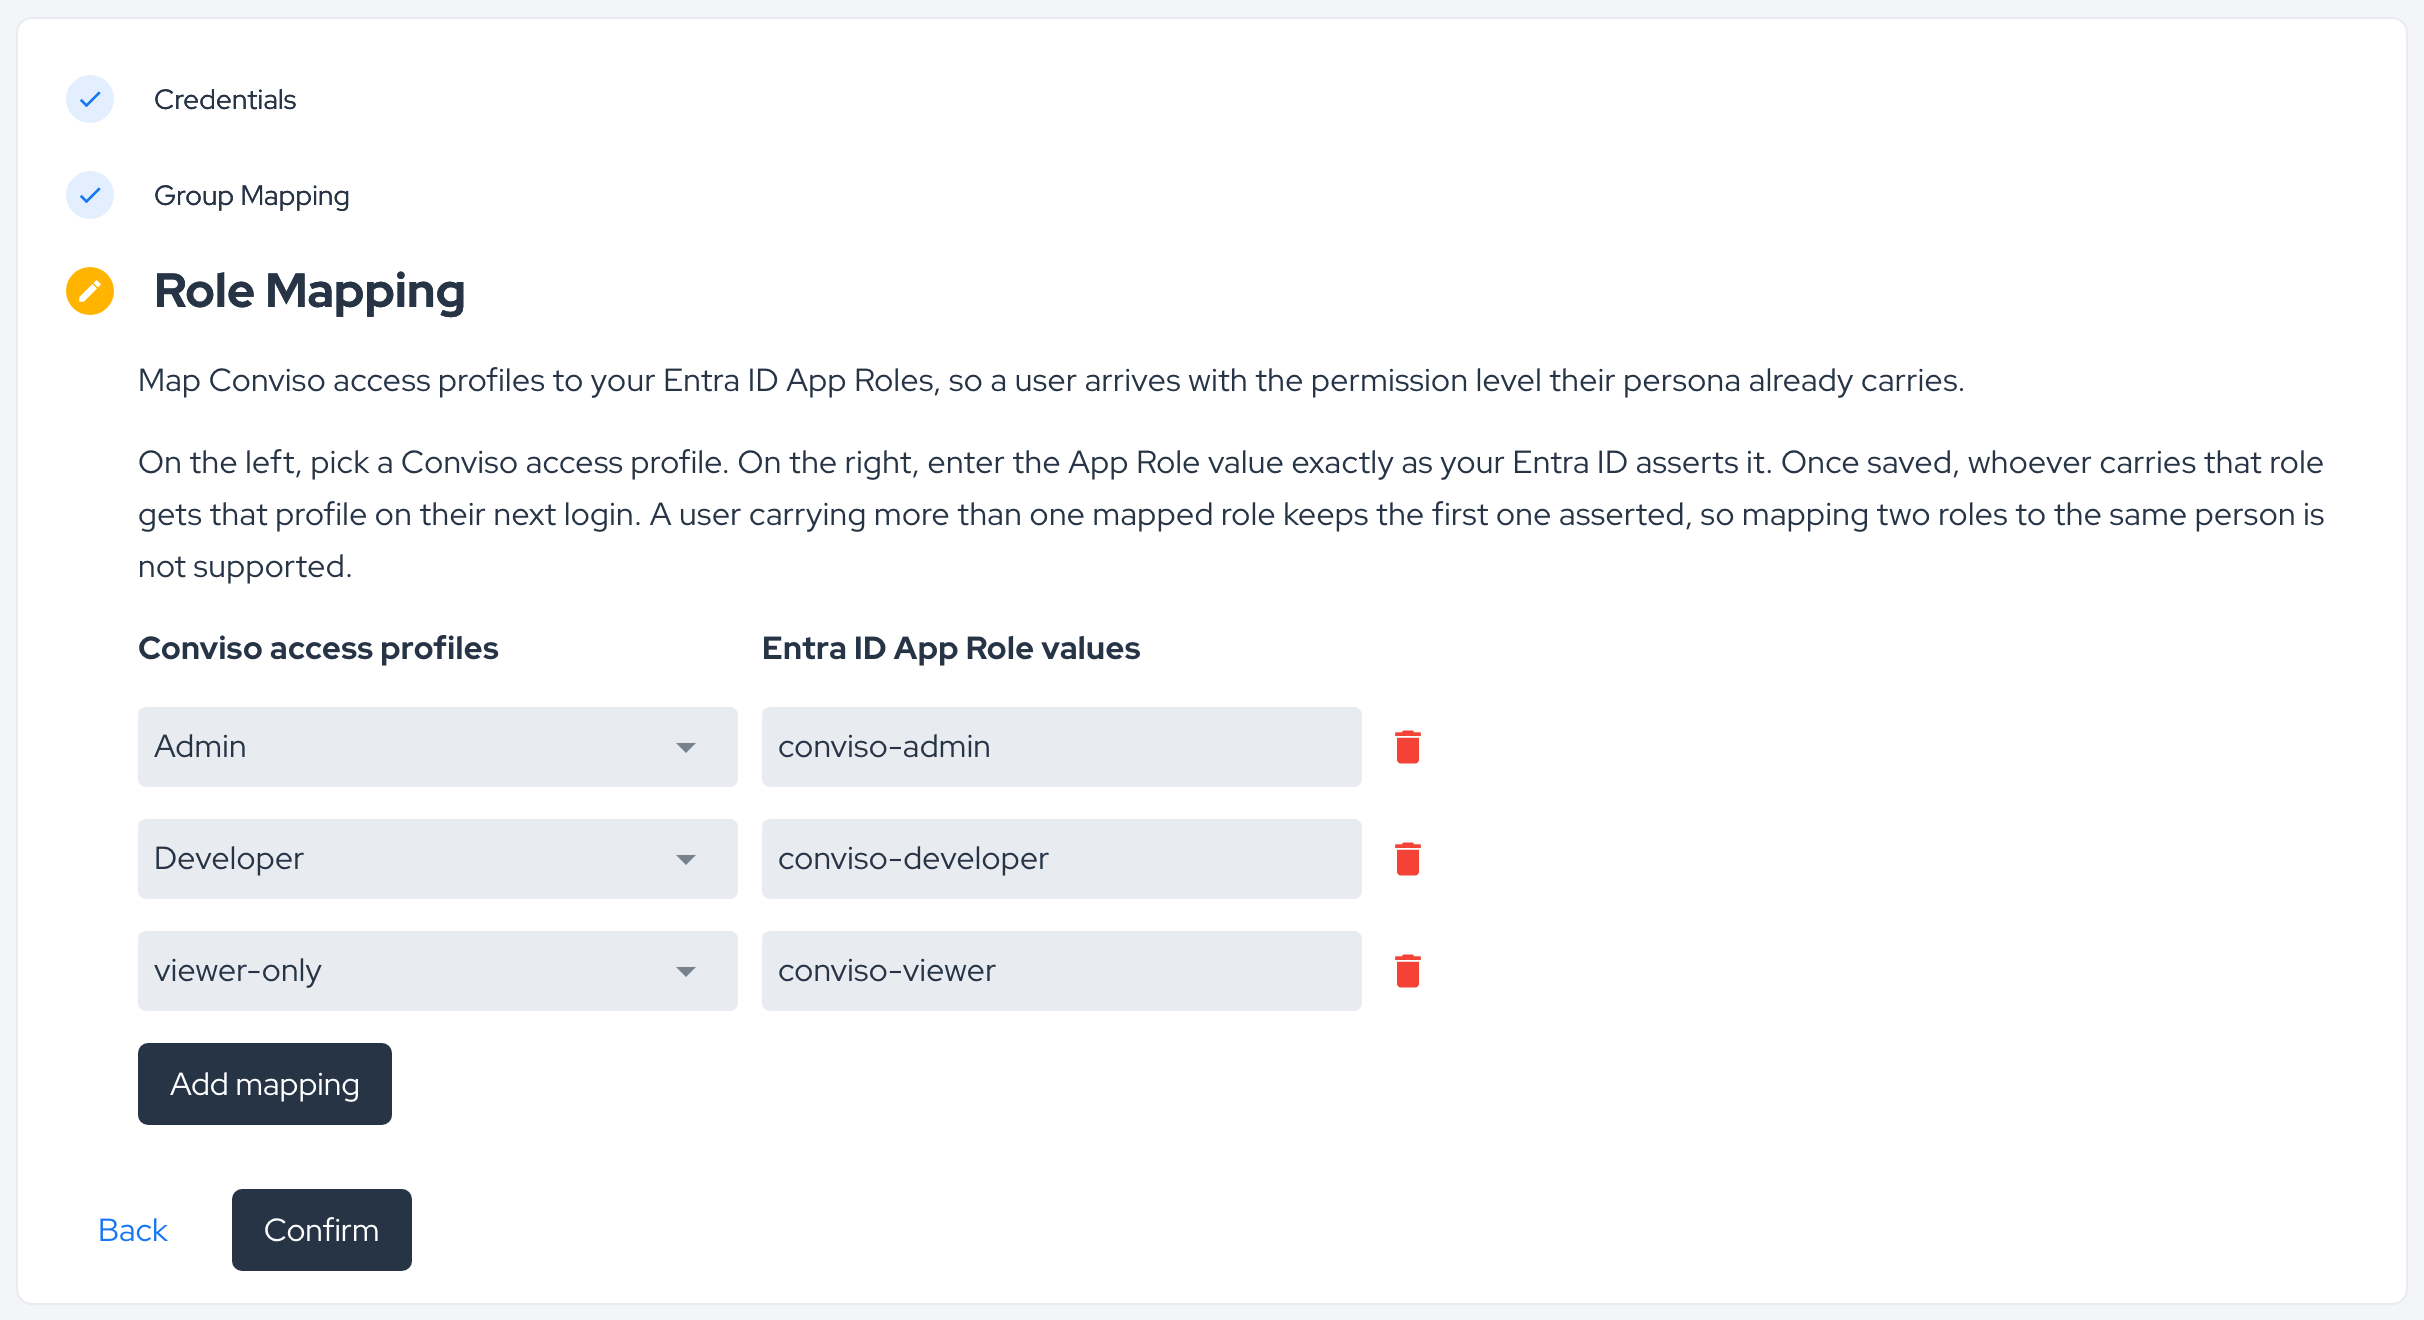
- Click Confirm.
The comparison ignores case and surrounding spaces, so Conviso-Admin matches conviso-admin. Everything else has to match character for character.
What happens on each login
Declaring the first mapping is what hands the access profiles of that company over to Entra ID. From then on, every SSO login re-evaluates the user's profile:
- A role that matches a mapping — the user gets the mapped access profile, replacing whatever profile they had.
- No role, or only roles that match nothing — the user is set to the global viewer-only profile. Profiles granted manually in the Conviso Platform do not survive the next login, so an operator who needs to override a profile has to change it in Entra ID.
- More than one matching role — one of them is applied, and there is no guarantee of which: the order of a multivalued claim is not defined, so it may differ between logins. Assign a single mapped role per user.
While a company has no mapping declared, nothing changes: access profiles keep being managed entirely in the Conviso Platform.
An access profile says what a user is allowed to do; it is not what gives them access to the company's data. That comes from an invite or from a Team the user joined through group mapping. A user mapped only by role logs in with the mapped profile and still sees nothing until they have access.
You are now ready to go. To log in again with an email from the domain specified in the integration, use the SSO Access option on the Conviso Platform website.
Note: Also consult the Microsoft Documentation for further guidance. There you will find a similar tutorial to help you.
Email Field Mapping in SAML 2.0 for Microsoft Entra ID
When configuring the Microsoft Entra ID SSO integration via SAML, it's essential to ensure that the email field is correctly mapped. The email configured in your Microsoft Entra ID identity provider must match the email of the logged-in user on the Conviso Platform to ensure proper authentication.
To do this, in the Attributes & Claims section, make sure that the name (http://schemas.xmlsoap.org/ws/2005/05/identity/claims/name) is mapped to the attribute corresponding to the email the user uses to log in:
The user.userprincipalname attribute is not mandatory. Just make sure you're using the email the user uses to log in.
How this works:
During the SSO authentication process, the email is used as the primary identifier to map the user's identity in the Conviso Platform. This means the email value provided by the Microsoft Entra ID identity provider in the SAML Assertion must match exactly with the user's email in Conviso. If it doesn't match, login may fail.
Therefore, when configuring Microsoft Entra ID as the identity provider, make sure the email field is mapped correctly and matches the email associated with the user's account in the Conviso Platform.
Support
If you have any questions or need help using our product, please don't hesitate to contact our support team.
Resources
Contribute to the Docs
Found something outdated or missing? Help us improve the documentation with a quick suggestion or edit.
How to contributeResources
By exploring our content, you'll find resources that will enhance your understanding of the importance of a Security Application Program.
Conviso Blog: Explore our blog, which offers a collection of articles and posts covering a wide range of AppSec topics. The content on the blog is primarily in English.
Conviso's YouTube Channel: Access a wealth of informative videos covering various topics related to AppSec. Please note that the content is primarily in Portuguese.