Gitlab Integration

Introduction
With Conviso Platform integrated into your Gitlab Secure CI/CD Pipeline, you can automate and streamline your security processes, ensuring that your applications undergo thorough security assessments throughout the development lifecycle.
You can run the Conviso Platform AST (Application Security Testing). The tool offers Static Application Security Testing (SAST), Software Composition Analysis (SCA), Infrastructure as Code (IaC) analysis, SBOM generation and secret detection directly on your Gitlab pipeline.
The security scans workflow is used in this integration for all execution and connection with the Conviso Platform.
Prerequisites
This integration works for both Cloud and On-Premises Gitlab solutions.
Before you can use Conviso Platform with Gitlab, you need to make sure that:
-
You have your API Key, which is a code that identifies you to Conviso Platform. Find yours using this tutorial.
-
You must also set an environment variable for the runner:
CONVISO_API_KEY. This code tells Conviso Platform which account you are using. To do this on Gitlab, you must:- Go to your project’s Settings > CI/CD and expand the Variables section.
- Select Add variable and fill in the detail.
-
After you create a variable, you can use it in the
.gitlab-ci.ymlconfiguration file or in job scripts. To make the.gitlab-ci.ymlfile, go to your repository page and click on “CI/CD Configuration”:
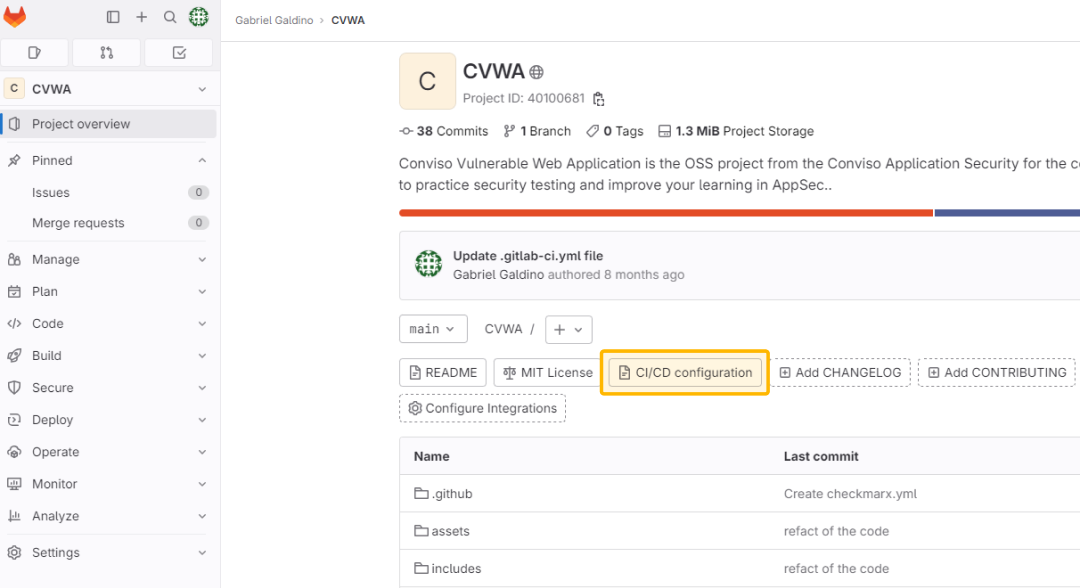
This will allow you to write the code that we will use in this tutorial!
Perform a Conviso AST scan to analyze your application's security
Harness the power of Application Security Testing (AST) by incorporating the Conviso AST scan into your application's security analysis. A single conviso ast run combines SAST, SCA, IaC, SBOM and secret analysis, providing comprehensive security coverage directly within your pipeline.
Follow the steps below to integrate it seamlessly into your pipeline, creating a comprehensive solution within your .gitlab-ci.yml file:
conviso-ast:
    image: convisoappsec/convisoast:latest
    services:
        - docker:dind
    only:
        variables:
            - $CONVISO_API_KEY
    script:
        - conviso ast run
    tags:
        - docker
The identified vulnerabilities will be automatically sent to your Project on Conviso Platform. Now you can use the Vulnerabilities resource to work on the correction flow.
Running Conviso AST with the GitLab CI/CD component
Instead of writing the job above, you can include the Conviso AST component from the GitLab CI/CD Catalog. A single component covers Static Application Security Testing (SAST), Software Composition Analysis (SCA), Infrastructure as Code (IaC), Software Bill of Materials (SBOM), secret and container scanning. To configure it, follow these steps:
- Access the GitLab CI/CD Catalog.
- Search for gitlab-ast-component or directly visit this link.
- In the project you want to scan, go to Settings → CI/CD → Variables and add
CONVISO_API_KEYwith your Conviso API Key. Mark it as Masked and Protect variable. Keep Protect on so only pipelines on protected branches (and protected tags) receive the key. - Edit your
.gitlab-ci.yml. - Configure the pipeline with the following code. Use
workflow:only when this file exists to run the scan; if you already have tests or a release job, omitworkflow:and setrules:on theconviso-astjob instead:
workflow:
  rules:
    - if: $CI_COMMIT_BRANCH == "main" || $CI_COMMIT_BRANCH == "staging"

include:
  - component: gitlab.com/convisoappsec/gitlab-ast-component/ast@1
    inputs:
      company_id: $CONVISO_COMPANY_ID
company_idmust be numeric. Replace$CONVISO_COMPANY_IDwith your company ID, or store that ID as a CI/CD variable that expands to digits. Adjust the pipeline settings below to your workflow.- Save it and run the pipeline.
Pipeline Settings: the component itself needs only company_id plus CONVISO_API_KEY — everything around it is a starting point you should adapt:
workflow.rules: Use this in a scan-only.gitlab-ci.yml.mainandstagingare an example, so use your own protected branches. Withoutworkflow:, GitLab starts a pipeline on every branch.- Merge request pipelines: add
- if: $CI_PIPELINE_SOURCE == "merge_request_event"toworkflow.rulesin a scan-only file, or toconviso-astrules:in an existing pipeline. - Other jobs in the same file: do not add
workflow:— it decides whether the pipeline exists. Limit the scan withrules:on theconviso-astjob after the include. - Feature branches: protect those refs (for example a
feature/*wildcard) so the protected API key is available, or use a separate lower-privilege key. Do not unprotect the company key.
Field Descriptions:
CONVISO_API_KEY: Your Conviso API Key. It is a CI/CD variable, not a component input. Store it masked and protected.company_id: Your numeric company ID in the Conviso Platform.scan_types: Which scan types to run —sast,sca,iac,sbom,secret,container. Optional; leave it empty to run all of them. If you list onlycontainerwithoutimage_name, the job fails.image_name: The image analyzed by thecontainerscan (e.g.myorg/app:$CI_COMMIT_SHA). The scan job must be able to pull it. For a private registry, set the project CI/CD variableDOCKER_AUTH_CONFIG— adocker loginin another job does not reach this one.baseline_ref: Branch, tag, or commit to compare against so only what changed is scanned, such asmainor$CI_MERGE_REQUEST_TARGET_BRANCH_NAME. Optional. The component already clones withGIT_DEPTH: "0".asset_id: Pins the scan to a specific asset, skipping the automatic lookup by repository URL. Optional; use it if a scan stops with an asset ambiguity error.
Expected Behaviors:
- Branch association: The scan is recorded against the branch the pipeline is for. In a merge request pipeline, this is the branch the merge request is coming from, so its findings are not filed under the target branch.
- Findings never fail the pipeline: The job fails only when a scan or an upload fails. Add
allow_failure: trueon theconviso-astjob if you do not want even that to stop the pipeline. - Session archive: Every run writes a zip with the raw output of each scan (including secret-scanner matches) and the debug log under
/tmp. It is not a job artifact. That zip is what Conviso support asks for — publish it with anartifacts:overlay onconviso-astonly then.
The component requires a Linux x64 runner that can pull convisoappsec/convisoast. Shared runners on GitLab.com qualify. The image is published for linux/amd64 only.
Running the Conviso Containers
To perform the Conviso Containers, you can use the example configuration below:
conviso-containers:
  image: convisoappsec/convisoast:latest
  services:
    - docker:dind
  variables:
    CONVISO_COMPANY_ID: <YOUR_COMPANY_ID>
  only:
    variables:
      - $CONVISO_API_KEY
  script:
    - export DOCKER_BUILDKIT=1
    - export IMAGE_NAME="my-image"
    - export IMAGE_TAG="latest"
    - docker pull $IMAGE_NAME:$IMAGE_TAG
    - docker build -t $IMAGE_NAME:$IMAGE_TAG .
    - conviso container run "$IMAGE_NAME:$IMAGE_TAG"
If you'd like to scan a public image available on DockerHub, modify the configuration as shown below:
conviso-containers:
  image: convisoappsec/convisoast:latest
  services:
    - docker:dind
  variables:
    CONVISO_COMPANY_ID: <YOUR_COMPANY_ID>
  only:
    variables:
      - $CONVISO_API_KEY
  script:
    - export IMAGE_NAME="vulnerables/web-dvwa"
    - export IMAGE_TAG="latest"
    - docker pull $IMAGE_NAME:$IMAGE_TAG
    - conviso container run "IMAGE_NAME:$IMAGE_TAG"
These are only examples. You are required to provide the image for scanning, and you can use alternative methods based on your environment.
The IMAGE_NAME and IMAGE_TAG are variables that should be adjusted based on your project. For example, you may want to name the image after your project or version it differently.
Run a scan exclusively using Conviso SAST
The steps below will show you what your .gitlab-ci.yml must have to perform Static Application Security Testing (SAST):
conviso-sast:
    image: convisoappsec/convisoast:latest
    services:
        - docker:dind
    only:
        variables:
            - $CONVISO_API_KEY
    script:
        - conviso sast run
    tags:
        - docker
Alternatively, you can scan only what changed against a baseline, by setting BASELINE_REF (a branch or ref) or BASELINE_COMMIT (an exact commit):
conviso-sast:
    image: convisoappsec/convisoast:latest
    services:
        - docker:dind
    variables:
        GIT_DEPTH: "0"
    only:
        variables:
            - $CONVISO_API_KEY
    before_script:
        - export BASELINE_COMMIT=`git rev-parse @~1`
    script:
        - conviso sast run
GIT_DEPTH: "0" gives the job the full history, without which the baseline commit is not in the clone.
Run a scan exclusively using Conviso SCA
The steps below will show you what your .gitlab-ci.yml must have to perform Software Composition Analysis (SCA):
conviso-sca:
    image: convisoappsec/convisoast:latest
    services:
        - docker:dind
    only:
        variables:
            - $CONVISO_API_KEY
    script:
        - conviso sca run
    tags:
        - docker
Importing and Synchronizing Assets from External Scanners
Integrating the Conviso Platform with external scanners such as Checkmarx, Fortify, or Dependency-Track allows for automated asset import and synchronization. This ensures that your Conviso Platform remains up-to-date with the latest scan results. To configure this behavior, follow these steps:
- Access the GitLab CI/CD Catalog.
- Search for Sync External Scans with Conviso or directly visit this link.
- In the project that will run the sync, go to Settings → CI/CD → Variables and add
CONVISO_API_KEYwith your Conviso API Key. Mark it as Masked and Protect variable. Keep Protect on so only pipelines on protected branches (and protected tags) receive the key. - Edit your
.gitlab-ci.yml. - Configure the pipeline with the following code:
include:
  - component: gitlab.com/convisoappsec/gitlab-sync-component/sync@1
    inputs:
      company_id: 'your-company-id'
      integration: 'FORTIFY' # or 'DEPENDENCY_TRACK' or 'CHECKMARX'
      project_id: 'external-tool-project-id'
- Save it and run the pipeline.
If this pipeline also uploads the scan (Dependency-Track, Fortify, and similar), set stage (or needs in your YAML) so conviso-sync runs after that upload. Otherwise a fast pipeline can synchronize the previous run's results.
Field Descriptions:
CONVISO_API_KEY: Your Conviso API Key. It is a CI/CD variable, not a component input. Store it masked and protected.company_id: Your company ID in the Conviso Platform.project_id: The project ID from the external scanner (e.g., Fortify, Checkmarx, Dependency-Track).integration: The name of the integration as specified in Conviso's GraphQL schema (e.g.,FORTIFY,CHECKMARX,DEPENDENCY_TRACK). UseSALT_SECURITYfor Salt Security.repository_url: The repository this scan belongs to. Optional; it defaults to the GitLab project the pipeline runs in — see Repository and branch below. Not sent forSALT_SECURITY.branch: The branch this scan covers. Optional; it defaults to the branch that triggered the run.subproject_path: Folder inside the repository this scanner project covers (monorepo). Optional; only sent together with a repository URL. Use a distinct path per include when two scanner projects share the same repository and branch.
Outputs: the job writes CONVISO_SYNC_ASSET_ID and CONVISO_SYNC_ASSET_NAME to conviso-sync.env in the job workspace. That file is not a job artifact. Later jobs do not see those variables unless you publish the dotenv on conviso-sync after the include.
Expected Behaviors:
- Importing a New Project: If the external scanner's project does not exist in the Conviso Platform, it will be imported as a new asset.
- Synchronizing an Existing Project: If the project already exists in the Conviso Platform, it will be synchronized to update its data.
In both scenarios, the process is triggered by the pipeline and executed asynchronously. You can monitor the progress directly within the respective asset on the Conviso Platform.
Repository and branch
The component also reports which repository and which branch the run is for. Both are optional inputs, and both are filled in from the pipeline when you leave them empty, so the usual setup needs no extra YAML:
| Input | Where it comes from when left empty |
|---|---|
repository_url | The GitLab project the pipeline is running in (CI_PROJECT_URL). Omitted for SALT_SECURITY. |
branch | The branch that triggered the run. On a merge request pipeline, this is the branch the merge request is merging into, not the source branch. Tag pipelines do not send a branch unless you set branch. |
Setting repository_url (or leaving the default) attaches the scan to that repository. The Asset
keeps the scanner project name; it is not renamed to org/repo. The branch input only takes
effect together with a repository URL — on its own, Conviso Platform ignores the branch.
In a merge request pipeline the reported branch is the merge request's target branch, so findings from that run are recorded against the branch you are merging into. If your target is the repository's default branch, those findings count towards its risk score before the code is merged.
GitLab only creates a merge request pipeline if the project enables it (Settings → Merge
requests, or workflow:rules in your .gitlab-ci.yml). The component does not inject
workflow:. Without that, the job runs on the branch pipeline and records the source ref as if it
were a push.
Set the branch input explicitly if you want a merge request run recorded somewhere else.
A Branch without a Repository URL is discarded — the platform only records branches for repositories. The job warns you in the pipeline log when that happens, and the run still succeeds.
A fork pipeline uses the fork's CI_PROJECT_URL. If the group API key is inherited, that run can
create a second Asset for the same scanner project. Restrict the job in your YAML, for example
if: $CI_PROJECT_PATH == "org/repo". Do not unprotect the company key.
The asset this job reports to becomes — or joins — the repository at that address, and the findings appear under the branch above. See Repositories and Branches.
Support
If you have any questions or need help using our product, please don't hesitate to contact our support team.
Contribute to the Docs
Found something outdated or missing? Help us improve the documentation with a quick suggestion or edit.
How to contributeResources
By exploring our content, you'll find resources that will enhance your understanding of the importance of a Security Application Program.
Conviso Blog: Explore our blog, which offers a collection of articles and posts covering a wide range of AppSec topics. The content on the blog is primarily in English.
Conviso's YouTube Channel: Access a wealth of informative videos covering various topics related to AppSec. Please note that the content is primarily in Portuguese.