Azure DevOps AST Orchestrator
The Conviso Platform Azure DevOps AST Orchestrator runs Conviso AST from one Azure Pipeline (the orchestrator). Application repositories do not need a Conviso pipeline of their own.
When an eligible pull request is merged, Conviso triggers that pipeline and passes the target repository and branch. The job obtains a short-lived clone credential from the Platform (using your API key), clones the target repository, runs conviso ast run, and sends findings to the mapped asset.
You do not store a PAT or map System.AccessToken for clone — only CONVISO_API_KEY.
How it works
What Conviso checks before dispatching:
- The event is a pull request that was merged.
- AST scans on merge is enabled on the Azure DevOps integration.
- The repository is an imported asset that is enabled.
- The PR destination branch matches the configured merge target (see Merge target branch below).
The pipeline always appears on the orchestrator project (not on the application repository).
Execution costs: Pipelines run in your Azure Pipelines environment and consume your Azure Pipeline runtime.
Before you begin
Work in this order: Azure DevOps setup first, then Conviso Platform.
You need:
- Azure DevOps ALM integration connected (OAuth), with repositories imported as assets.
- The Microsoft account that connected the integration has Edit subscriptions on each Azure project you scan (Service Hooks for merged pull requests). Consent in Microsoft Entra is not enough — see Service hook permissions.
- At least one application repository imported as an asset and enabled.
- A dedicated orchestrator repository (or an empty repo you will use only for this).
- Permission to create pipelines and set pipeline variables on the orchestrator.
- A Conviso API key for the same environment you will scan against (production or staging).
| Term | Exact meaning |
|---|---|
| Orchestrator pipeline | Azure Pipeline whose YAML is azure-pipelines.yml. Conviso triggers this pipeline only. |
| Target repository | Application repo imported as an asset. It must not rely on a local Conviso pipeline for this flow. |
| Ref | Branch or tag of the orchestrator where Azure loads azure-pipelines.yml when Conviso starts the run. |
| Merge target branch | The PR destination branch on the target repo that is allowed to trigger a scan (for example main). See below. |
| Asset | Imported repository in Conviso where findings are stored. |
Merge target branch
Conviso compares the merged PR’s destination branch to:
- The asset’s configured AST / branch mapping, if set; otherwise
- The integration Ref (
orchestrator_ref).
| Configuration | What triggers a scan |
|---|---|
Asset branch = master, Ref = main | Only merges into master on that asset |
Asset branch empty, Ref = main | Only merges into main on that asset |
| Asset branch empty and Ref empty | No branch filter (any destination branch can trigger). Prefer setting Ref explicitly. |
Ref is still the orchestrator branch that holds azure-pipelines.yml. It is reused as the default merge-target filter when the asset has no branch of its own. Those are two roles of the same field — do not confuse “where the YAML lives” with “any branch on the target”.
Part 1 – Azure DevOps setup
Step 1 – Create the orchestrator repository
- Create an Azure DevOps repository (recommended name:
conviso-ast-orchestrator). - Choose the branch that will contain the YAML (almost always
main). That value is what you will set as Ref in Conviso.
Step 2 – Add azure-pipelines.yml
On the orchestrator branch you will set as Ref (usually main):
- Create
azure-pipelines.ymlat the repository root. - Paste the YAML below. It is the template to use, including the parameters Conviso sends on each run. Do not copy an older file that wraps the job in
container:— that form fails on current hosted agents with the Alpine image.
parameters:
  - name: repo_full_name
    type: string
    default: ""
  - name: branch
    type: string
    default: ""
  - name: commit_sha
    type: string
    default: ""
  - name: pr_number
    type: string
    default: ""
  - name: api_url
    type: string
    default: "https://api.convisoappsec.com"
  - name: company_id
    type: string
    default: ""
  - name: asset_id
    type: string
    default: ""
  - name: scan_run_id
    type: string
    default: ""
  - name: repo_url
    type: string
    default: ""

trigger: none
pr: none

variables:
  - name: CONVISO_COMPANY_ID
    value: ""
  - name: CONVISO_AST_IMAGE
    value: convisoappsec/convisoast:latest

pool:
  vmImage: ubuntu-latest

# The Conviso AST image is Alpine. Azure container jobs (`container:`) run
# Node-based tasks inside that image and break on current hosted agents, so
# steps run on the host and call the image with `docker run`.
steps:
  - checkout: none

  - script: docker pull "$(CONVISO_AST_IMAGE)"
    displayName: Pull Conviso AST image

  - script: |
      set -euo pipefail
      if [ -z "${REPO_FULL_NAME}" ] || [ -z "${BRANCH}" ]; then
        echo "##vso[task.logissue type=error]repo_full_name and branch are required"
        exit 1
      fi

      export CONVISO_API_URL="${API_URL:-https://api.convisoappsec.com}"
      CONVISO_API_URL="${CONVISO_API_URL%/}"
      case "$CONVISO_API_URL" in
        https://app.convisoappsec.com)
          export CONVISO_API_URL="https://api.convisoappsec.com"
          ;;
        https://staging.convisoappsec.com)
          export CONVISO_API_URL="https://api.staging.convisoappsec.com"
          ;;
      esac

      export CONVISO_REPO_FULL_NAME="$REPO_FULL_NAME"
      case "${ASSET_ID:-}" in
        ""|none|0) unset CONVISO_ASSET_ID || true ;;
        *) export CONVISO_ASSET_ID="$ASSET_ID" ;;
      esac
      case "${SCAN_RUN_ID:-}" in
        ""|none|0) unset CONVISO_SCAN_RUN_ID || true ;;
        *) export CONVISO_SCAN_RUN_ID="$SCAN_RUN_ID" ;;
      esac

      umask 077
      TOKEN=$(docker run --rm --entrypoint "" \
        -e CONVISO_API_KEY -e CONVISO_API_URL -e CONVISO_REPO_FULL_NAME \
        -e CONVISO_ASSET_ID -e CONVISO_SCAN_RUN_ID \
        "$(CONVISO_AST_IMAGE)" \
        conviso-ast-repository-token --provider azure_devops)
      echo "##vso[task.setvariable variable=REPO_TOKEN;issecret=true]$TOKEN"
      echo "##vso[task.setvariable variable=CONVISO_API_URL]$CONVISO_API_URL"
    displayName: Get repository token
    env:
      CONVISO_API_KEY: $(CONVISO_API_KEY)
      API_URL: ${{ parameters.api_url }}
      REPO_FULL_NAME: ${{ parameters.repo_full_name }}
      ASSET_ID: ${{ parameters.asset_id }}
      SCAN_RUN_ID: ${{ parameters.scan_run_id }}
      BRANCH: ${{ parameters.branch }}

  - script: |
      set -euo pipefail
      # Prefer repo_url from the platform (asset.repo_url). Azure webhooks send
      # project/repo while clone needs org/project/repo — reconstructing from
      # repo_full_name alone is unreliable.
      REMOTE_URL=$(python3 -c '
      import base64, json, os, urllib.request
      from urllib.parse import urlsplit, urlunsplit

      token = os.environ["REPO_TOKEN"]
      repo_url = (os.environ.get("REPO_URL") or "").strip()
      repo_full_name = (os.environ.get("REPO_FULL_NAME") or "").strip()

      def strip_auth(remote: str) -> str:
          parts = urlsplit(remote)
          host = parts.hostname or ""
          if parts.port:
              host = f"{host}:{parts.port}"
          return urlunsplit((parts.scheme, host, parts.path, parts.query, parts.fragment))

      if repo_url:
          print(strip_auth(repo_url))
          raise SystemExit(0)

      parts = repo_full_name.split("/")
      if len(parts) == 3:
          org, project, repo = parts[0], parts[1], "/".join(parts[2:])
          print(strip_auth(f"https://dev.azure.com/{org}/{project}/_git/{repo}"))
          raise SystemExit(0)

      if len(parts) != 2:
          raise SystemExit(f"repo_full_name must be organization/repository. Got: {repo_full_name!r}")

      org, repo = parts
      req = urllib.request.Request(
          f"https://dev.azure.com/{org}/_apis/git/repositories?api-version=7.1",
          headers={"Authorization": "Basic " + base64.b64encode((":" + token).encode()).decode()},
      )
      with urllib.request.urlopen(req, timeout=60) as resp:
          data = json.load(resp)
      matches = [r for r in data.get("value", []) if r.get("name") == repo]
      if not matches:
          raise SystemExit(f"Azure returned no repository named {repo!r} in org {org!r}")
      if len(matches) > 1:
          raise SystemExit(
              f"Multiple Azure repositories named {repo!r} in org {org!r}; "
              "platform must send repo_url"
          )
      print(strip_auth(matches[0]["remoteUrl"]))
      ')

      rm -rf target
      git init target
      cd target
      git remote add origin "$REMOTE_URL"
      if [ -n "${COMMIT_SHA:-}" ]; then
        git -c http.extraheader="AUTHORIZATION: bearer ${REPO_TOKEN}" fetch --depth=50 origin "$COMMIT_SHA"
        git checkout -B "$BRANCH" "$COMMIT_SHA"
      else
        git -c http.extraheader="AUTHORIZATION: bearer ${REPO_TOKEN}" fetch --depth=50 origin "$BRANCH"
        git checkout -B "$BRANCH" FETCH_HEAD
      fi
    displayName: Clone target repository
    env:
      REPO_FULL_NAME: ${{ parameters.repo_full_name }}
      REPO_URL: ${{ parameters.repo_url }}
      BRANCH: ${{ parameters.branch }}
      COMMIT_SHA: ${{ parameters.commit_sha }}
      REPO_TOKEN: $(REPO_TOKEN)

  - script: |
      set -euo pipefail
      mkdir -p "$(Build.ArtifactStagingDirectory)"
      export CONVISO_API_URL="${NORMALIZED_BASE_URL}"
      export CONVISO_COMPANY_ID="${PARAM_COMPANY_ID:-$VAR_COMPANY_ID}"
      export CONVISO_BRANCH="$BRANCH"
      case "${ASSET_ID:-}" in
        ""|none|0) unset CONVISO_ASSET_ID || true ;;
        *) export CONVISO_ASSET_ID="$ASSET_ID" ;;
      esac
      case "${SCAN_RUN_ID:-}" in
        ""|none|0) unset CONVISO_SCAN_RUN_ID || true ;;
        *) export CONVISO_SCAN_RUN_ID="$SCAN_RUN_ID" ;;
      esac
      # docker.sock: container scan (Trivy). Azure CI env vars: build URL in alerts.
      docker run --rm --entrypoint "" \
        -v "$(System.DefaultWorkingDirectory)/target:/src" -w /src \
        -v "$(Build.ArtifactStagingDirectory):/out" \
        -v /var/run/docker.sock:/var/run/docker.sock \
        -e CONVISO_API_KEY -e CONVISO_API_URL -e CONVISO_COMPANY_ID \
        -e CONVISO_BRANCH -e CONVISO_ASSET_ID -e CONVISO_SCAN_RUN_ID \
        -e TF_BUILD -e SYSTEM_TEAMFOUNDATIONCOLLECTIONURI -e SYSTEM_TEAMPROJECT -e BUILD_BUILDID \
        "$(CONVISO_AST_IMAGE)" \
        conviso ast run --repository-dir . --output /out/conviso-ast-session.zip
    displayName: Run Conviso AST
    env:
      CONVISO_API_KEY: $(CONVISO_API_KEY)
      NORMALIZED_BASE_URL: $(CONVISO_API_URL)
      PARAM_COMPANY_ID: ${{ parameters.company_id }}
      VAR_COMPANY_ID: $(CONVISO_COMPANY_ID)
      ASSET_ID: ${{ parameters.asset_id }}
      SCAN_RUN_ID: ${{ parameters.scan_run_id }}
      BRANCH: ${{ parameters.branch }}

  - task: PublishBuildArtifacts@1
    condition: succeededOrFailed()
    displayName: Upload session log
    inputs:
      PathtoPublish: $(Build.ArtifactStagingDirectory)
      ArtifactName: conviso-ast-session
- Commit and push to that Ref branch.
trigger: none/pr: noneare intentional — Conviso starts the run; Azure must not auto-trigger on every push.- Do not use a job-level
container:with the Alpineconvisoastimage. Hosted agents run Node-based tasks inside that container and fail (node16/node24missing). Call the image withdocker runas in the template. - Do not add
variables: - group: ...to this YAML. The API key is a pipeline variable (Step 4), not a Library variable group.
Step 3 – Create the pipeline and copy its ID
- Open Pipelines → New pipeline.
- Select the repository that holds
azure-pipelines.yml. - Choose Existing Azure Pipelines YAML file, select the Ref branch and
/azure-pipelines.yml, then Continue. - Save the pipeline (you can skip the first run).
Copy the pipeline ID from the browser address bar:
https://dev.azure.com/my-org/my-project/_build?definitionId=42
The number after definitionId= (here 42) is the Orchestrator pipeline ID you will paste into Conviso.
Step 4 – Add CONVISO_API_KEY on the pipeline
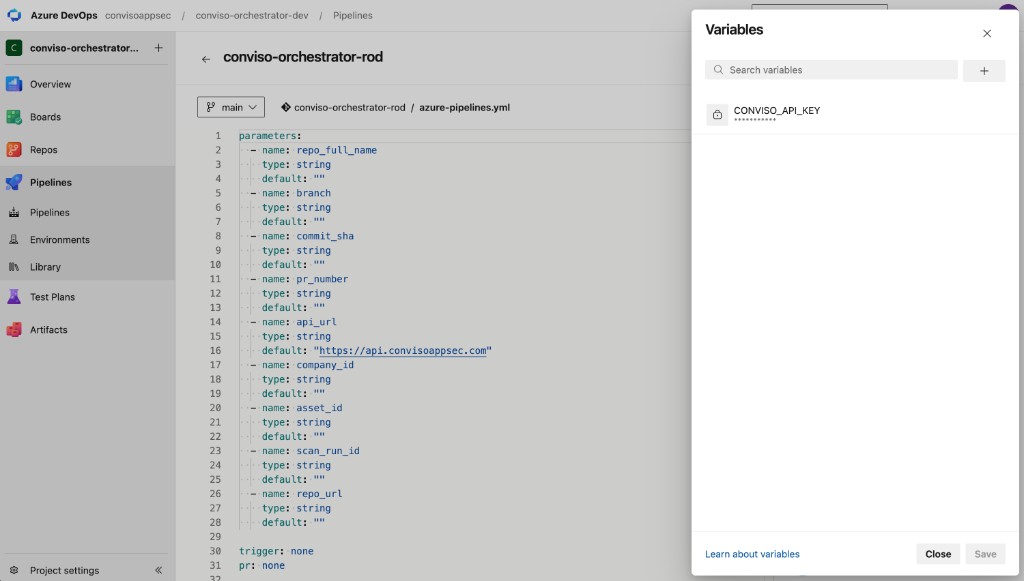
On the orchestrator pipeline you just created — Edit → Variables on that pipeline, not Pipelines → Library:
- Open the pipeline and click Edit.
- Click Variables (top right of the YAML editor, next to Run).
- Stay on the Pipeline variables tab. Do not open Variable groups and do not create a group under Pipelines → Library.
- Add:
| Name | Secret? | Required |
|---|---|---|
CONVISO_API_KEY | Yes (keep this value secret) | Yes |
Use the API key for the same Conviso environment as the Platform you configured (production vs staging).
You may add CONVISO_COMPANY_ID on the same Variables screen. The job uses it only when the company_id parameter is empty (typical for a manual Run pipeline). When Conviso dispatches after a merge, it sends company_id, so this fallback is not required for Platform-triggered runs.
Do not add an Azure DevOps PAT for clone. The job calls conviso-ast-repository-token --provider azure_devops, and the Platform returns the integration’s OAuth credential for that run.
Pipeline variable CONVISO_API_KEY under Edit → Variables (not Library).
Part 2 – Conviso Platform setup
Step 5 – Configure the orchestrator
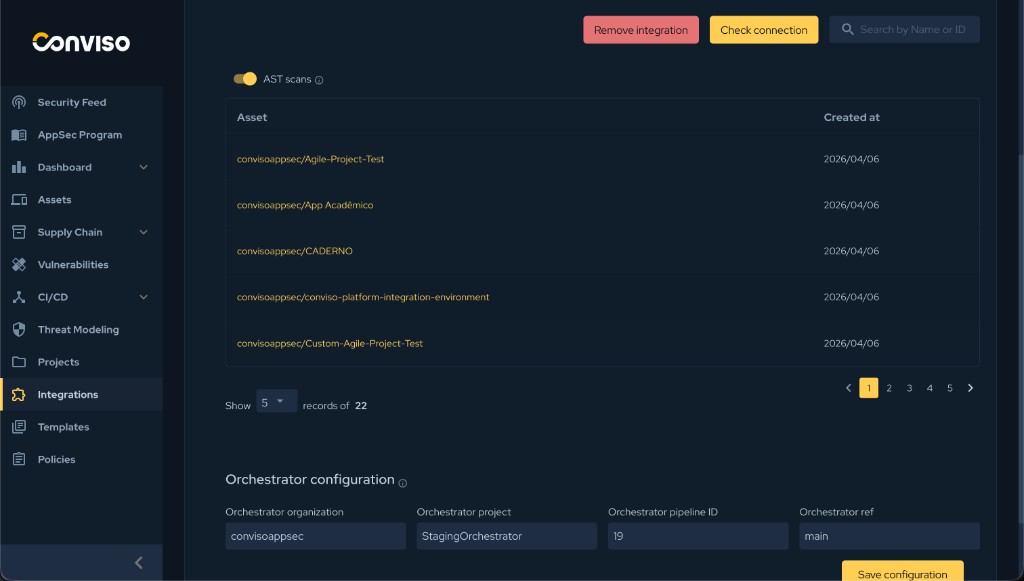
- Open Integrations → Azure DevOps → Configuration (or Orchestrator configuration).
- Turn AST scans on merge on.
- Under Orchestrator pipeline, fill:
| Field | What to enter | Where to find it |
|---|---|---|
| Orchestrator organization | Azure DevOps organization, e.g. my-org | First path segment of https://dev.azure.com/my-org/... |
| Orchestrator project | Project that contains the orchestrator pipeline | Second path segment of the same URL |
| Orchestrator pipeline ID | The number from Step 3, e.g. 42 | definitionId= in the pipeline URL |
| Orchestrator ref | Branch holding the YAML — usually main | Same branch from Step 1. Conviso prefixes plain values with refs/heads/; a tag must be written as refs/tags/<tag> |
- Save.
Step 6 – Assets and merge target
- Confirm each application repository is imported and enabled.
- Set the asset branch mapping when the merge target is not the same as Ref (example: Ref
mainon the orchestrator, merges intomasteron the asset → map the asset tomaster). - If the asset has no branch mapping, merges must go into the branch named by Ref (or any branch only if Ref is also empty — avoid that setup).
End-to-end flow (after setup)
- Developer merges a PR into the configured merge target on an imported, enabled asset.
- Conviso validates the event and configuration, then starts the orchestrator pipeline on the Ref branch.
- Template parameters include the repository, branch, and related ids Conviso needs for the run.
- Job steps: issue repository token → clone target → run
conviso ast run→ upload session artifact. - Findings appear on the asset in Conviso Platform.
- In Azure DevOps, open the orchestrator pipeline run to inspect logs.
Validation checklist
| Check | Expected |
|---|---|
| Variable | CONVISO_API_KEY exists as a secret pipeline variable on the orchestrator |
| Path | azure-pipelines.yml is on the Ref branch |
| Conviso | Organization + project + pipeline ID + Ref saved; AST scans on merge on |
| Asset | Target repo imported, enabled; merge target branch matches mapping or Ref |
| After merge | New pipeline run on the orchestrator; findings (or a clean result) on the asset |
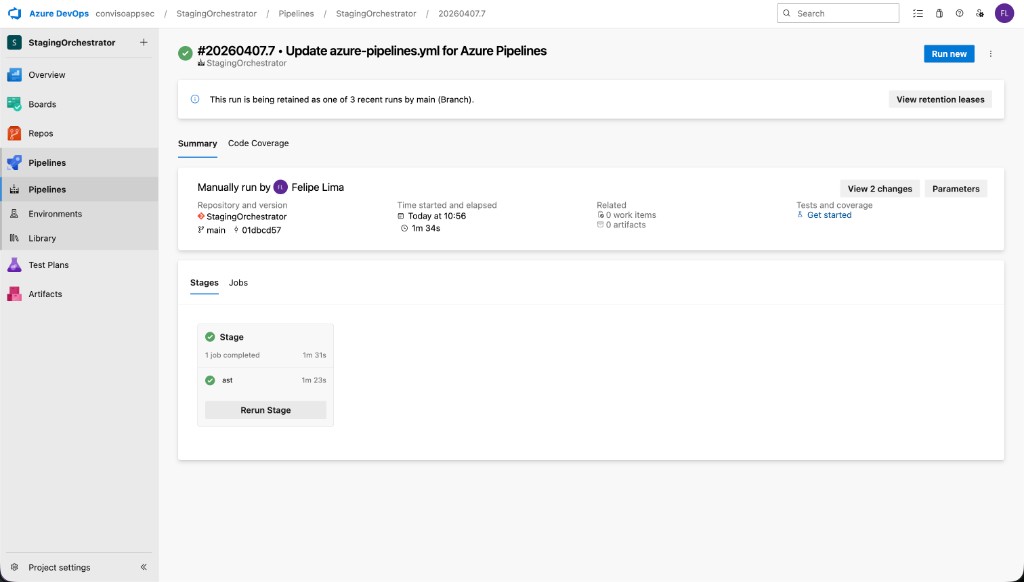
Manual test (optional): on the orchestrator, Run pipeline. Set repo_full_name and branch for an imported asset. Leave api_url as the default for production (https://api.convisoappsec.com). Set company_id or define the pipeline variable CONVISO_COMPANY_ID.
Troubleshooting
| Symptom | Cause / fix |
|---|---|
| Merge done, no pipeline | AST scans on merge off; organization/project/pipeline ID/Ref incomplete; asset disabled or not imported; PR destination ≠ asset branch / Ref; connecting user lacks Edit subscriptions so no Service Hook was registered (details) |
Repository is not available for this API key | Wrong environment (CONVISO_API_KEY vs api_url); Azure integration not authorized; asset not imported/enabled for that company |
| Unreadable / HTML response from Platform | Use the production API host (https://api.convisoappsec.com). The template remaps https://app.convisoappsec.com automatically |
exec .../node16/bin/node: no such file (or node24) on first script step | Job-level container: with the Alpine image. Use the template above (docker run on the host) — do not wrap the job in container: |
Initialize containers / docker exec fails | Same cause: remove job-level container: and follow the docker run template |
CONVISO_API_KEY empty / unauthorized | Confirm the secret is a pipeline variable (Edit → Variables). A Library / variable group is not enough unless the YAML also references that group — this template does not |
Scanner missing CONVISO_COMPANY_ID | Manual run without company_id and without pipeline variable CONVISO_COMPANY_ID |
| Wrong code scanned | Merge target / branch mismatch; confirm you merged into the configured destination branch |
Migrating from System.AccessToken or ADO_GIT_PAT
- Replace the orchestrator YAML with the template in Step 2.
- Keep only
CONVISO_API_KEYas a secret pipeline variable (removeADO_GIT_PATand anySystem.AccessTokenmapping). - Re-run a manual test with
repo_full_nameandbranchset to an imported asset.
Related guides
Contribute to the Docs
Found something outdated or missing? Help us improve the documentation with a quick suggestion or edit.
How to contributeResources
By exploring our content, you'll find resources that will enhance your understanding of the importance of a Security Application Program.
Conviso Blog: Explore our blog, which offers a collection of articles and posts covering a wide range of AppSec topics. The content on the blog is primarily in English.
Conviso's YouTube Channel: Access a wealth of informative videos covering various topics related to AppSec. Please note that the content is primarily in Portuguese.