Repositories and Branches
Overview
In the repository model, one asset represents one repository, and every branch of that repository is tracked inside it.
Previously, each branch of the same codebase was registered as a separate asset. Three branches of the same service meant three assets, three risk scores and three independent vulnerability lists, with no built-in way to tell that they were the same application.
With the repository model:
- One asset = one repository, registered with the address you use to clone it.
- Every branch is listed inside the repository, with its own open vulnerabilities.
- Vulnerabilities and scans show which branch they came from.
- The repository's risk score reflects its default branch, so the number you track is the risk of the code you actually ship.
Assets created before the repository model become repositories when your scans report a repository address and a branch; anything left over is combined with the help of the Conviso team. Always report both — see How Your Assets Become Repositories.
Do I Need to Do Anything?
There is nothing for you to turn on. The repository model does not have a setting in your account, and no migration runs on your side. If Repositories is not listed under Inventory > Assets yet, ask Conviso Support where your account stands.
What is worth doing is making sure your pipelines report what the model needs, and that the branch the platform will measure is the branch you actually ship.
Where you need to act
| Situation | What to do |
|---|---|
| Your pipeline does not report a repository address and a branch | Act now. Without both, the consolidation either does not happen or lands on a branch you did not declare — with no error to tell you |
| The same codebase is registered under two addresses that do not look alike — the HTTPS and the SSH form on Azure DevOps, say, or a browser URL | Standardize on one address now: addresses that differ in host or path become two separate repositories |
| More than one asset carries the same repository address | Act now. With two or more candidates nothing is consolidated on its own, and the case has to go to the Conviso team |
| Your production branch is not the one marked as default | Adjust it before the first scan — see Setting the Branch That Represents Production |
| You report the risk score upward | Note the current numbers first: the score starts following the default branch alone |
Does it break anything?
What does not change:
- The id of the asset. Ids of assets that became branches keep resolving permanently — in the interface, in the API and in your integrations.
- Your findings, with their status, comments, assignees and history.
- Your defect-tracker links, bookmarks and deep links.
- Your pipelines and scanner integrations, which keep reporting without being edited.
What does change:
- The risk score reflects the default branch alone, and the repository's open-vulnerability counters — the list column and the Details card — no longer add up every branch.
- Dashboards, the Repositories export and the Security Gate follow the default branch; the vulnerability list and the export made from it still show every branch. See What Each Screen Shows.
- Rows that used to be separate assets collapse into a single repository row.
- Business Impact, Data Classification and Attack Surface of the assets that were absorbed are dropped — review them on the repository afterwards.
Before You Start
What your pipeline has to report
Two values, and both are required: the repository address and the branch.
A scan that reports the repository address without a branch — or a branch without the address — does not consolidate the way you expect, and nothing tells you so: there is no error and no warning. Depending on the path, nothing is consolidated at all, or the repository ends up measuring a branch you never declared.
There is no minimum version enforced by the platform. What matters is capability, not version: whatever reports your scans has to be able to send both values. If you use a Conviso task or plugin in your pipeline, check that it is on a version that offers repository and branch fields.
The GitHub Sync Task action, the GitLab Sync component and the Azure DevOps Sync task (also in graph mode) fill both in from the pipeline context by default, and are a good reference for what the equivalent fields look like elsewhere. For scanner integrations, each one asks for the repository and most ask for a branch — see Importing projects from a scanner integration.
The access you need
No new permission is introduced. The permissions you already use on assets cover branches:
| What you want to do | What you need |
|---|---|
| See a repository's branches | The same access that lets you see the asset |
| Set as default, Rename branch, Delete branch, New Branch | Update permission on Asset — and the asset must not be archived |
| Register a repository | Create permission on Asset |
| Have a scan consolidate an asset you already had | Permission on that asset: Update, and Delete when an existing repository absorbs it |
| Combine repositories, or split one back into separate assets | Conviso Support — this is not an action available in your account |
Those two permissions are worth checking against the credentials your pipeline uses: without them the scan does not consolidate, it creates a separate entry — with no error. If you would rather not grant them to a pipeline key, ask Conviso Support to consolidate instead.
Checking that it worked
After the first pipeline run:
- The repository is listed under Inventory > Assets > Repositories.
- The Git URL on the Details tab is filled in, and does not read Not Defined.
- The chip under the repository name shows the branch you consider production.
- The branch your pipeline reported appears on the Branches tab, and no branch you never declared is sitting there as the default. Either sign points to a scan that reported the address without the branch.
- With the Branch column enabled on the vulnerability list, new findings show the branch they came from.
Finding Your Repositories
You will find the list under Inventory > Assets > Repositories in the left menu, alongside Cloud, FQDN and API. Each row is one repository, and can hold branches.
Each row displays:
- The repository name, with the default branch shown as a chip below it, and the repository's Git URL when one is recorded.
- The risk score, open vulnerabilities, business impact, scanners, integrations, teams and last updated columns you already know. Tags is available too, hidden by default — turn it on in the table's column settings.
- A
N branchesbadge when the repository has more than one branch. The count includes the default branch.
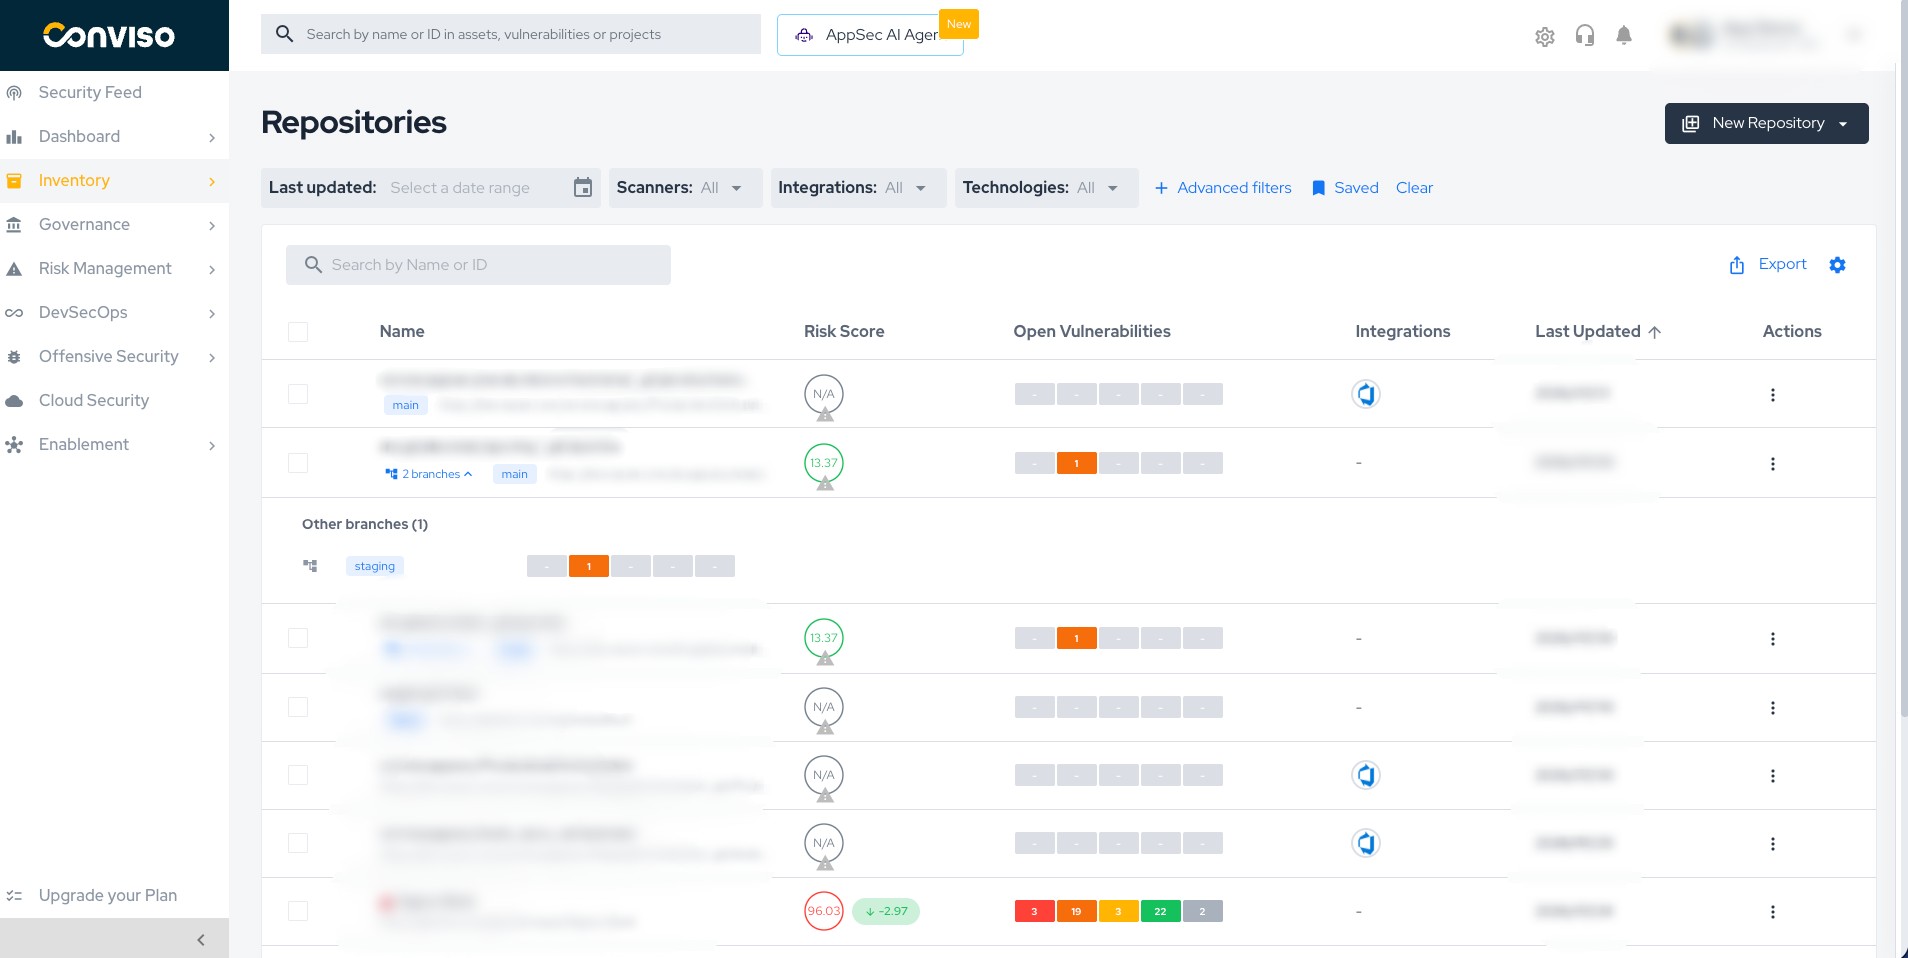
The risk score and open vulnerabilities on the row are those of the repository's default branch, not the sum of all its branches — the other columns describe the repository as a whole.
This is why a repository row can show 12 open vulnerabilities while the Vulnerabilities list filtered by that repository returns 30: the other 18 are on non-default branches, fully visible but not part of the headline number. See What Each Screen Shows.
Seeing a repository's branches
Click the N branches badge to expand the row and see the repository's other branches —
the default branch is not repeated in the expansion. Each branch shows its name and its open
vulnerabilities, broken down by severity.
The expansion is read-only, and clicking anywhere else on the row opens the repository as usual.
Filtering by branch
Open Advanced filters above the list. There are two branch filters and they do different things:
- On the Basic tab, the Branch field does not change which repositories are listed.
It filters the branches you see when you expand a row: type
releaseand each expanded repository shows only its branches whose name containsrelease. Upper and lower case are ignored here. - On the Advanced tab, add a rule on Branch to narrow the list itself — only
repositories that have a branch matching the rule are returned. Use
containsto match part of a name, oris/is notto match it exactly, and combine the rule with the other asset filters. This match is case-sensitive.
Inside a Repository
Opening a repository shows the same detail page you already use, with repository-specific information added. The header displays the repository name and its creation and update dates, and the page is organized into tabs:
| Tab | Content |
|---|---|
| Details | Risk score, risk parameters, open vulnerabilities, a Details card (integrations, scanners, technology, SBOM and the repository's Git URL), tags, description, developers and accesses |
| Branches | The repository's branches and the actions available on them |
| CI/CD | Scan configuration and recent scans |
| Projects | Projects linked to the repository |
The Branches tab is shown for repositories only. An asset that has not become a repository yet keeps the Details, CI/CD and Projects tabs.
The repository's Git URL appears on the Details tab, inside the Details card, as a link that opens the repository in a new tab. When no URL is recorded the field shows Not Defined.
The risk score and the open vulnerabilities on the Details tab are those of the repository's default branch — the same numbers shown on the default branch's row in the Branches tab. Manage your vulnerabilities opens the vulnerability list already filtered by the default branch, so the two views agree.
The Branches tab
The Branches tab lists every branch of the repository with:
- Branch — the branch name, with a
defaultpill on the default branch. - Open Vulnerabilities — the open findings of that branch, broken down by severity.
- Actions — the actions available for the branch.
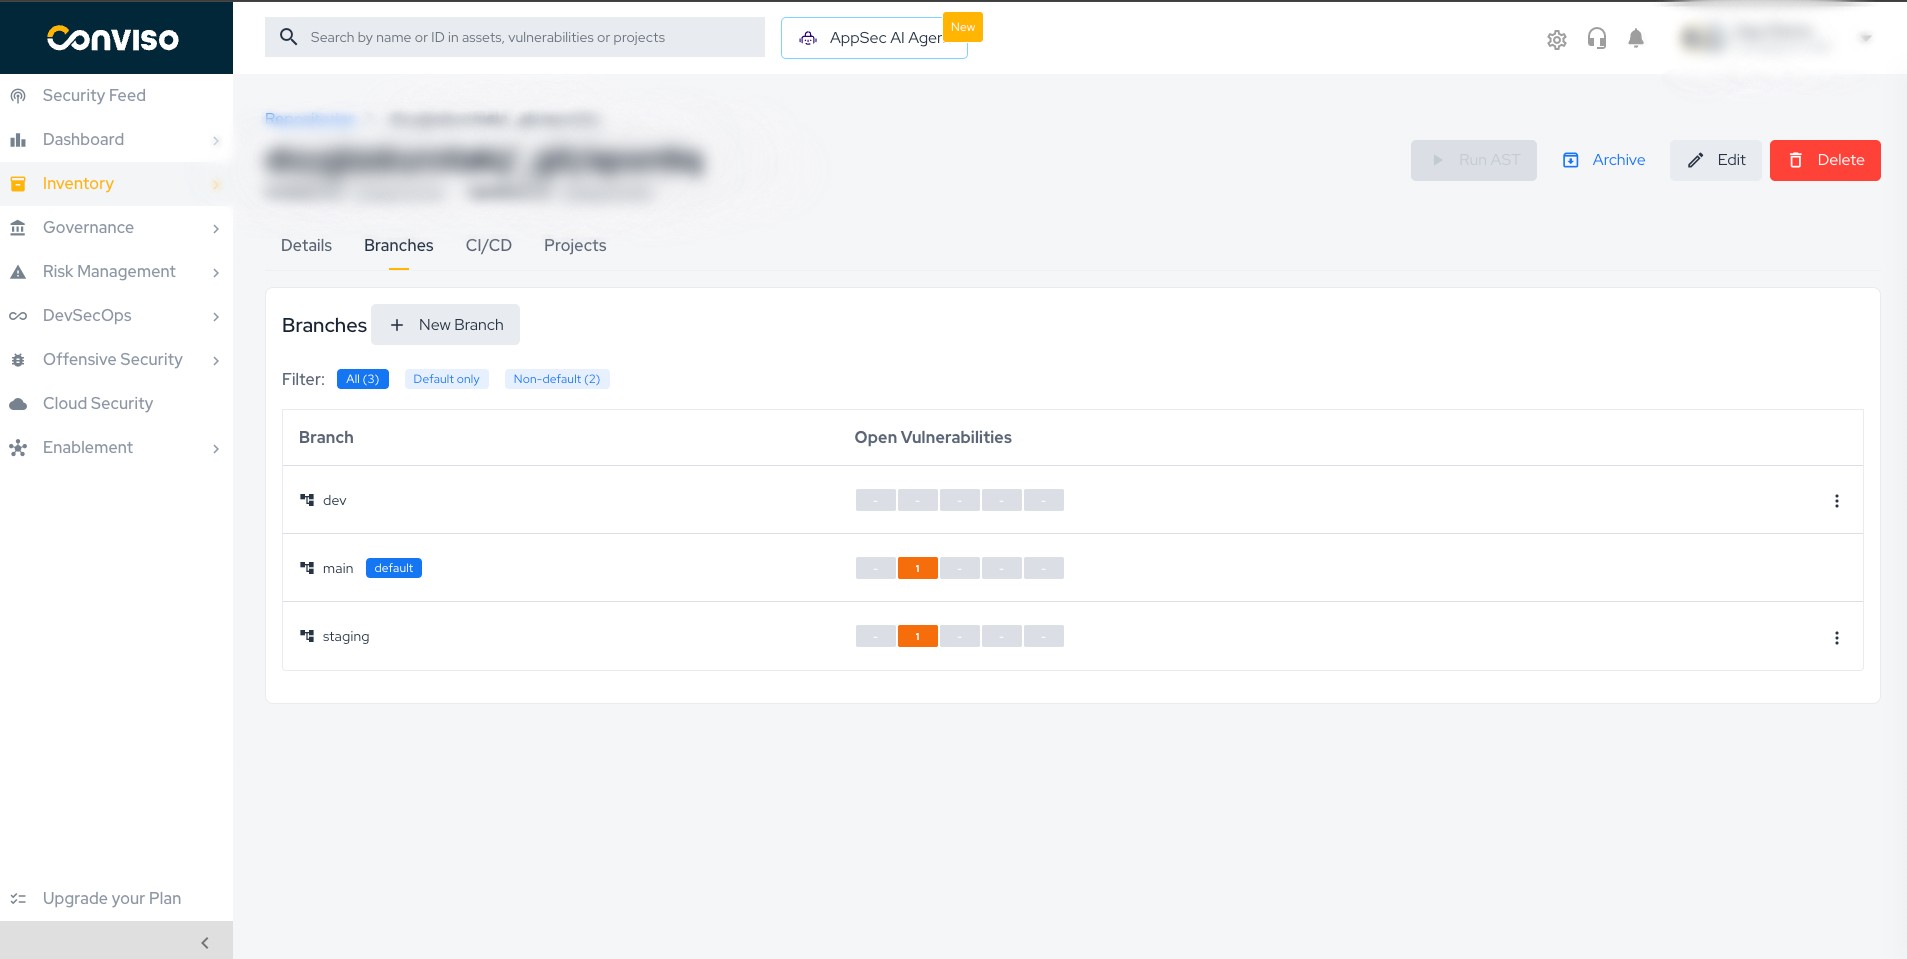
Use the All / Default only / Non-default filters above the table to narrow the list.
Branches appear on their own the first time something reports them, so the tab fills up as your pipelines run. New Branch, next to the table title, is there for when you want to track a branch before anything has reported it.
Branch names are case-sensitive, exactly as in Git: main and Main are two different
branches. Adding a branch that is already listed does not duplicate it.
Registering a Repository
When you create a repository, the form asks for the Repository URL — the address you use to
clone it, for example https://github.com/org/repo. The field is required.
The https:// is optional — github.com/org/repo is accepted and read as an https address. What
the field does need is the host, the organization and the repository: github.com/org, with the
repository missing, is rejected as an invalid URL.
The Asset Name is suggested automatically from the URL as org/repo. The field is required —
the suggestion simply fills it in for you, and you can replace it with any name you prefer.
Repository names do not have to be unique in your account.
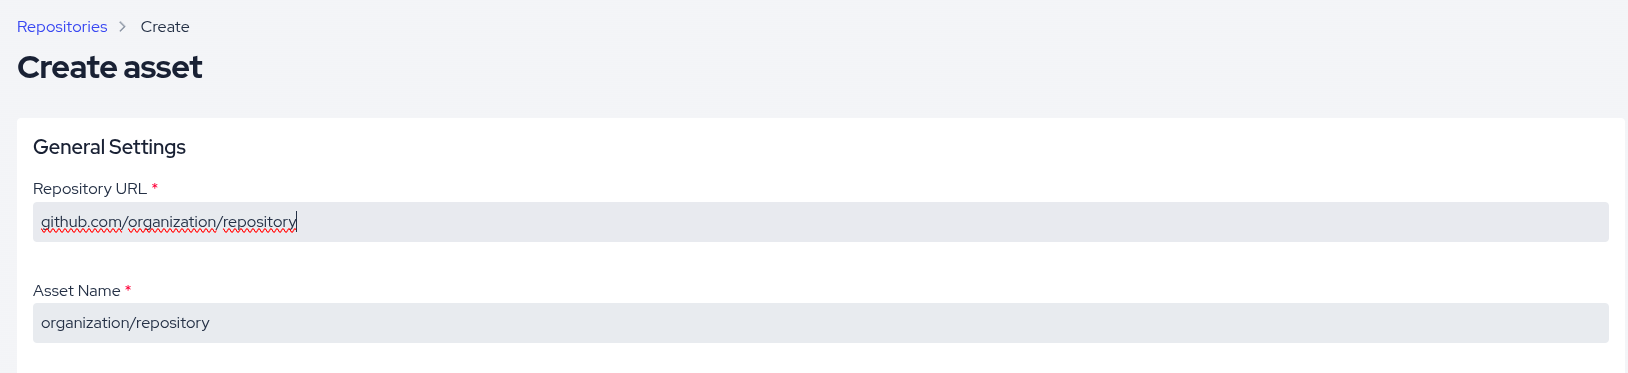
The address in your browser usually carries extra segments — .../tree/main, .../-/tree/main,
.../pull/42, .../blob/main/README.md. An address like that registers a separate entry that
your scans will never reach: it stays at risk score 0 with no findings, while your real results go
somewhere else.
The quickest tell is the Asset Name the form suggests while you type: for a correct URL it
reads org/repo. If it reads something like tree/main, you pasted a browser URL.
Pick one address per repository and use it everywhere — when you create the asset, when you import projects from a scanner and when you configure a defect tracker. Some Git servers publish an HTTPS address and an SSH address that do not look alike, Azure DevOps being the common case; registering both leaves you with two separate entries for the same codebase.
If the Repository URL you entered already belongs to a repository in your account, the repository is not created — the form fails to save and nothing is stored. The screen reports a generic save error, so if you see one right after entering a Repository URL, the most likely cause is that the repository is already registered. Search the Repositories list for its name or its Git URL and open the existing entry.
The Asset Name field is always shown, for repositories and for older assets alike. The Repository URL field appears when you edit any asset, including older assets that do not have one yet.
When editing, the Repository URL can be updated: the repository then follows the new address, and future scans are matched to it. If that URL already belongs to another repository in your account, the change is refused and nothing is saved.
Setting the Branch That Represents Production
The repository's risk score follows its default branch, so the default branch should be the branch you actually ship.
A repository you create by hand starts with a single branch named main. If your production
branch has another name, adjust it before or right after the first scan:
| Situation | What to do |
|---|---|
Nothing has been scanned yet and only main is listed | Rename it to your real branch name, so your scans report to that branch instead of creating a second one |
| Your real branch is already listed because a scan reported it | Open its actions menu and choose Set as default |
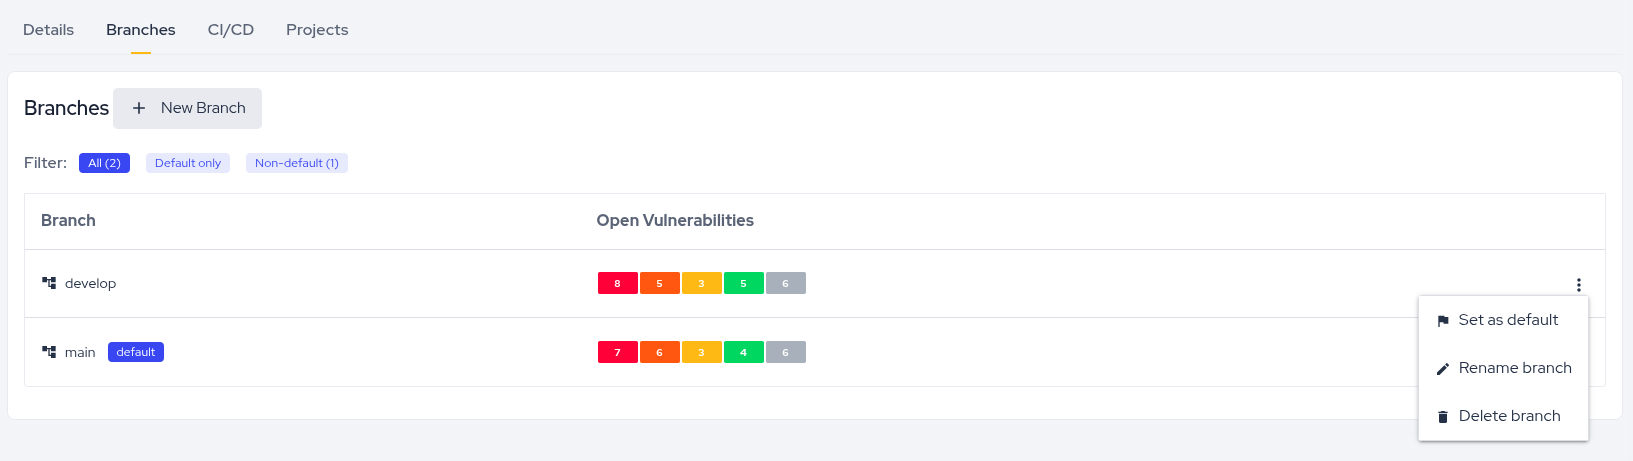
Setting the default branch
Select Set as default in a branch's actions menu, then provide a reason — the field is required.
Changing the default branch recalculates the repository's risk score, because the repository's risk always follows the default branch. The change raises a notification of its own, so whoever follows the repository sees why the number moved — default-branch changes made by Conviso while consolidating an account are not notified, so ask Conviso Support for the repository's default-branch history if a score moved and no notification explains it.
The open-vulnerability counters switch immediately; the recalculated score appears on the Details tab a few minutes later, so do not repeat the change if the number has not moved yet.
A default-branch change can move the score without your security posture having changed — you changed which code is being measured. Take note of the score before the change if you report it upward.
If you need the history of default-branch changes for a repository, ask Conviso Support.
Renaming a branch
Select Rename branch to change a branch's name. Renaming does not move any finding, does not change which branch is the default, and does not change the risk score.
A branch can only be renamed while nothing has been recorded on it — once a pipeline has reported to it, scanners rely on the name to reach the right branch, and the option is no longer offered in its actions menu. The branch the platform starts you with is the exception: you can always rename it to your real branch name.
Deleting a branch
Select Delete branch and confirm.
Deleting a branch also deletes the vulnerabilities, the scans and the scan history that belong to that branch — including a scan still running on it, which is cancelled.
The effect goes beyond the branch: those findings disappear from the vulnerability list, from the exports and retroactively from the dashboard charts. This cannot be undone from your account.
Use it to remove branches that no longer exist in your repository, not to tidy up the list view. The default branch cannot be deleted — set another branch as default first.
Vulnerabilities by Branch
Which branch a finding appears on
Findings appear under the branch your scan reported, whether they came from Conviso AST, a CI/CD pipeline, a scanner integration or a file upload. A branch that is not listed yet appears the first time it is reported.
The same issue detected on main and on release/2.0 is tracked as two findings, one per
branch, so each branch keeps its own list, its own status and its own history. A finding stays on
its branch: fixing it on a feature branch closes it there, and the one on the default branch
closes when the default branch is scanned after the merge.
Findings on assets that are not repositories — cloud, domain or API assets — have no branch.
The Branch column
The vulnerability list has a Branch column, placed right after Asset. The column is hidden by default — enable it in the table's column settings.
A dash appears when the finding has no branch: assets that are not repositories, and assets that have not been consolidated into a repository yet.
Filtering by branch
Open the vulnerability filters and use the branch field to filter findings by branch name. The filter is global: it works across all repositories, so a branch name that exists in several repositories returns the findings of all of them.
The name must match exactly: the match is case-sensitive (Main is not main), it matches
the whole name (release does not match release/2.0), it takes one name at a time, and a name
that matches no branch returns an empty list rather than the unfiltered one.
Branch on the vulnerability detail
On a vulnerability's detail page, the Affected Assets card shows the branch next to the asset, so the origin of the finding is visible without going back to the list.
Reporting a vulnerability manually
A vulnerability you create by hand is recorded on the repository's default branch, so it counts towards the repository's risk score like any other finding.
Where the form offers a Branch field, you can point the finding at another branch instead. The field is enabled once an asset is selected, lists that asset's branches, and comes already filled in with the default branch — change it only when the finding is on another one.
What Each Screen Shows
The same repository can legitimately show different vulnerability totals on different screens. This table is the reference:
| Screen | What it shows |
|---|---|
| Risk score of a repository | The default branch |
| Open vulnerabilities column in the Repositories list | The default branch |
| Open vulnerabilities card on the repository's Details tab | The default branch |
Counts in the Branches tab and in the expanded N branches row | That branch |
| Repositories CSV export | The default branch |
| SBOM inventory | The default branch |
| Vulnerabilities list, its counters and the vulnerabilities CSV export | All branches, unless you apply the branch filter |
| Dashboards and the reports exported from them | The default branch |
| Security Gate result | The repository's default branch |
The rule of thumb: the Vulnerabilities list is the one place that shows every branch at once — everywhere else a repository is summarized by its default branch. Opening the list from the repository's card applies the default-branch filter for you, so the list and the card agree; clear the branch filter to see the other branches.
Assets that are not repositories are unaffected: all of their open vulnerabilities keep counting, exactly as before.
Scanners and Defect Trackers
Scanner sync status per branch
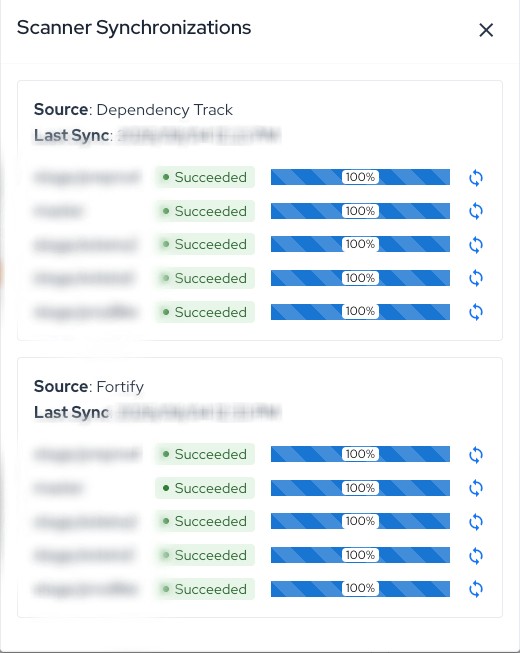
On a repository's Details tab, click Show Syncs next to Scanners to open the Scanner Synchronizations panel. Each scanner appears as a single card listing one row per branch, with that branch's status, its progress and a button to synchronize that branch on its own.
The Last Sync date is shown once per scanner and is the most recent synchronization across the repository's branches — it is not a date per branch. Scanners that report without a branch keep the single card you already know.
Importing projects from a scanner integration
When you import projects from a scanner integration, each project row gains a Repository column where you enter the repository the project maps to, so imported findings land on the right repository. This applies to Checkmarx, Snyk, SonarCloud, SonarQube, Fortify and Dependency Track; Tenable is unchanged and does not ask for a repository.
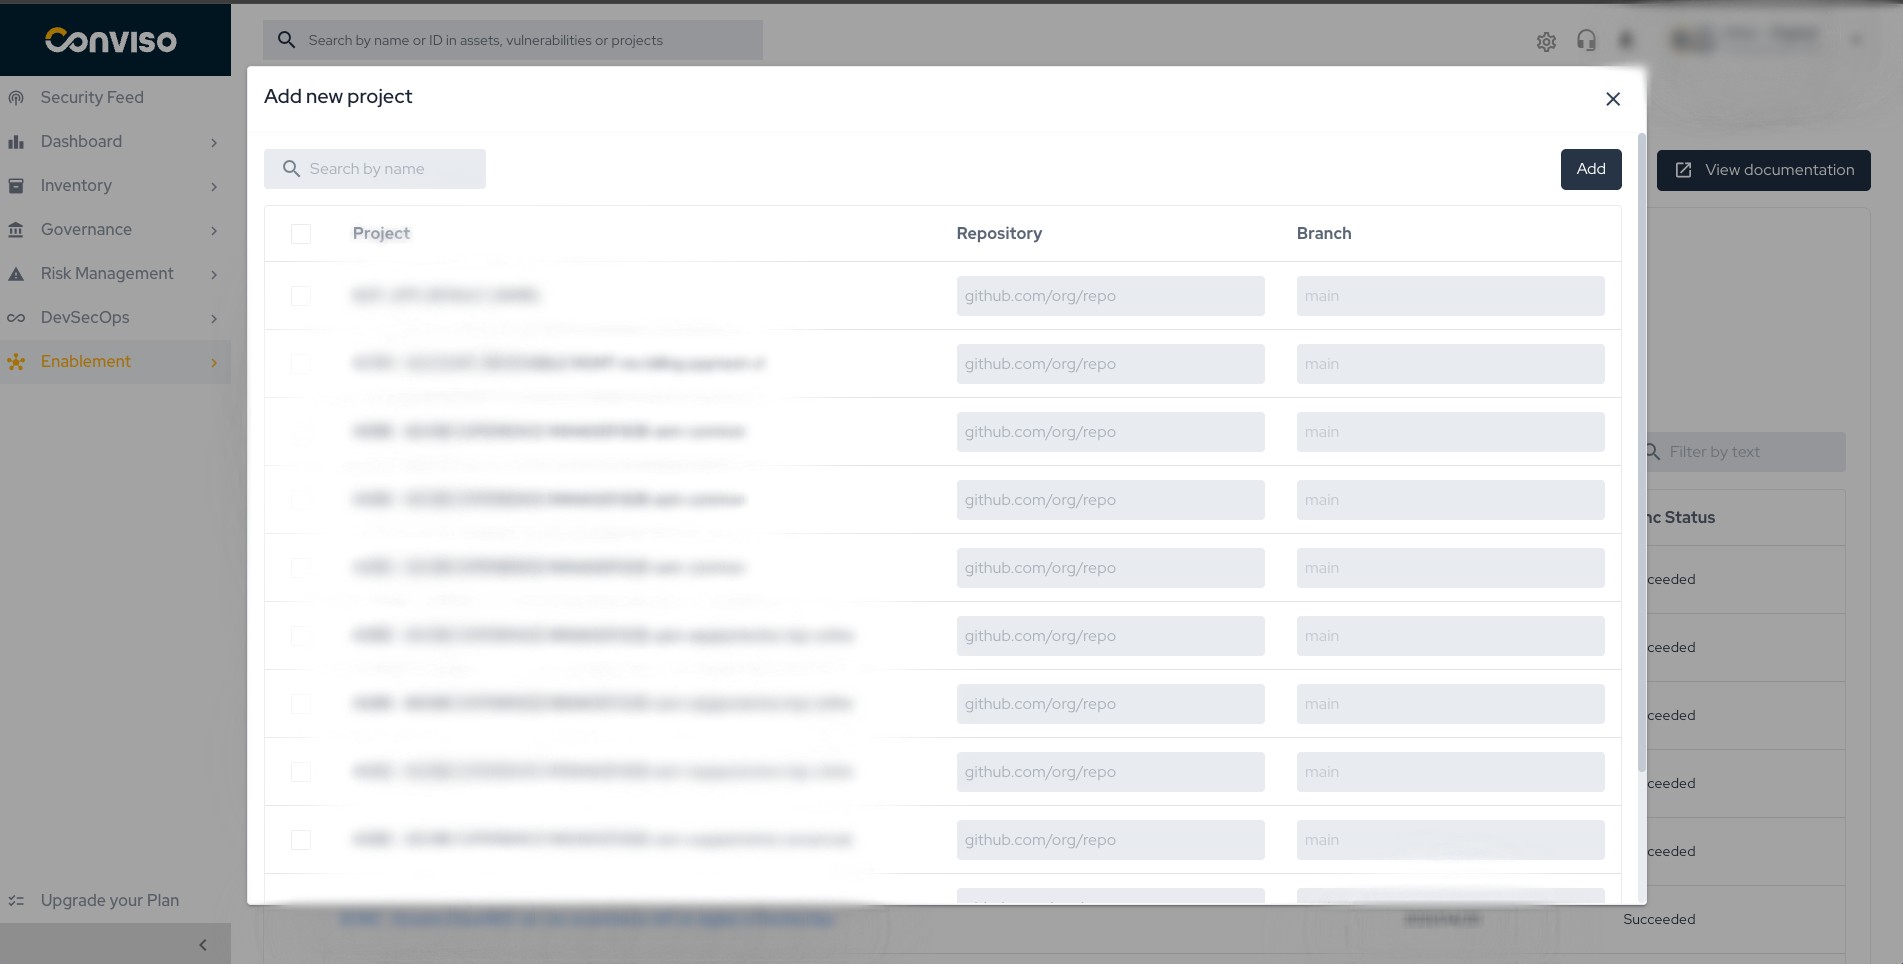
Only Snyk reports the repository address itself, so there the column comes already filled in. On the other scanners you type the repository URL by hand.
Branch selection depends on the scanner:
- Checkmarx and Fortify keep their existing multi-select, so you can still import several branches at once.
- SonarCloud and SonarQube now import one branch per project: the branch list becomes a single choice, and when the project reports no branches you type the branch name.
- Snyk and Dependency Track gain a Branch field where you pick or type the single branch to import. On Snyk, importing every project at once is no longer offered, since each project needs its own repository.
The branch you choose here is where that project's findings appear from then on.
Defect trackers
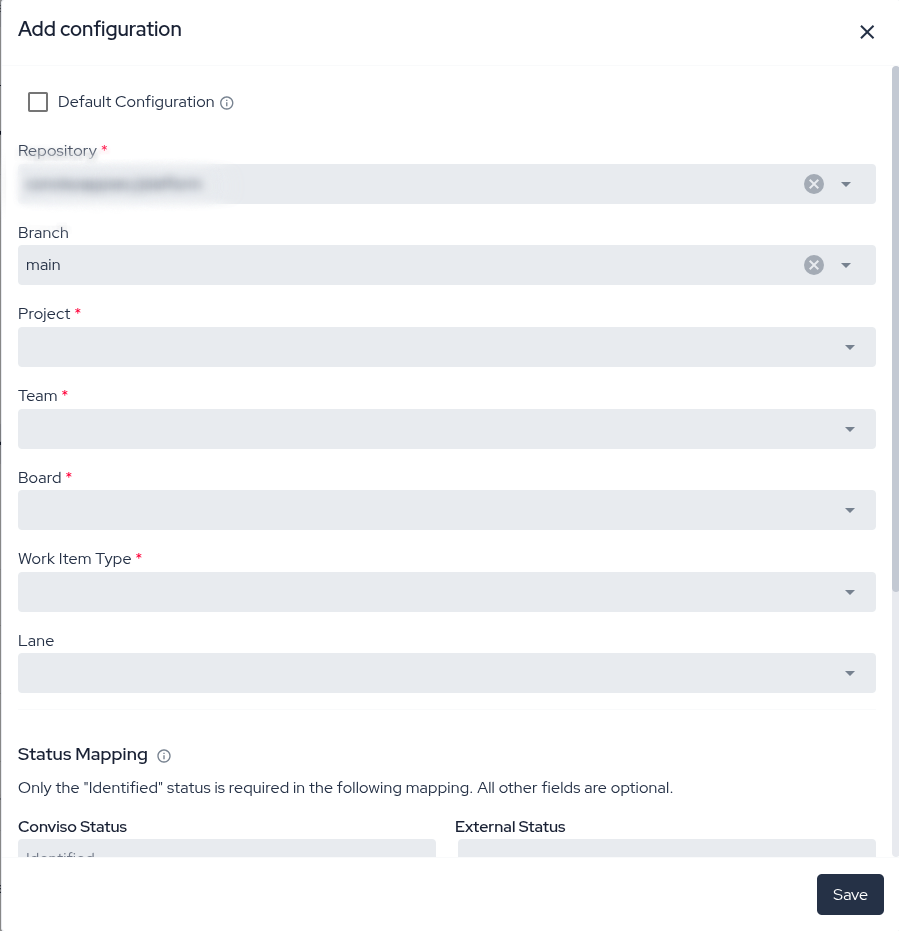
The configuration form of Jira V2, ServiceNow, Azure Boards and Business Map labels the asset field Repository and offers an optional Branch field, so you can route a configuration to a single branch. ClickUp and the first version of the Jira integration do not offer it yet.
Leaving the Branch field empty keeps the configuration at repository level: it applies to every branch that does not have a configuration of its own. You can keep a repository-level configuration and add branch-specific ones alongside it — a finding on a branch that has its own configuration goes there, and everything else uses the repository-level one.
How Your Assets Become Repositories
Accounts that used the platform before the repository model have assets representing individual branches. They become repositories two ways.
When a scan reports a repository and a branch
An asset is turned into a repository on its own when a scan — or a call to the API that creates or updates it — reports a repository address together with a branch, and the match leaves no room for doubt:
- Both values are reported. Always report the branch: without it the platform cannot tell which branch the findings belong to, and the consolidation either does not happen or adopts a branch nobody declared.
- Exactly one asset carries that repository address. With two or more candidates nothing is consolidated, and the case goes to the Conviso team.
- The asset is not archived, and it is not a cloud, domain or API asset.
- Whoever makes the call has Update permission on the asset.
When the match is unambiguous, one of two things happens:
- If no repository is registered at that address yet, the asset becomes the repository for it, keeping its id, its name, its findings and its history. The branch that was reported becomes the repository's default branch.
- If a repository is already registered at that address, the asset is absorbed into it as the branch that was reported, and stops appearing as a row of its own. Absorbing also requires Delete permission on the asset being absorbed.
The branch is what keeps this safe. Without one the platform has nothing to file the scan under,
and the repository can end up with a default branch nobody declared — and because the risk score
follows its default branch, a critical finding reported on staging leaves the repository reading
zero.
Outside those conditions nothing is consolidated on its own: assets nothing scans, scans that report no address, and addresses claimed by more than one asset. There are narrower cases too — if the repository already has a branch with the name your scan reported, the asset is not folded into it and stays beside it. All of them are handled with the Conviso team, below.
With the Conviso team
Whatever is left — assets no pipeline reaches, duplicates created by hand, the same address claimed by several assets, groupings you want reviewed — is combined by the Conviso team. Combining is always a reviewed action: nothing is merged without someone deciding it. Contact Conviso Support if you want your account consolidated, or a particular grouping looked at.
What is preserved, either way
Your vulnerabilities, scans and history are not deleted: they move under the branch they came from, keeping their status, comments, assignees and defect-tracker links. Existing links keep working permanently — the ids of the former assets never expire, so bookmarks, deep links and API calls that use them open the repository they became, and your pipelines and scanner integrations keep reporting without being edited.
What you will see afterwards
| What you had | What you see afterwards |
|---|---|
| One row per branch in the asset list | One repository row, with a N branches badge |
| The name you gave to each asset | The name of the asset the others were combined into — an asset keeps the name it already had |
| Tags, technologies and environments per asset | All of them together, on the repository |
| Access lists per asset | Everyone who could see any of the assets can see the repository |
| Projects and scanner integrations per asset | All of them on the repository |
The asset that tracked develop becomes the develop branch, so nothing is lost from view — it
moves inside the repository.
Cloud, API and domain assets are never turned into repositories, and archived assets are left out — unarchive them first if you want them included.
Business Impact, Data Classification and Attack Surface are never combined: the repository keeps the values of the asset the others were combined into, and the values of the other assets are dropped. Review them on the repository afterwards if the assets differed.
If a consolidation was not what you expected, talk to Conviso Support: a repository can be split back into separate assets, branch by branch. There is no deadline for this — the split can be requested at any time, not only right after the consolidation. It is worth reviewing the case with the team before requesting it.
Related Areas
- Asset Management — the asset list, filters, creation and export flows that also apply to repositories.
- Vulnerabilities — the vulnerability list, filters and detail page.
- Risk Score — how the risk score of a repository is computed.
- SBOM Management — component inventory for your repositories.
Support
Should you have any questions or require assistance while using the Conviso Platform, feel free to reach out to our dedicated support team.
Contribute to the Docs
Found something outdated or missing? Help us improve the documentation with a quick suggestion or edit.
How to contributeResources
By exploring our content, you'll find resources that will enhance your understanding of the importance of a Security Application Program.
Conviso Blog: Explore our blog, which offers a collection of articles and posts covering a wide range of AppSec topics. The content on the blog is primarily in English.
Conviso's YouTube Channel: Access a wealth of informative videos covering various topics related to AppSec. Please note that the content is primarily in Portuguese.