Issuing a Certificate
Objective
Issue an SSL/TLS certificate through the Conviso Platform: choose the product, prepare the Certificate Signing Request, provide the organization data your validation level requires, and publish the record that proves you control the domain.
Prerequisites
- The SSL Certificates module enabled for your account, and permission to create certificates. See Before You Start.
- At least one credit with status Available for the product you want to issue. See Certificate Credits.
- Access to publish a DNS record for the domain, to upload a file to its web server, or to receive e-mail at one of its approved addresses — one of the three is required to prove control.
- If you will provide your own CSR, generate it before starting.
Open Inventory > Assets > Certificates and select New Certificate to start the wizard.
The wizard adapts to the product you choose. The Organization step appears only for OV and EV products, and the Review step only for multi-domain products. A single-domain DV certificate goes straight from Configure to Validation.
Step 1: Choose the Product
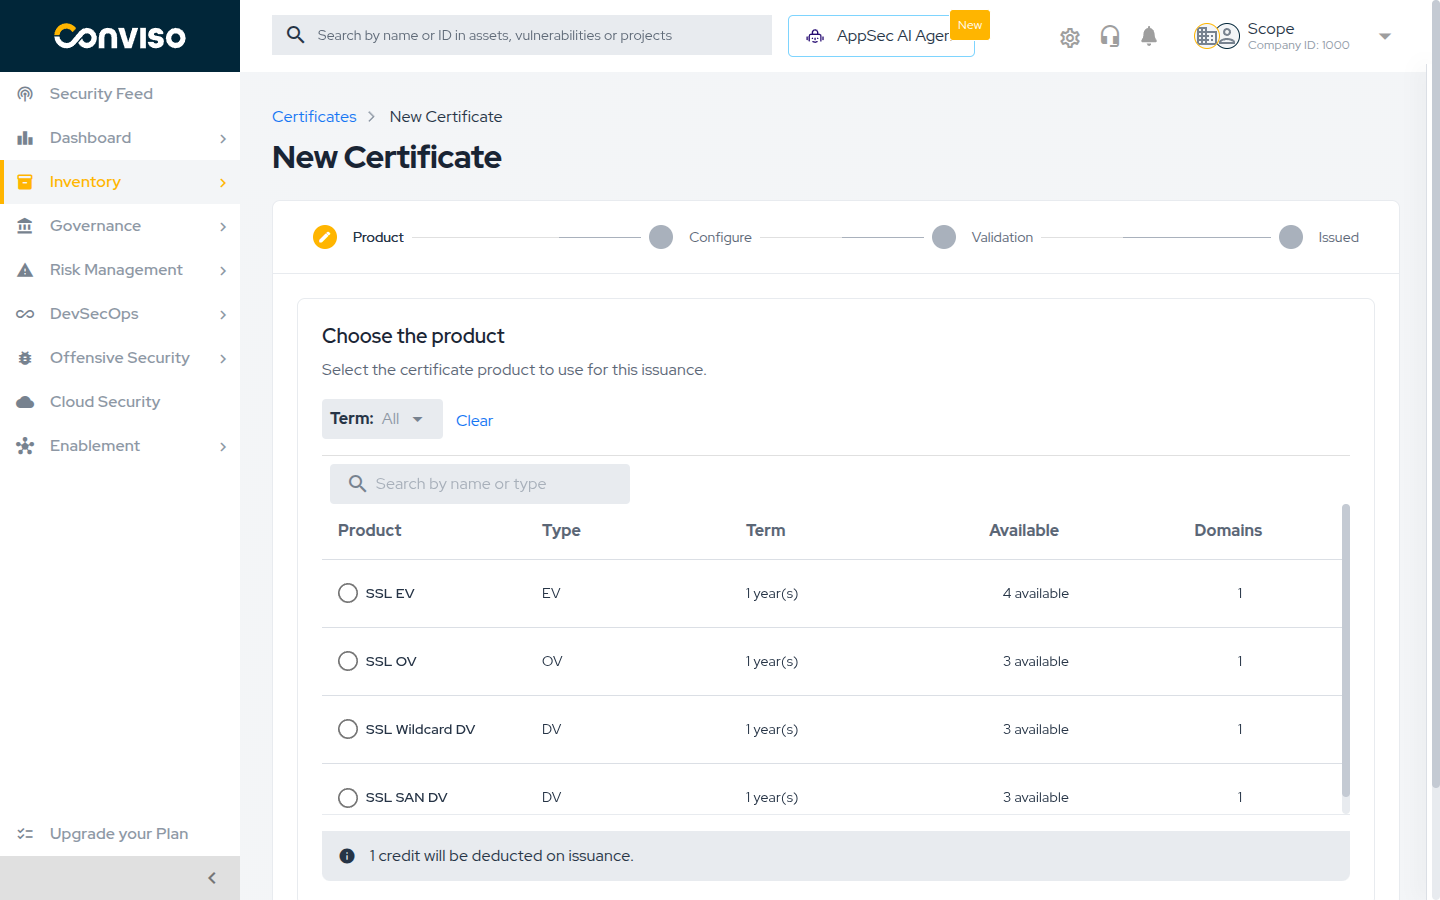
The first step lists the credits you can spend, grouped by product:
| Column | Content |
|---|---|
| Product | The certificate product |
| Type | DV, OV or EV |
| Term | The subscription length, in years |
| Available | How many credits of that product you hold |
| Domains | How many domains the product covers |
Filter by Term or search by name or type to narrow the list, then select the product's radio
button. Only credits with status Available appear here; if the table is empty you will see
No credits available to issue. and need to
request credits first.
The banner 1 credit will be deducted on issuance. is a reminder that the credit is spent when the
order is placed.
Changing the product resets everything you have already filled in in the wizard. Pick the product first, and change it only if you are prepared to start over.
Select Continue.
Step 2: Configure the Certificate
This step produces the Certificate Signing Request (CSR) — the file that carries your public key and the domain names the certificate will cover.
First choose the Web server where the certificate will be installed. The field defaults to
Others, which is the right answer when your server is not on the list or you are not sure.
Then choose how to obtain the CSR.
Option A: Provide Own CSR
This is the default. Paste the CSR you generated on your server into the CSR field and select Verify CSR. The platform parses it and shows a CSR details summary: key size, Common Name, organization, country, state, city and any additional domains it carries.
Use this option whenever the private key must stay on the server — which is the usual practice.
Select Change CSR if you need to replace it.
Option B: Generate CSR
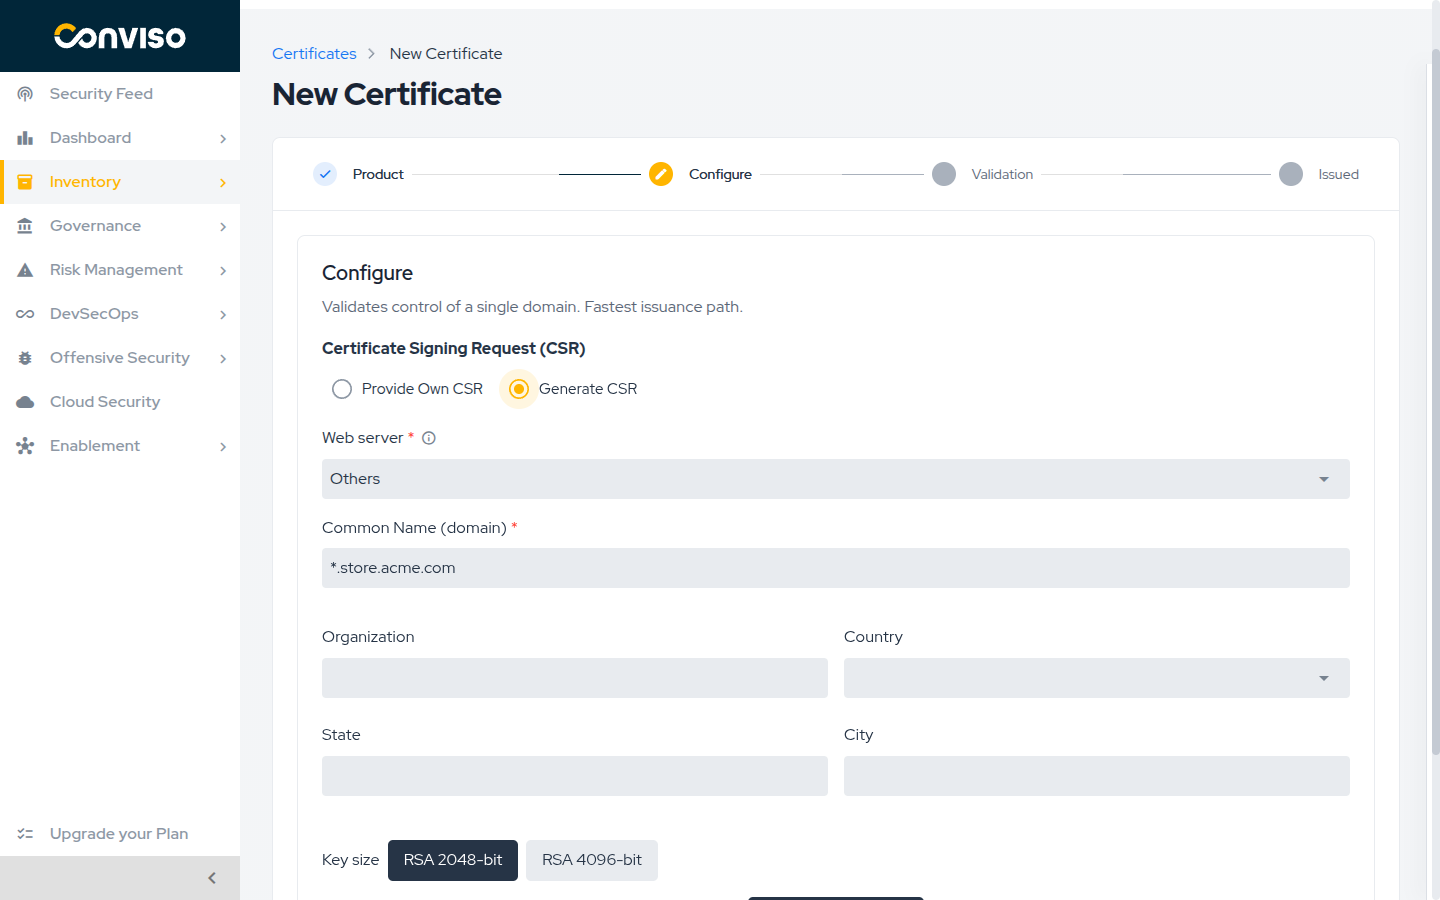
The platform generates the CSR and the private key for you. Fill in:
| Field | Required | Notes |
|---|---|---|
| Common Name (domain) | Yes | The main domain, up to 64 characters. A SSL Wildcard product requires it to start with *., for example *.acme.com. A multi-domain wildcard product accepts one here but does not require it |
| Additional domains (SAN) | No | Multi-domain products only. Type a domain and press Enter; commas, semicolons and spaces also separate entries |
| Organization | For OV and EV | The organization's legal name |
| Country, State, City | For OV and EV | The organization's location |
| Key size | Yes | RSA 2048-bit (default) or RSA 4096-bit |
Select Generate CSR & key.
The generated private key is never stored by the platform. It is displayed once, on this screen, and cannot be recovered afterwards.
Select Download private key or copy it, and store it securely, before you continue. If you lose it, the certificate that gets issued is unusable and you have to issue a new one — spending another credit.
If a certificate already exists for this domain
When your account already holds a valid certificate for the same Common Name, the wizard warns you before you spend a credit, showing when the existing one expires. Continuing places a second certificate and consumes another credit. If you meant to renew, close the wizard and use Reissue on the existing certificate instead — it consumes no credit.
Select Continue.
Step 3: Organization Details
This step appears only for OV and EV products. A chip breadcrumb shows the sections you have to complete: Organization and Contact for OV, plus Jurisdiction and Vetting for EV. A section turns green when it is valid.
If you provided your own CSR, these fields are prefilled from it and can be edited.
Organization
All fields are required: Organization, Street address, City, State, Postal code and Country. Use the organization's legal registration data — this is what the certificate authority verifies.
The optional Prioritise the CSR values on conflict checkbox is off by default. Leave it off unless you want the certificate authority to prefer the values inside your CSR whenever they differ from what you type here.
Contact
The Contact details section registers the Application Representative for the organization. Use Prefill from a user to copy the data of a platform user, or type it in: First name, Last name, E-mail and Telephone are required, Job title is optional.
The certificate authority contacts this person, by phone or e-mail, to confirm the request was authorized. Issuance stays pending until they respond. Register someone reachable, and let them know a verification call or e-mail is coming.
Jurisdiction — EV only
The Extended validation details section records where the organization is legally registered:
| Field | Required |
|---|---|
| Company registration number | Yes |
| Jurisdiction country | Yes |
| Jurisdiction city, Jurisdiction state | No |
| Date of incorporation | No |
| Assumed name | No |
Organization category — Private organization, Government entity or Business entity | No |
Vetting — EV only
The Vetting details section holds the Incorporating agency and the Main telephone number, plus three contacts the certificate authority requires: Certificate requester, Certificate approver and Contract signer. Each contact needs a full name, job title, telephone, e-mail and postal address. Use Copy from… to reuse data you already entered.
You can defer this: choose Fill in later instead of Fill in now. The order is placed, but the certificate is only issued after you complete the vetting details on the certificate's detail page. See Completing EV vetting details.
Select Continue.
Step 4: CSR Review
This step appears only for multi-domain products. It is read-only: check the key size, Common Name, organization and location, then the full list of domains the certificate will cover.
Confirm the domain list carefully — it is fixed when the order is placed. Select Continue.
Step 5: Domain Control Validation
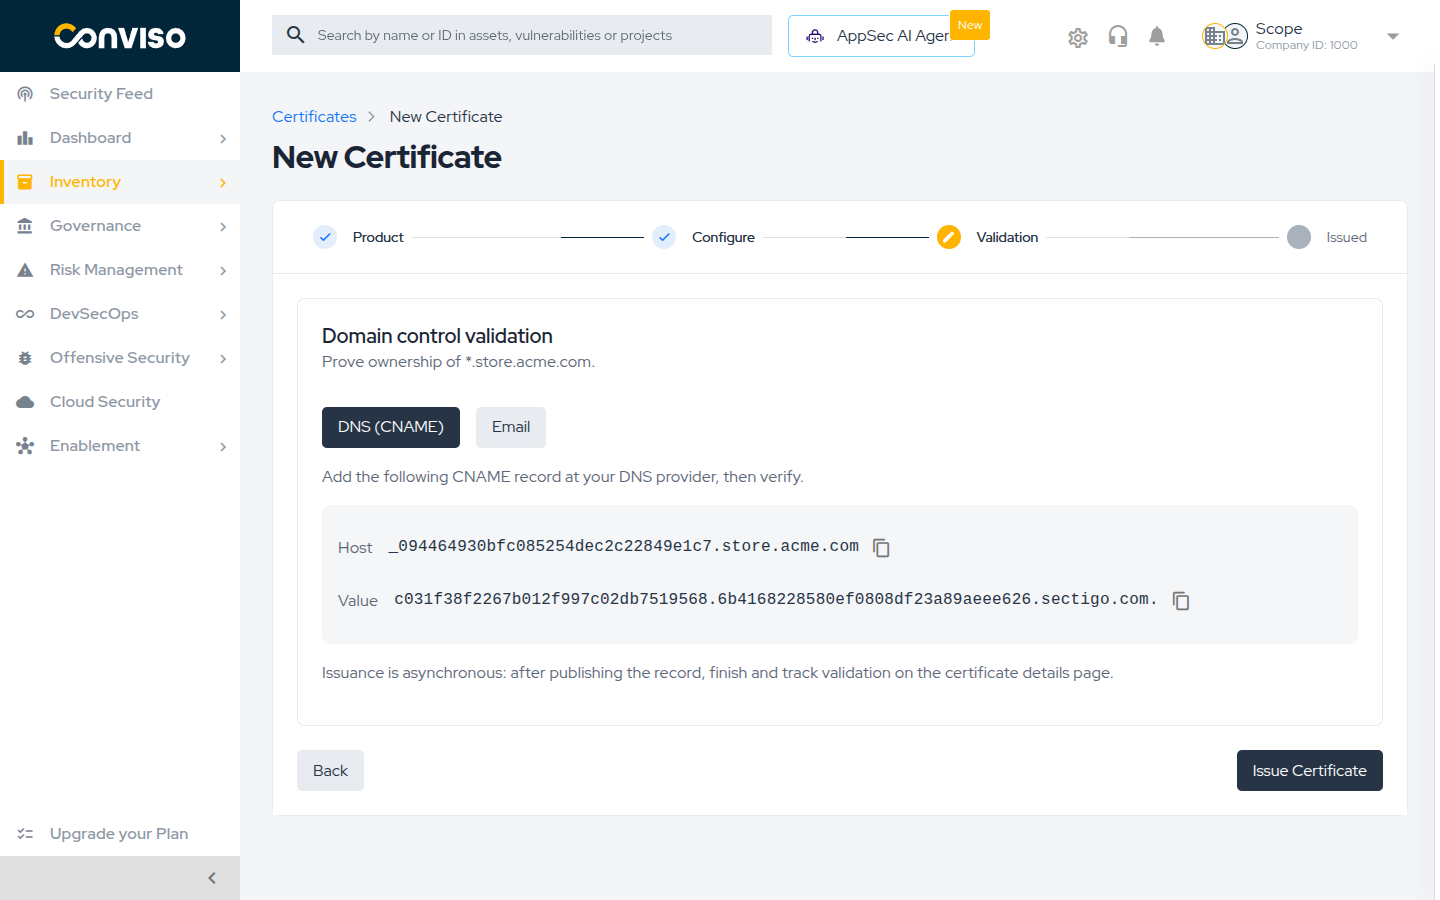
Domain Control Validation (DCV) is how you prove to the certificate authority that you control each domain in the certificate. Choose one of three methods per domain.
DNS (CNAME)
The default, and the most reliable. The platform shows a Host and a Value; create that CNAME record at your DNS provider, exactly as shown.
This is the only method that works for every domain, including wildcards, and it does not require the domain to be serving traffic yet.
HTTPS
The platform shows a File URL under /.well-known/pki-validation/ and the File contents.
Create that file on the domain's web server so it is reachable at the URL shown.
This method requires the domain to already answer over HTTPS, and it is not available for wildcard domains.
Email
The platform sends a validation e-mail to an address you choose from an approved list. The
certificate authority only accepts a fixed set of addresses at the domain and its parent domains:
admin@, administrator@, hostmaster@, postmaster@ and webmaster@. That is why the dropdown
is short — arbitrary addresses cannot be used.
Multi-domain certificates
For a certificate covering several domains, choose a method for each domain in the table (Domain, Method, Record). Select View record to see the record for a domain, or select several domains and use Change DCV method to set the same method for all of them.
Issue Certificate stays disabled until every domain has a valid method, and every domain
validated by e-mail has an address chosen. If you apply HTTPS in bulk and some domains are
wildcards, the platform reports HTTPS not applied to {n} wildcard domain(s). and leaves those
domains on their previous method.
Publish the record, then select Issue Certificate.
Placing the order does not issue the certificate. The certificate authority checks your record on its own schedule, and the certificate is issued once the check passes. You can leave this screen — validation is tracked on the certificate's detail page.
Step 6: Certificate Requested
The wizard confirms with Certificate requested and a summary of the Common Name and type. Select Go to certificate to open the detail page and follow the rest of the process there.
Validation
You have issued the certificate correctly when:
- The certificate appears in Inventory > Assets > Certificates with the status Pending Validation.
- On its detail page, the Domain Control Validation card lists every domain with the state Pending and the method you chose.
- The Lifecycle timeline shows Requested completed.
After the certificate authority confirms your record, the domains turn Validated, the status becomes Valid, and the Issued and Expires dates are filled in. This is not instantaneous — see Tracking a Certificate for how to follow it and how to force a re-check.
Troubleshooting
| Message or symptom | Cause and what to do |
|---|---|
No credits available to issue. | You hold no credit with status Available. Request credits. |
The Common Name for this product must start with *. | You chose a wildcard product but entered a plain domain. Enter *.example.com, or choose a non-wildcard product. |
This product does not accept a wildcard Common Name | The opposite case: use a wildcard product, or a plain domain. |
EV certificates do not accept wildcard Common Names or SANs | EV cannot cover wildcards. Use a DV or OV wildcard product. |
This product does not accept a wildcard domain. Use a multi-domain product with wildcard | The product you selected is not sold with wildcard coverage. Spend a credit of SSL MDC Wildcard DV or SSL SAN Wildcard DV, or remove the wildcard entries. |
This product does not accept additional SAN domains | The product covers a single domain. Choose a multi-domain product. |
This CSR contains {n} domains, but the selected product allows at most {max}... | Your CSR carries more domains than the credit covers. Use a CSR with fewer domains, or request a credit with more domains. |
Enter a valid DNS domain | The domain is not a valid DNS name. Check for typos, trailing dots or a protocol prefix such as https://. |
Wildcard domains only accept CNAME or email. | HTTPS validation was selected for a wildcard. Use DNS (CNAME) or e-mail. |
| The e-mail dropdown is empty for a domain | The certificate authority has no approved address for it. Use DNS (CNAME) or HTTPS instead. |
The order was placed but the status is Manual reconciliation required | The certificate authority did not confirm the submission. The credit was not returned automatically — contact Conviso Support to reconcile the order. |
Related Areas
- SSL Certificates — certificate types, permissions and credits.
- Managing Certificates — what to do after the order is placed.
Support
Should you have any questions or require assistance while using the Conviso Platform, feel free to reach out to our dedicated support team.
Contribute to the Docs
Found something outdated or missing? Help us improve the documentation with a quick suggestion or edit.
How to contributeResources
By exploring our content, you'll find resources that will enhance your understanding of the importance of a Security Application Program.
Conviso Blog: Explore our blog, which offers a collection of articles and posts covering a wide range of AppSec topics. The content on the blog is primarily in English.
Conviso's YouTube Channel: Access a wealth of informative videos covering various topics related to AppSec. Please note that the content is primarily in Portuguese.